EBS Accounts Payable (AP)
Last updated: 2/1/2026
1. Distribution Set
2. Payment Terms
3. Creation of Bank and Branches
4. Creation of Vendor/ Supplier
5. Payables Invoice Types
6. Create a Manual Invoice
7. Payment of Invoice
8. Recurring Invoice
9. Pre-Payment to Supplier
10. Interest Invoice
11. Pre-Payment to Employee
12. Expense Report
13. Tax Withholding
14. Integration of SLA with Payable
15. SLA process for Payables Manager
16. Debit Memo & Credit Memo
1. Distribution Set Public Sector Payables Manager responsibility >> Invoice >> Distribution Sets >> Enter values as below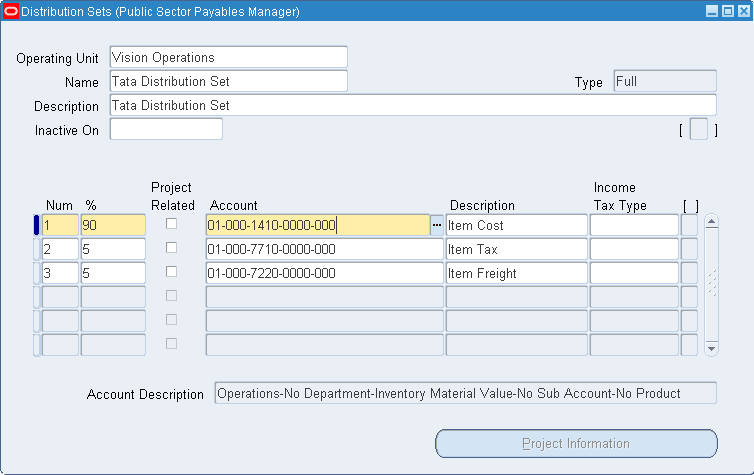 Here we have type as Full since we considered 90, 5 and 5.
The type will be Skeleton when we have values as 0, 0 and 0. Here supplier is not going to disclose the % of amount which he will charge.
Here we have type as Full since we considered 90, 5 and 5.
The type will be Skeleton when we have values as 0, 0 and 0. Here supplier is not going to disclose the % of amount which he will charge.
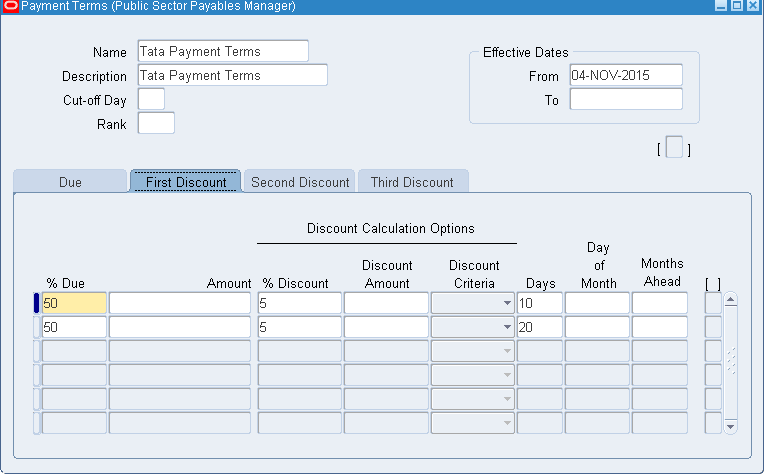
2. Payment Terms Public Sector Payables Manager >> Setup >> Invoice >> Payment Terms We have two installments. 50% of amount has be paid by 30 days and rest 50% by 60th day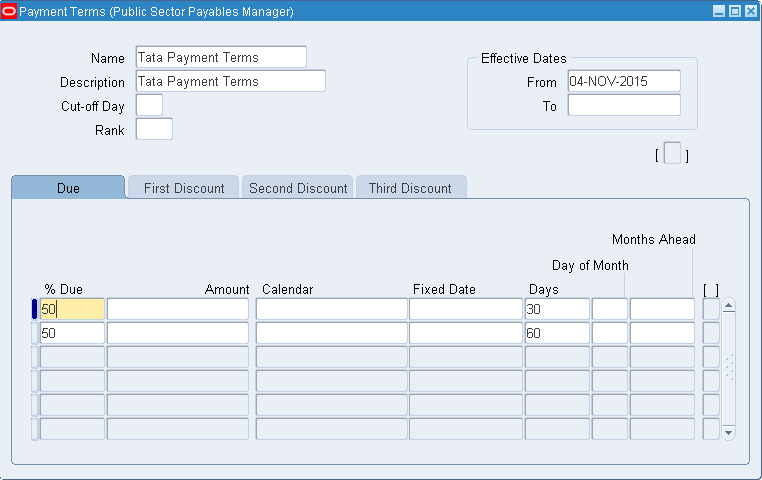 Also we can apply discounts. First 5% discount on or before 10th day. After 30th day, second payment we get 5% discount on or before 20th day.
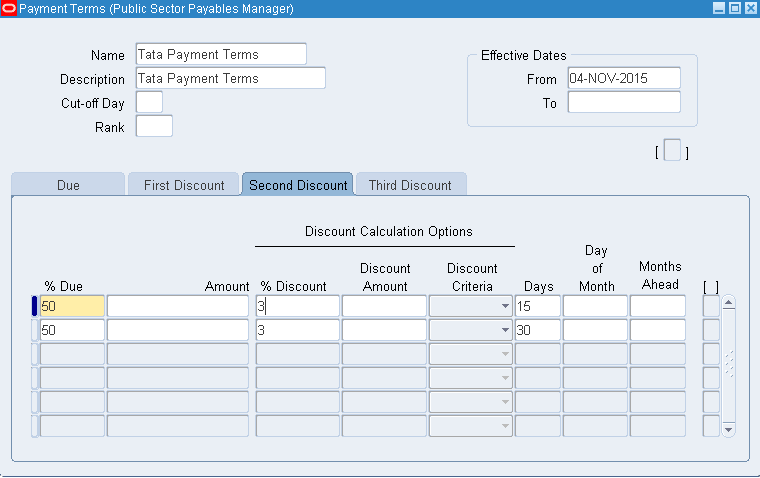
 Second 3% discount on or before 15th day
 Third 2% discount on or before 20th day

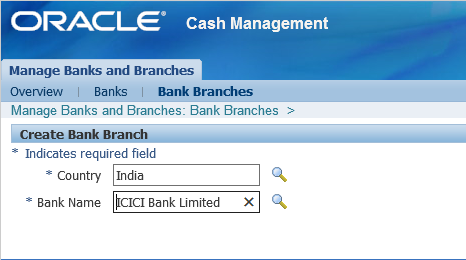
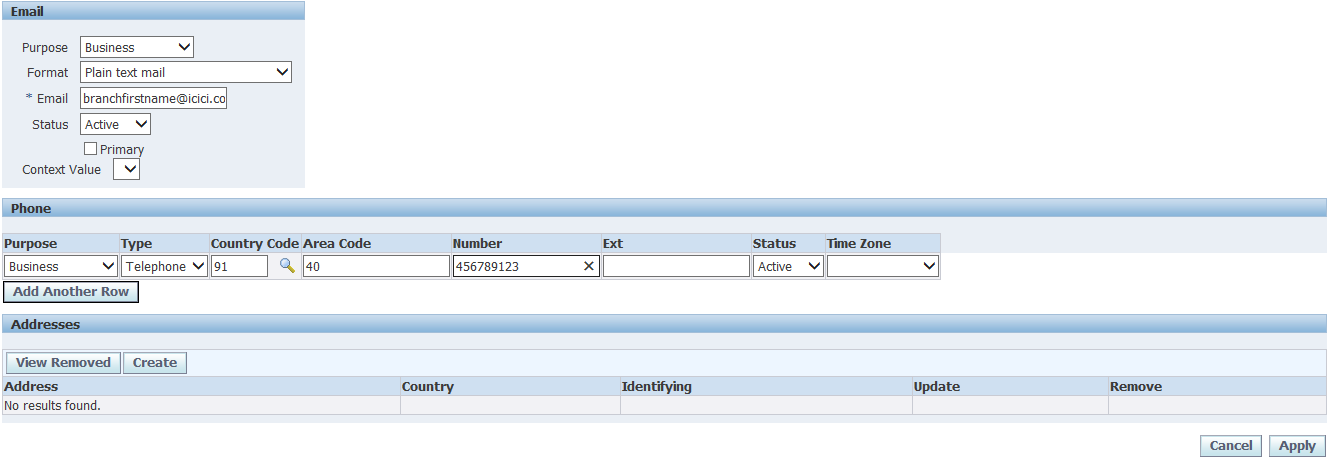
3. Creation of Bank and Branches We require: 1. Bank details (Corporate office) 2. Bank branch details (Branch) 3. Accounting information (A/C details) 4. Cheque book information (Payment document) Setup >> Payment >> Banks and Bank Branches >> go to Banks menu >> Create Save and Next >> Create >> Enter address details and Apply
 Save and Next >> Create Contact
 Click on Apply and Finish in next page
Now creation of bank branch. Go to Bank Branches menu >> Create
Click on Apply and Finish in next page
Now creation of bank branch. Go to Bank Branches menu >> Create
 Continue
ABA = American Banking Association = Standard Chartered Bank/ Royal Bank of Scotland
SWIFT = Society for World wide inter financial telecommunication = Any branch having ATM or net banking facility
EDI = Electronic data interchange
EFT = Electronic funds transfer
Continue
ABA = American Banking Association = Standard Chartered Bank/ Royal Bank of Scotland
SWIFT = Society for World wide inter financial telecommunication = Any branch having ATM or net banking facility
EDI = Electronic data interchange
EFT = Electronic funds transfer
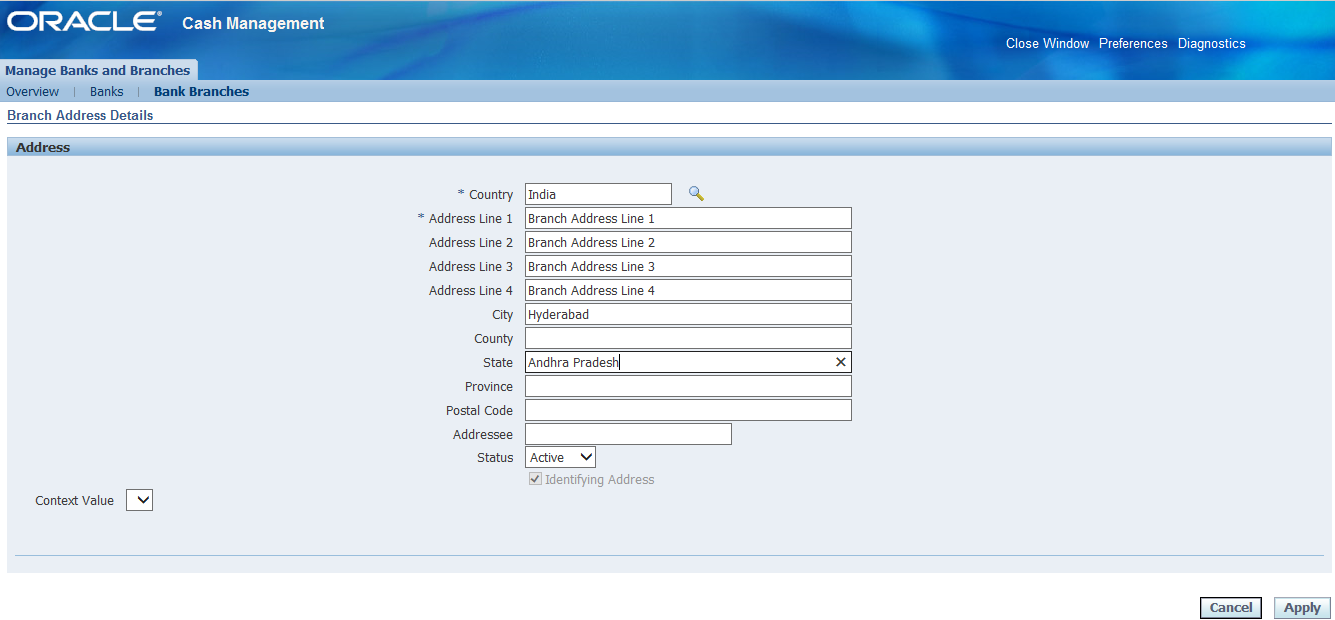
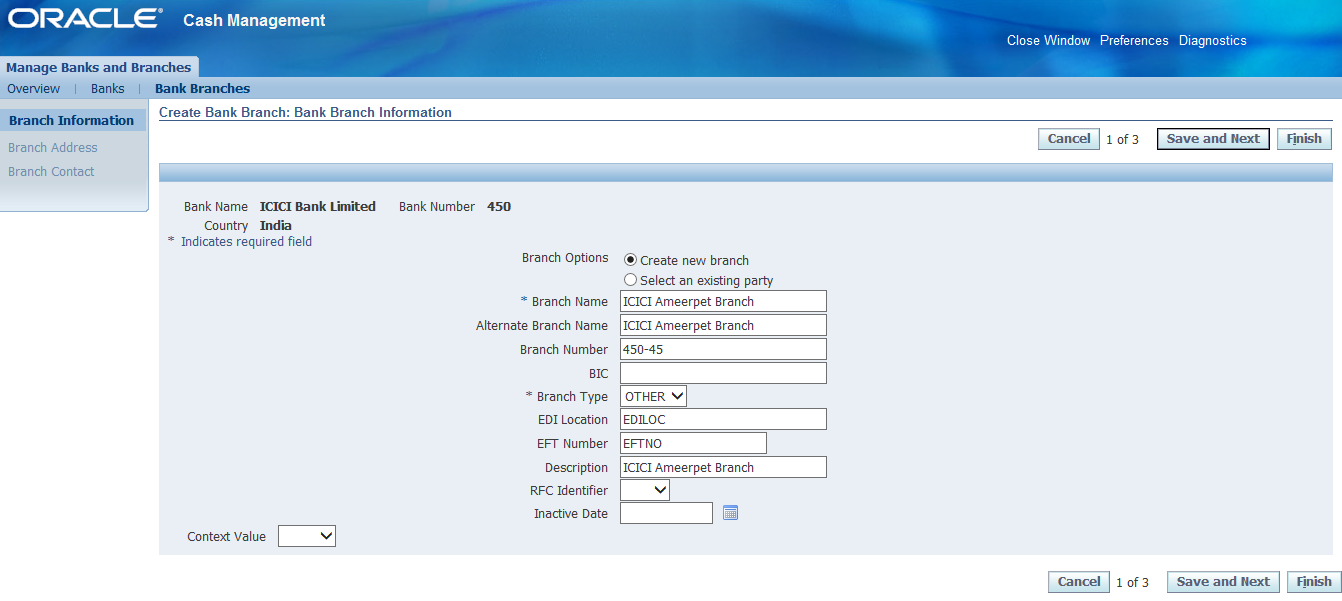 Save and Next >> Create branch address and Apply
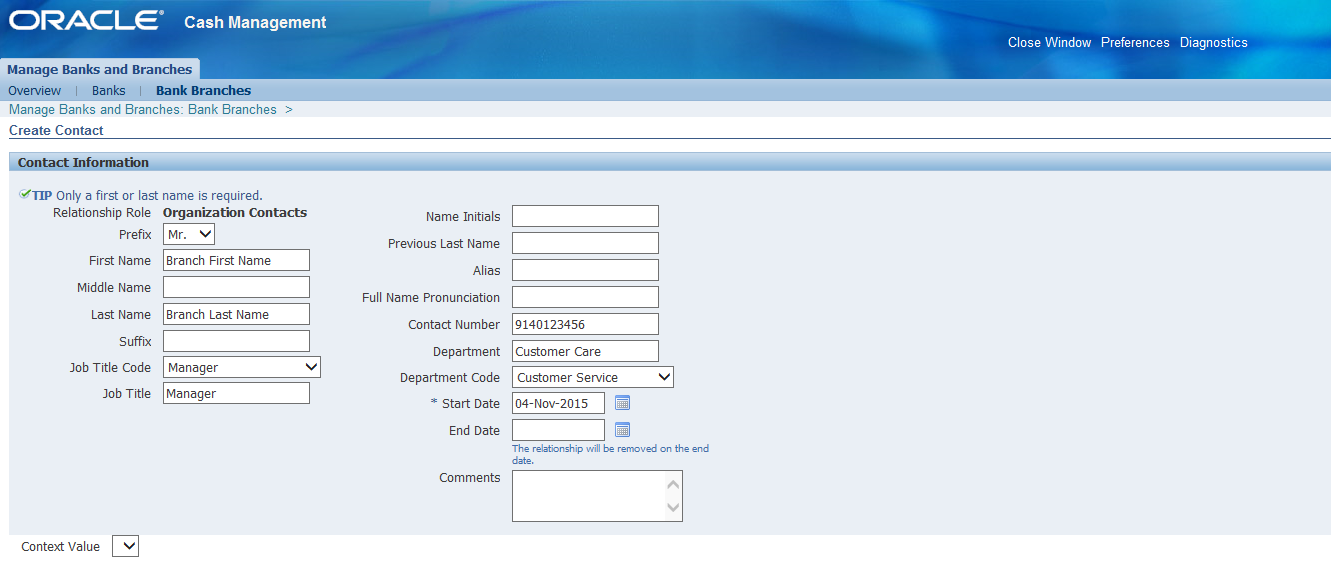
 Save and Next >> Create Contact
 Click Apply and Finish
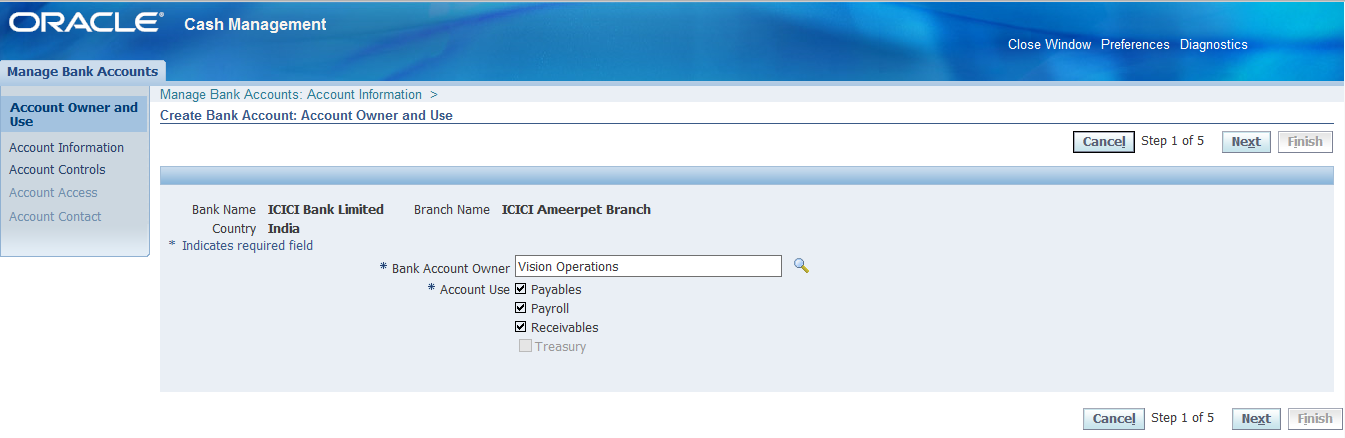
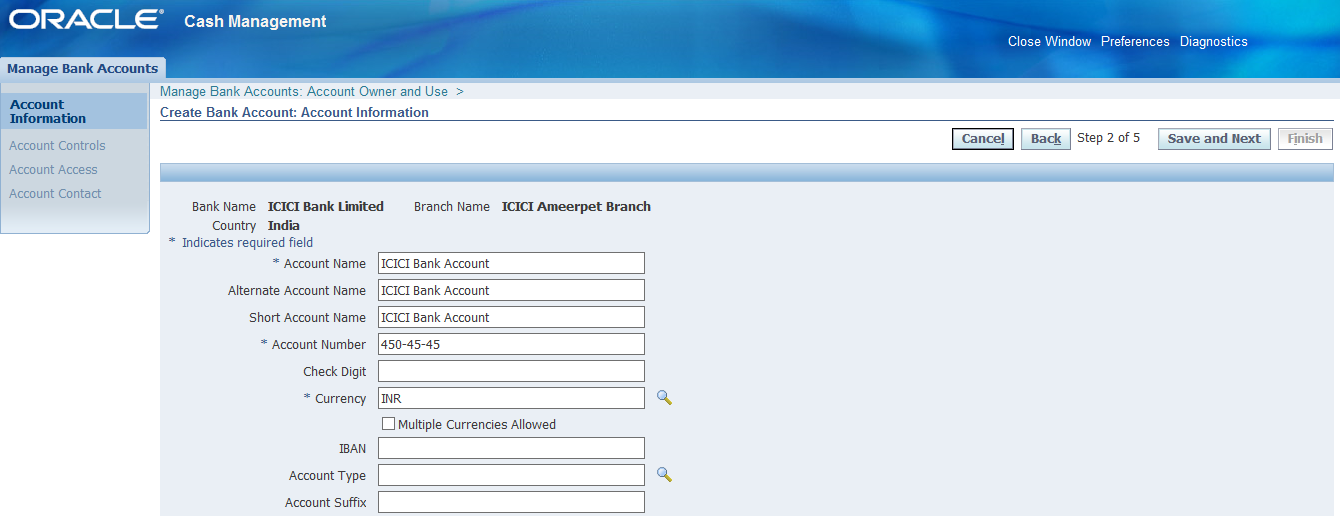
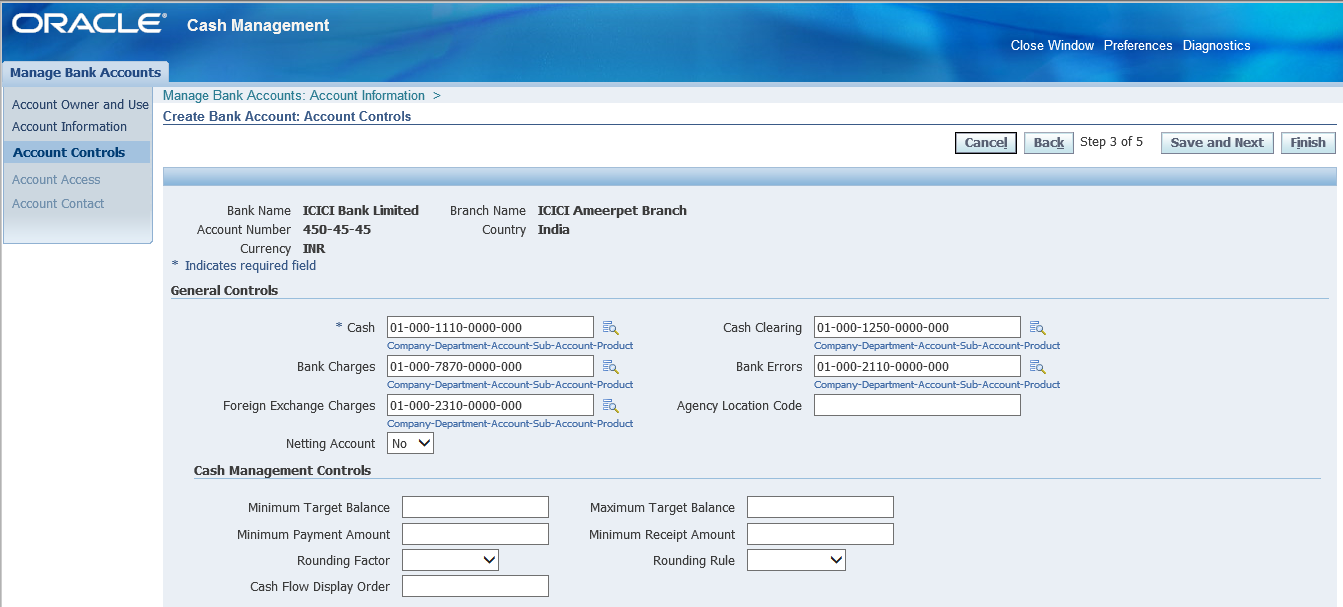
Creation of Bank Account
Setup >> Payment >> Bank Accounts >> Create
Click Apply and Finish
Creation of Bank Account
Setup >> Payment >> Bank Accounts >> Create
 Continue
 Next
Next
 Save and Next
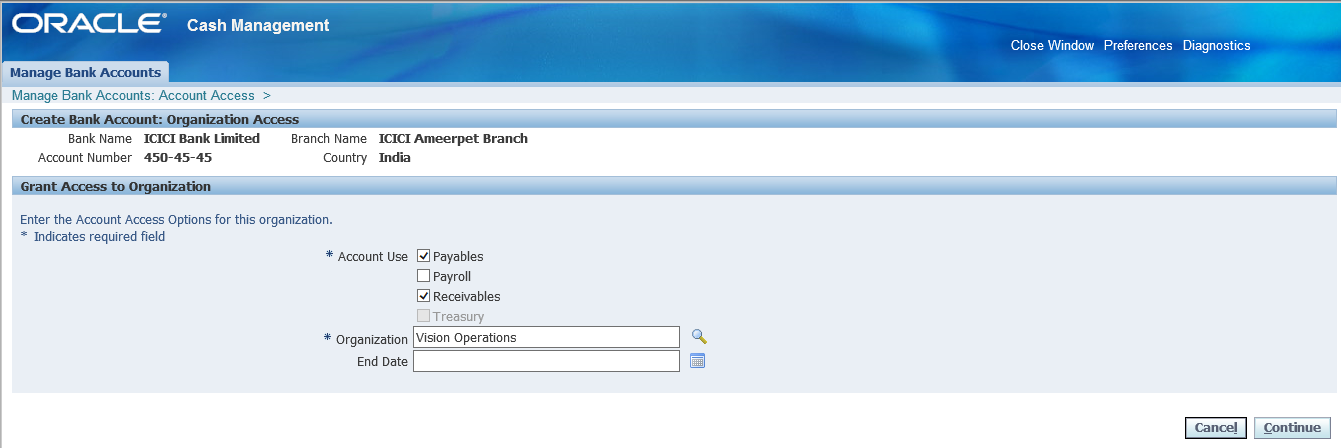
 Save and Next
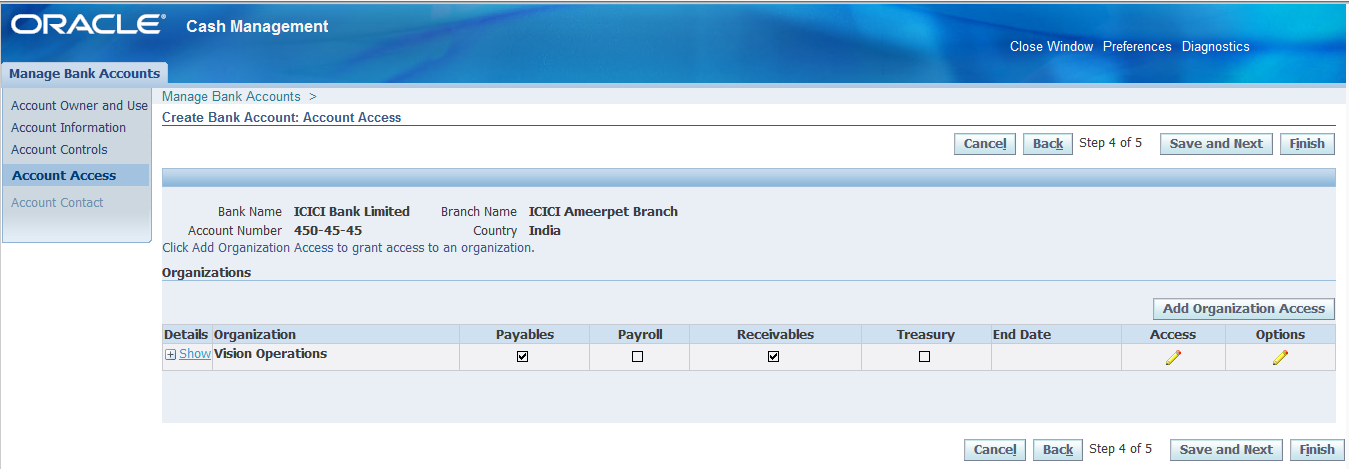
Click on Add Organization Access
Save and Next
Click on Add Organization Access
 Continue
 Apply
Apply
 Save and Next
Create Contact
Save and Next
Create Contact
 Apply and Finish
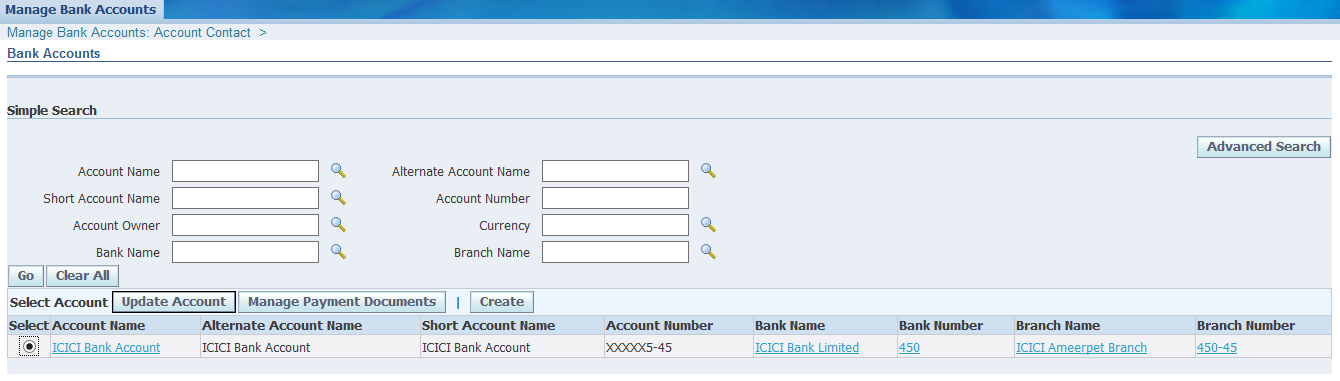
Now cheque book (payment document creation)
Select the particular account and click on Manage Payment Documents
Apply and Finish
Now cheque book (payment document creation)
Select the particular account and click on Manage Payment Documents
 Create
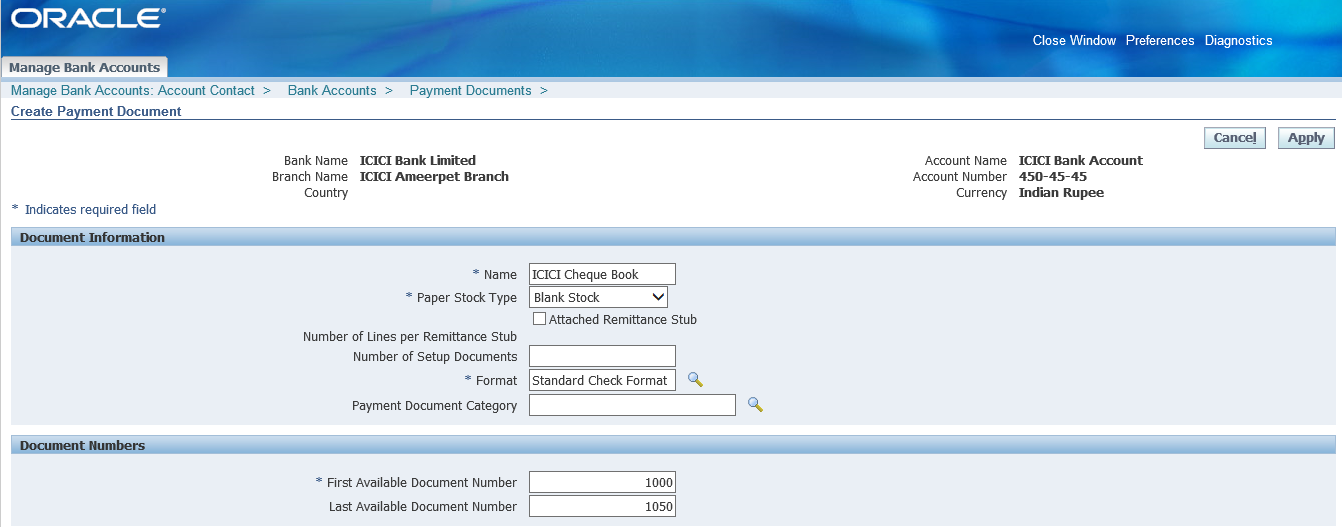 Apply. With this we are done with Bank, Bank branch, Bank account and Cheque book creation
4. Creation of Vendor/ Supplier In Public Sector Payables Manager >> Suppliers >> Entry >> Create Supplier (or) In Purchasing Super User >> Supply Base >> Suppliers >> Create Supplier Apply. The supplier number and registry id gets auto generated.
 In the same page, Click on Address book which is at left list >> Create
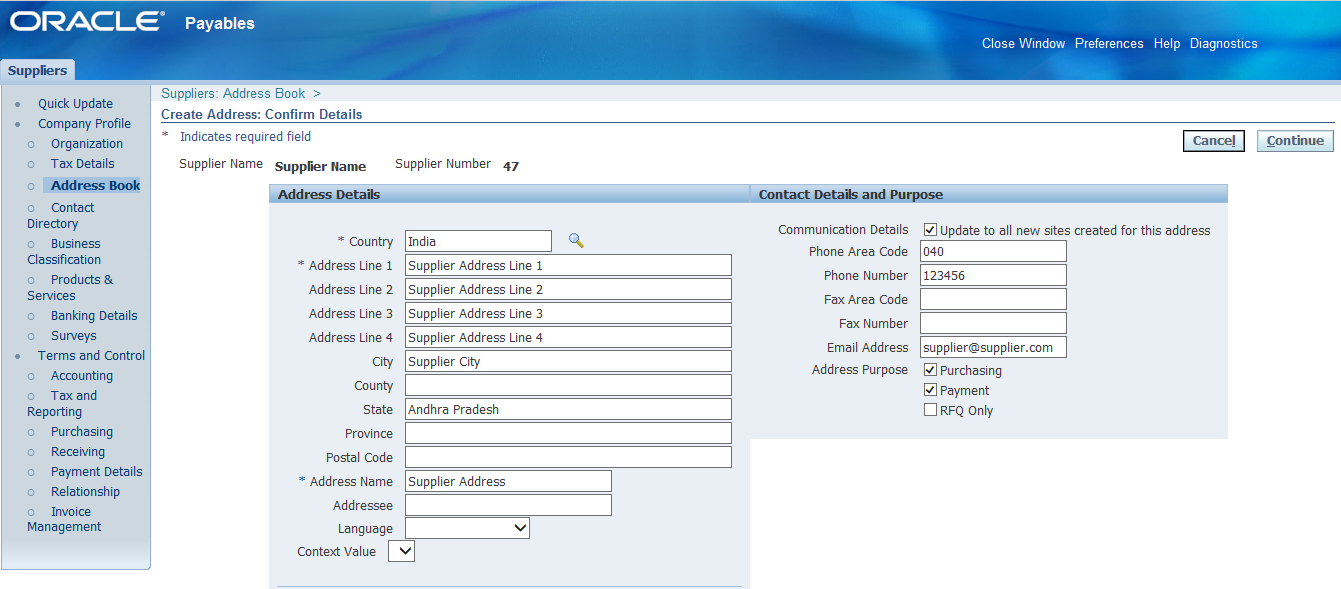 Continue >> Check Supplier Address for Vision Operations >> Apply
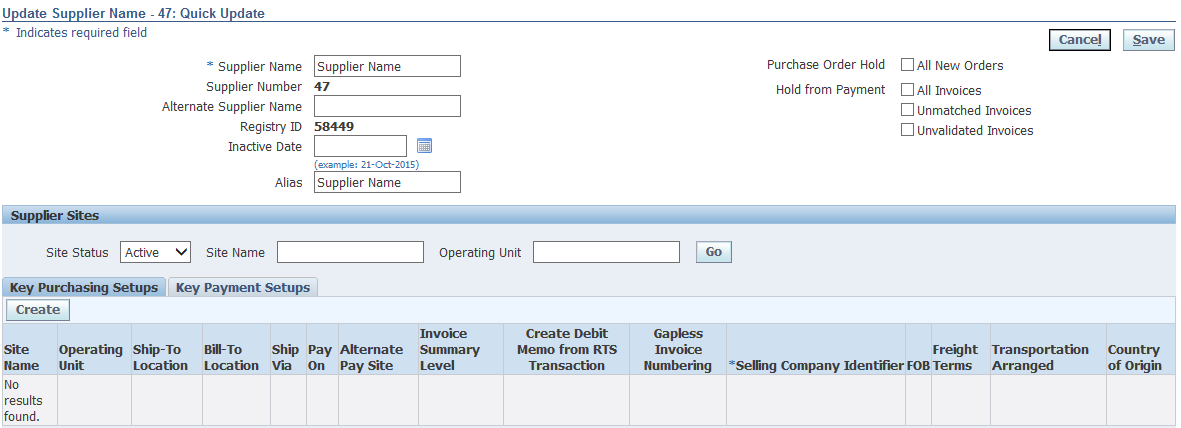
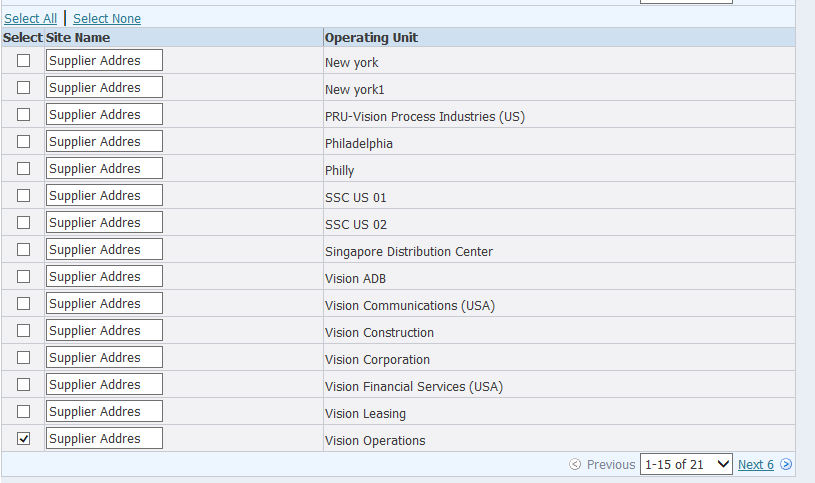 In case we want to go with creation of more sites then go with Manage sites.
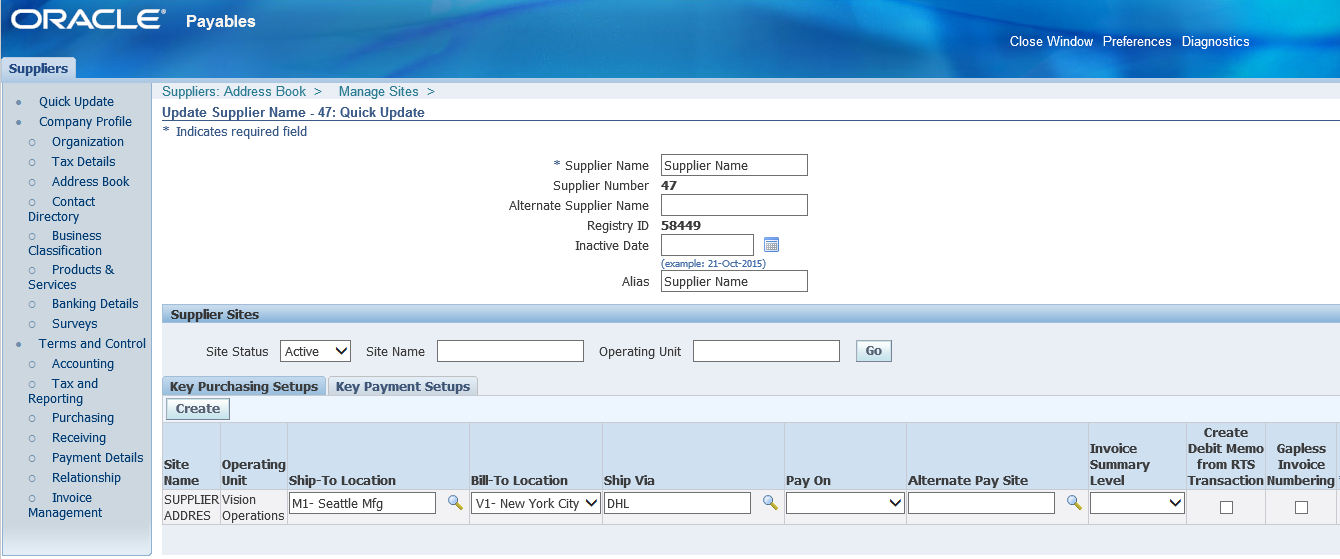
Now go to Quick Update
(FOB = Free on Board = The point where supplier responsibility ends)
In case we want to go with creation of more sites then go with Manage sites.
Now go to Quick Update
(FOB = Free on Board = The point where supplier responsibility ends)
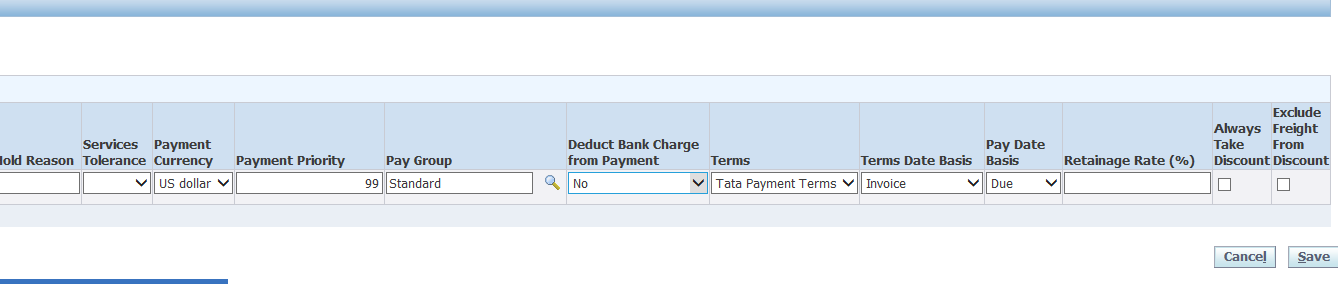
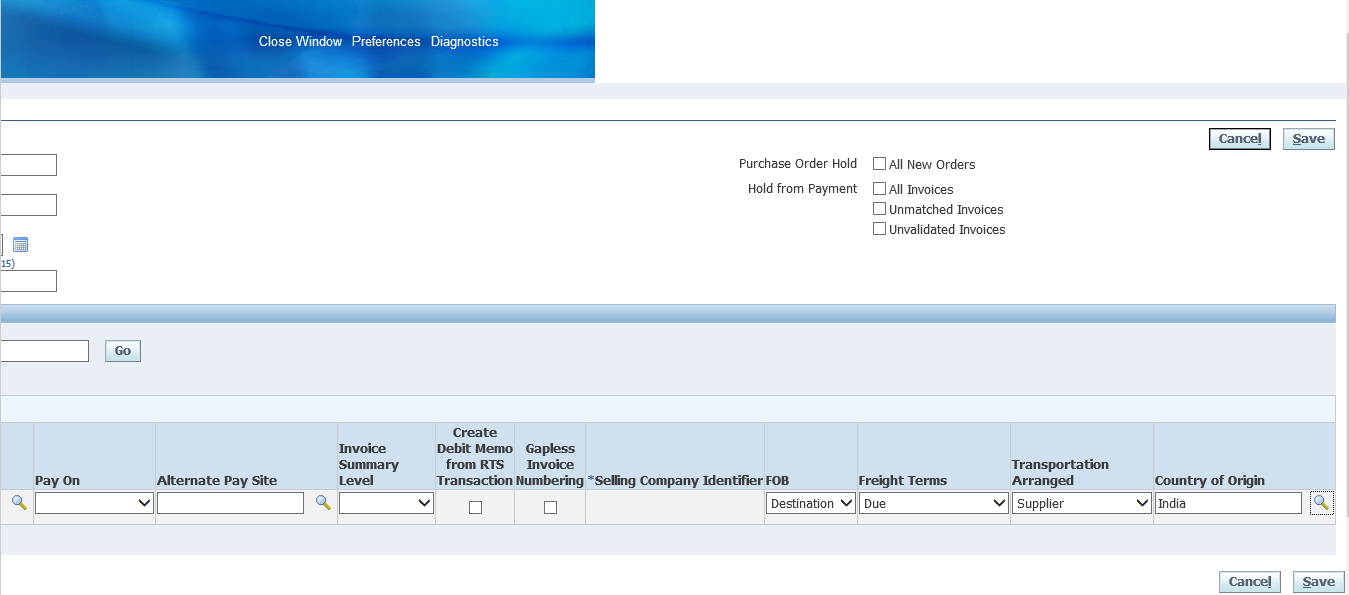 Save and go to Key Payment Setups tab
Payment priority = 99 = Low priority; 01 = High priority payment has to be done
Save and go to Key Payment Setups tab
Payment priority = 99 = Low priority; 01 = High priority payment has to be done
 Save
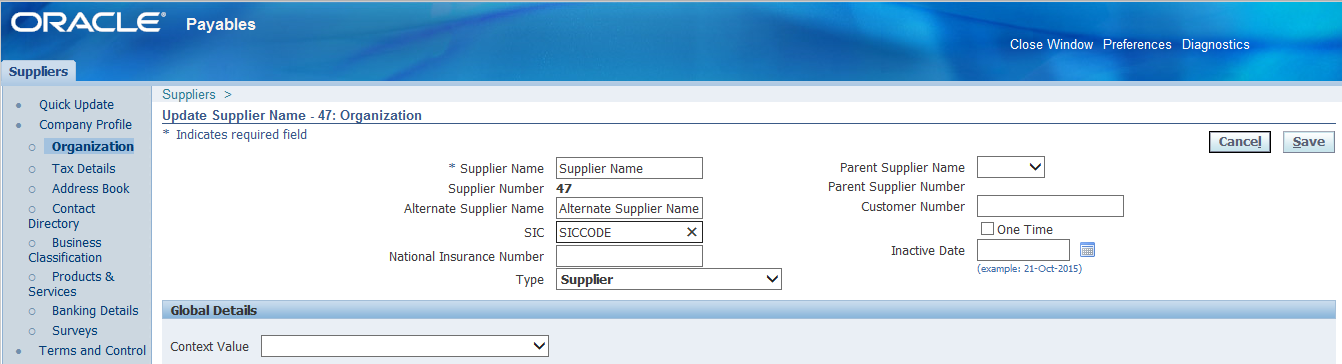
Now go to Organization which is at left list
Save
Now go to Organization which is at left list
 Save
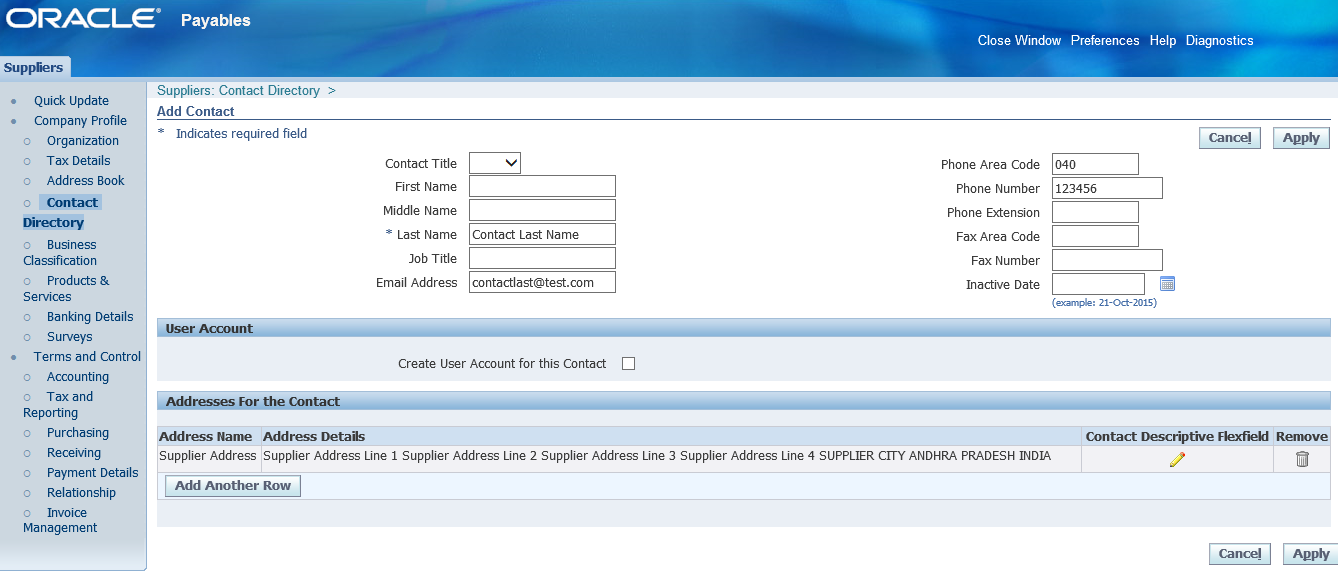
Go to Contact Directory >> Create >> Fill details and Apply
Save
Go to Contact Directory >> Create >> Fill details and Apply
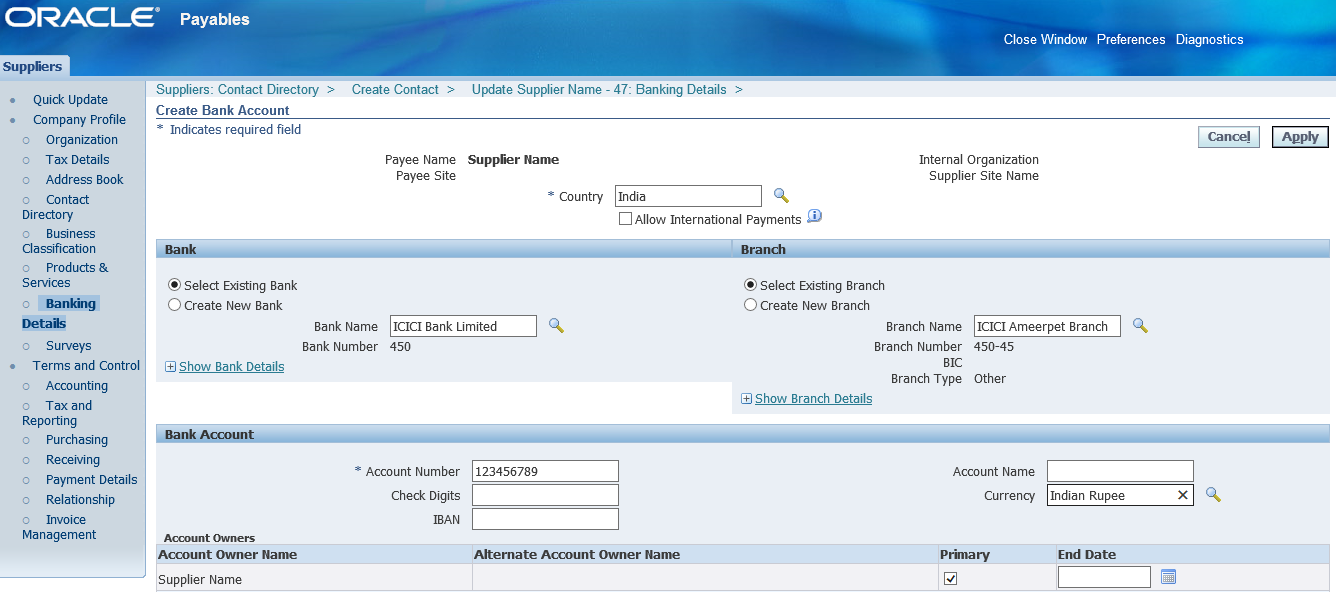
 Go to Banking Details >> Create >> Enter details as below >> Apply >> Save
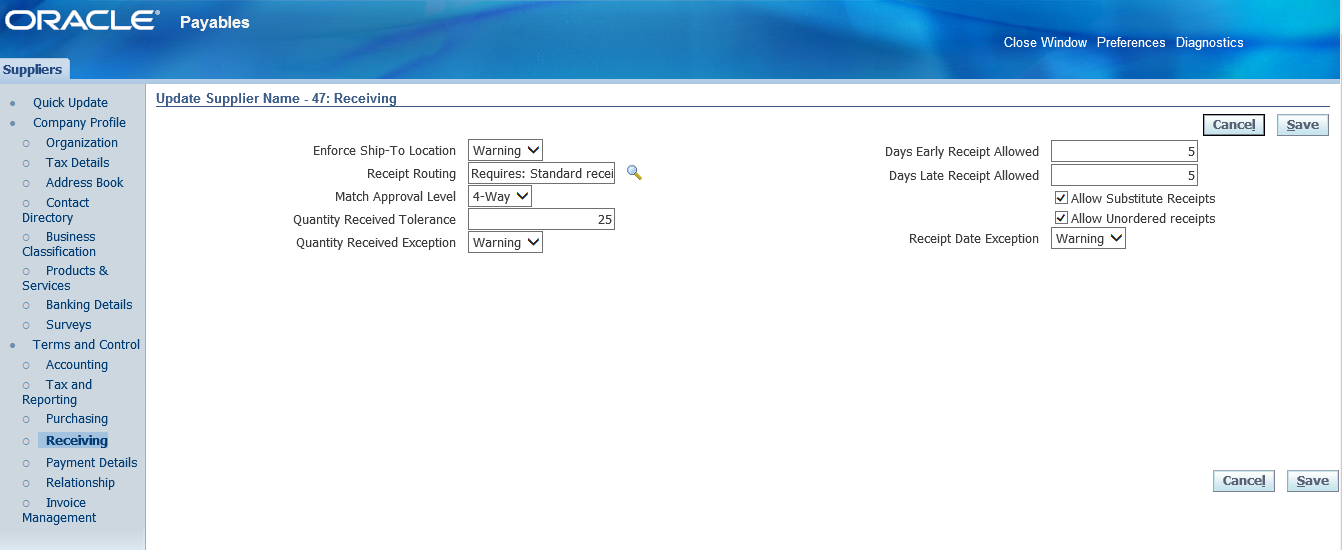
 Go to Receiving >> Enter details as below >> Save
 Go to Payment Details >> Select the Payment Method as Check >> Save
Go to Invoice Management >> Enter details >> Save
Go to Payment Details >> Select the Payment Method as Check >> Save
Go to Invoice Management >> Enter details >> Save
 With this the supplier creation completed.
For creation of PO, Receipt, Invoice and Invoice payment refer to P2P page.
Whenever we enter invoice and match with PO then no need to go with distribution set in invoice window.
Whenever we enter invoice and doesn’t match with PO then we need to opt distribution set in invoice window.
With this the supplier creation completed.
For creation of PO, Receipt, Invoice and Invoice payment refer to P2P page.
Whenever we enter invoice and match with PO then no need to go with distribution set in invoice window.
Whenever we enter invoice and doesn’t match with PO then we need to opt distribution set in invoice window.
5. Payables Invoice Types 1. Standard 2. Credit Memo 3. Debit Memo 4. Expense Report 5. Prepayment 6. Retainage Release 7. Transportation Invoices 8. Withholding Tax 9. Mixed
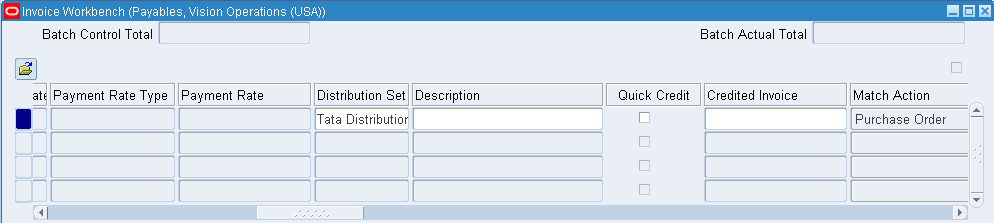
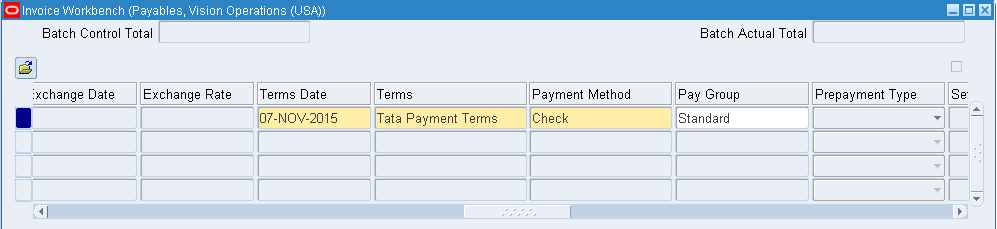
6. Create a Manual Invoice
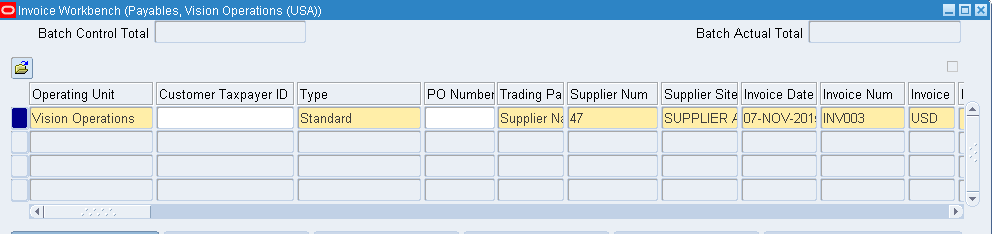
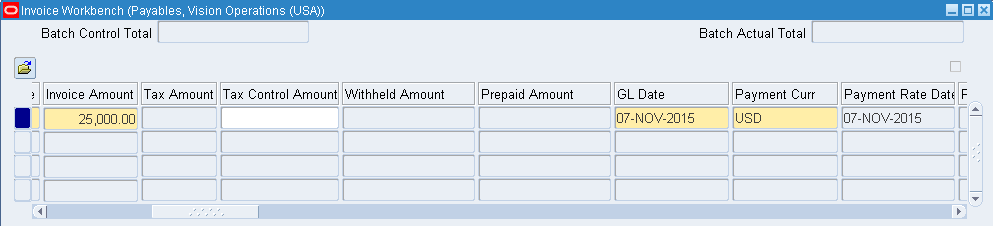
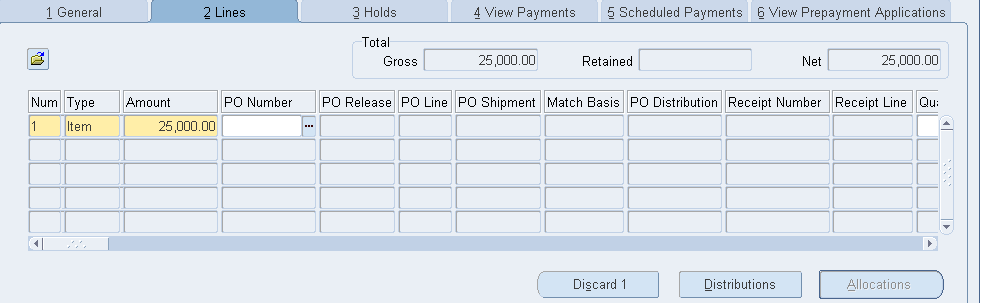
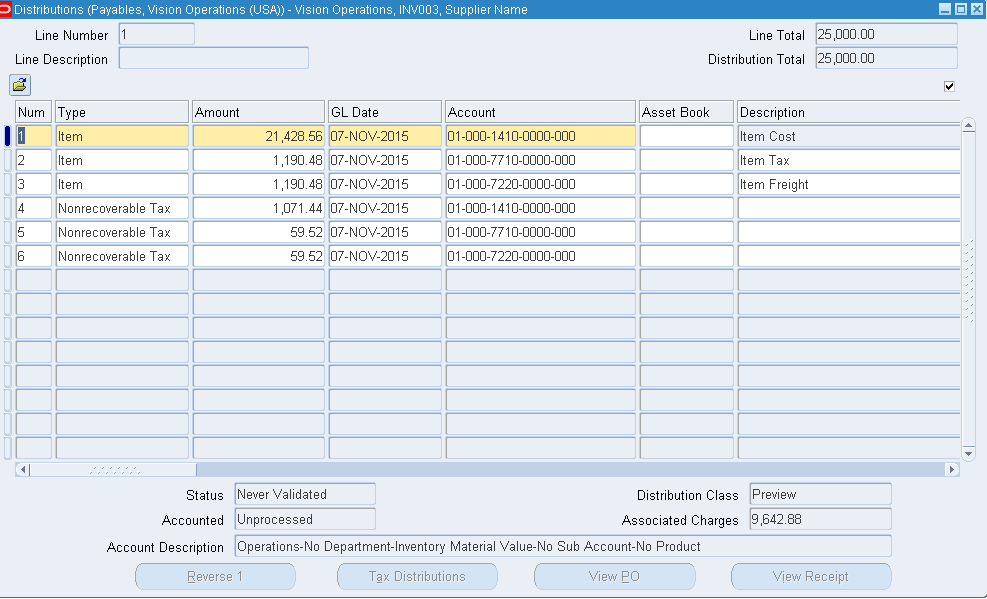
 Go to Lines menu >> Enter amount as 25000 and click on Distributions
 System automatically generates based on distribution set.
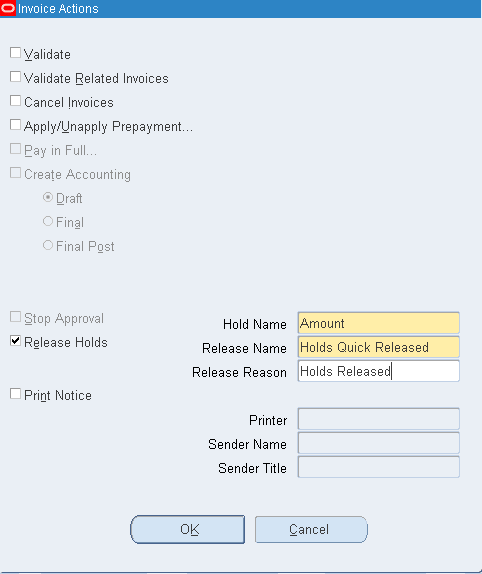
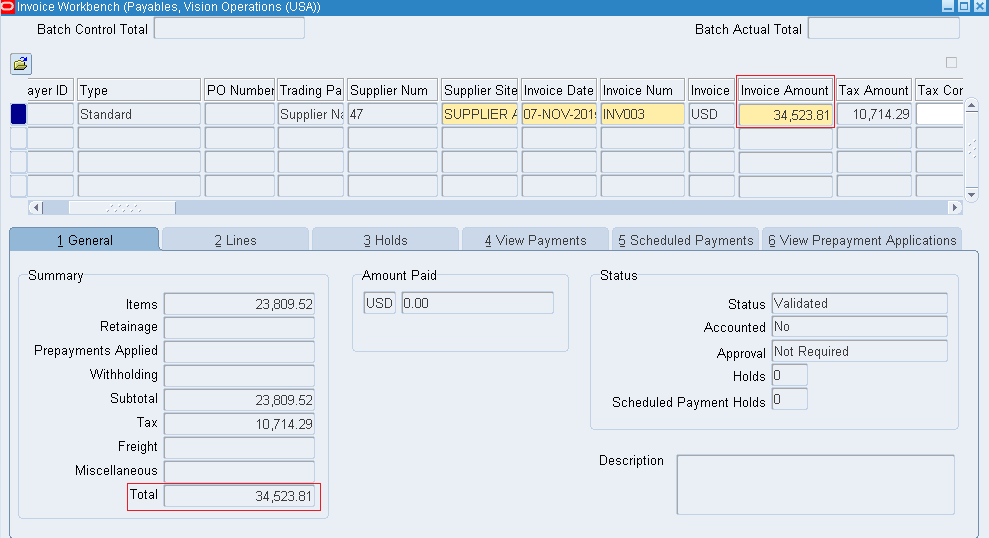
 Close the window >> Actions…1 >> Validate >> Ok >> The status has to be validated. Here we have status as Needs Revalidation. Go to Actions…1 >> Enter below image details >> Ok
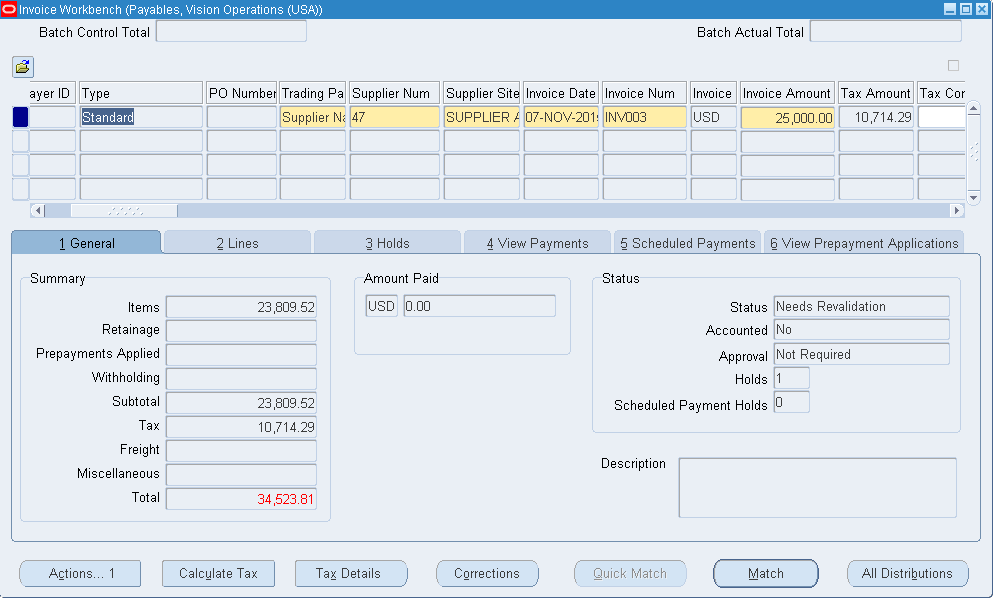 In case still hold doesn’t get released and we have hold message as ‘Total of Invoice Lines does not equal Invoice Amount’ then modify the invoice amount = Total
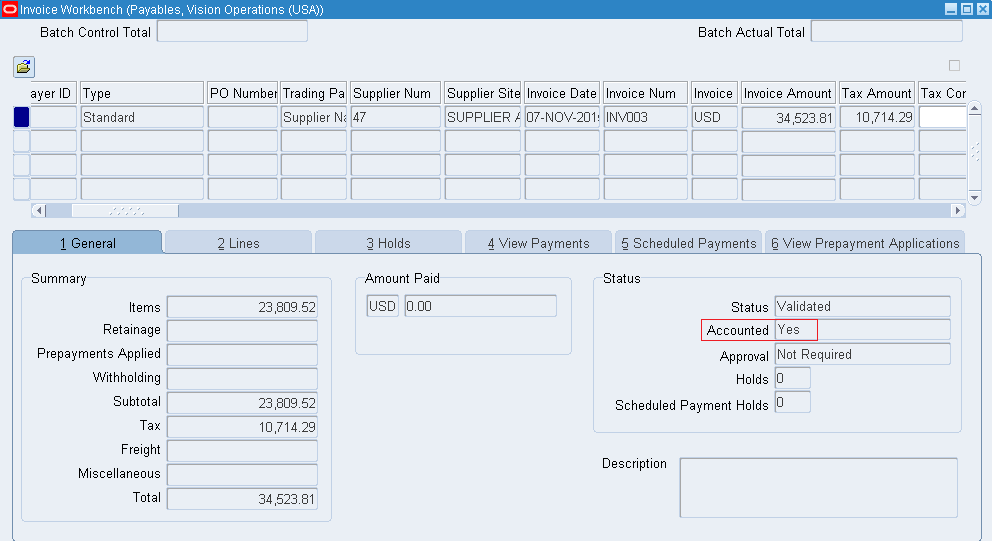
 After validation >> Click Actions…1 >> Check Create Accounting with Final. The Accounted status is modified to Yes
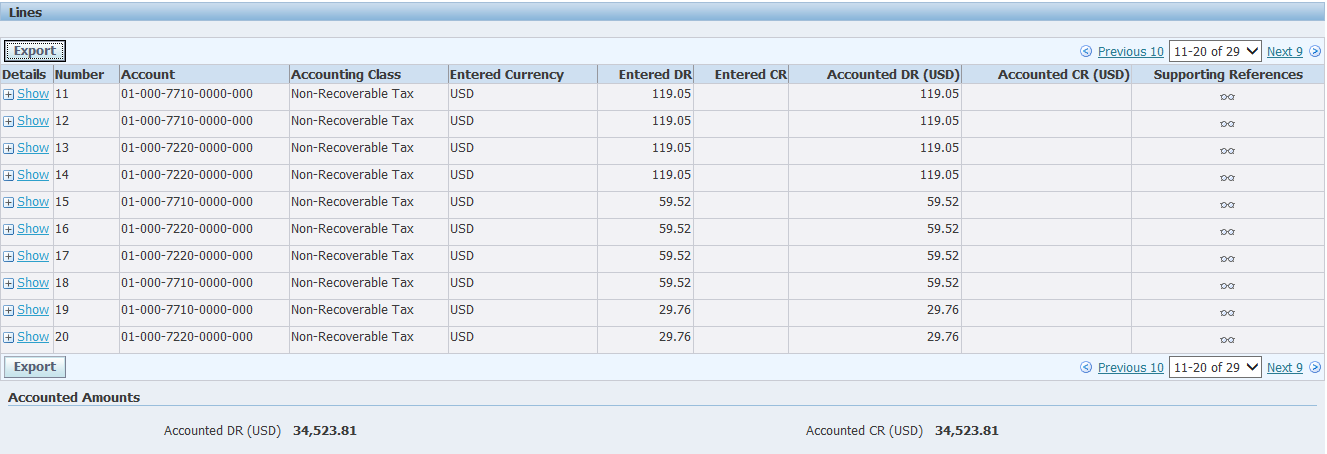
 Go to Tools menu >> Click on View Accounting Events >> Click on View Journal Entries - Entered DR = Entered CR

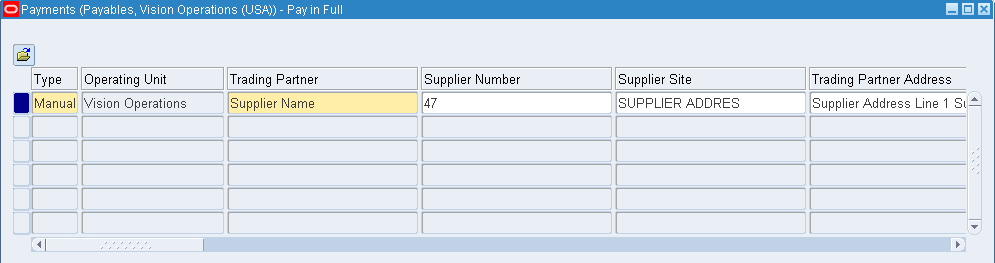
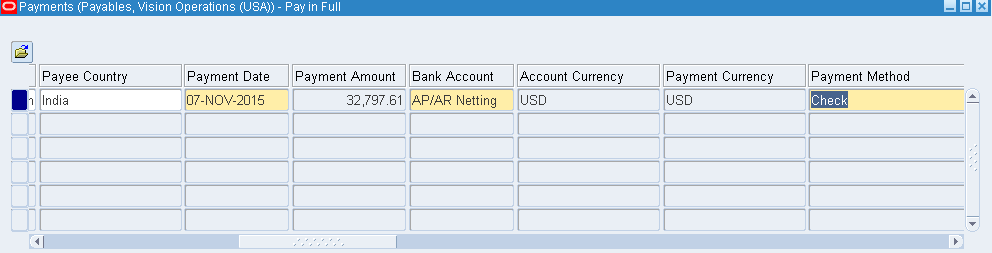
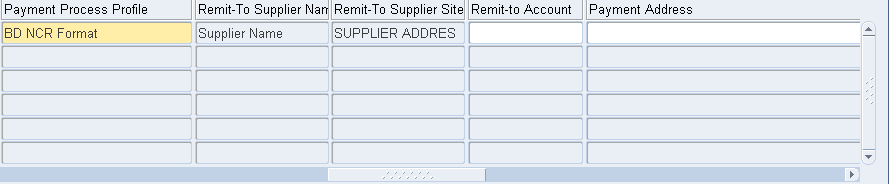
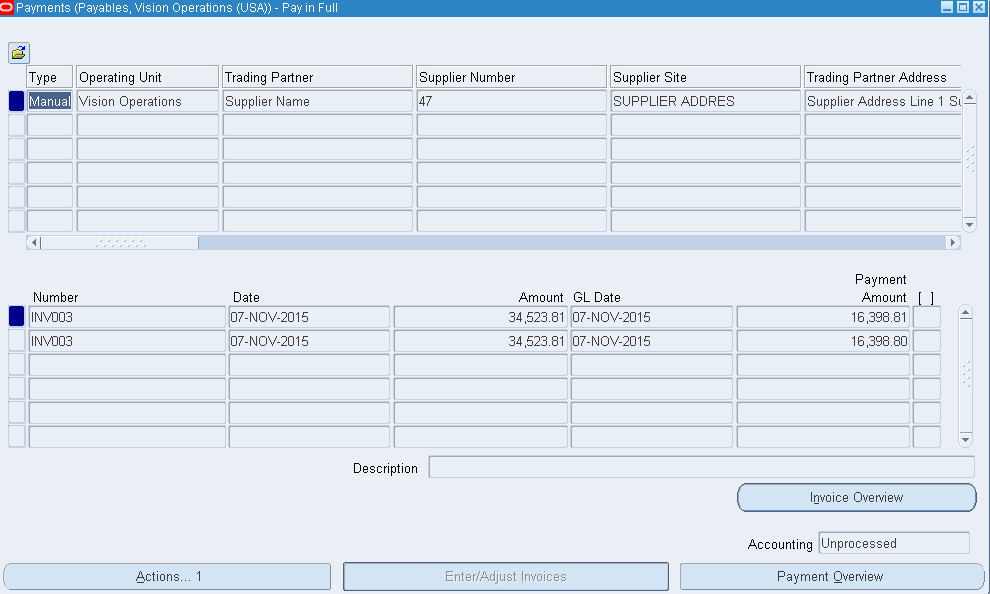
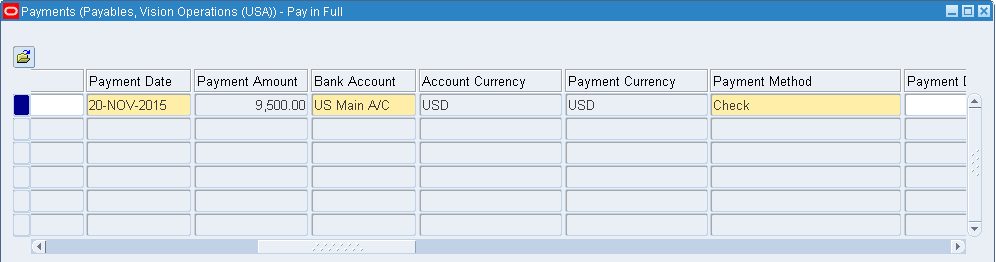
7. Payment of Invoice We can pay either opting Scheduled Payments tab >> click on Pay…1 Or Click on Actions…1 >> check Pay in Full >> New payment window appears. We have three payment types 1. Manual – Transaction occurred outside of Oracle applications. Example issuance of cheque or net banking. Here user has to enter manual details. 2. Quick – Generation of payment using Oracle applications. Here we generate cheque through Oracle application 3. Refund – We doesn’t satisfy with the item provided by supplier and return the good. That case supplier provide refund amount/ cheque.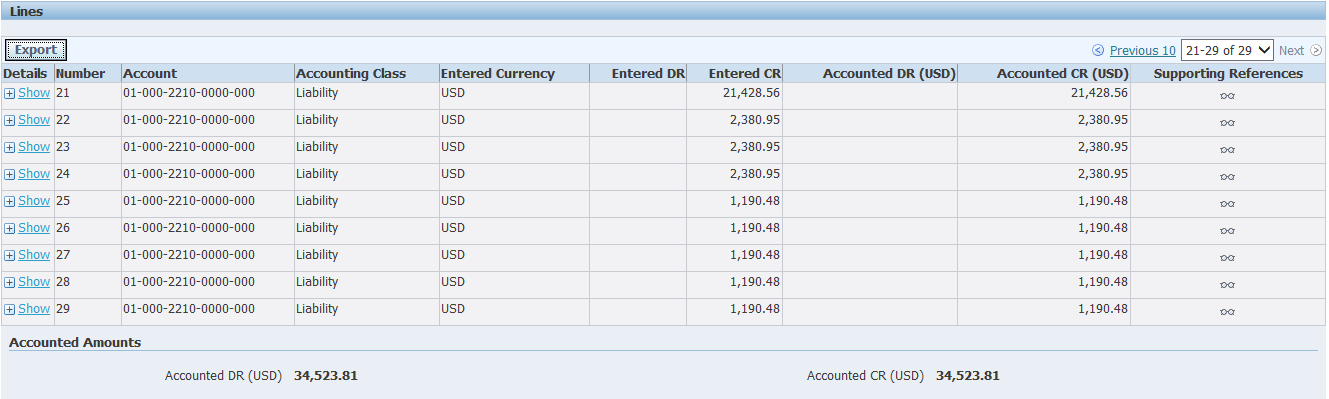
 We are paying the amount in two installments as below.
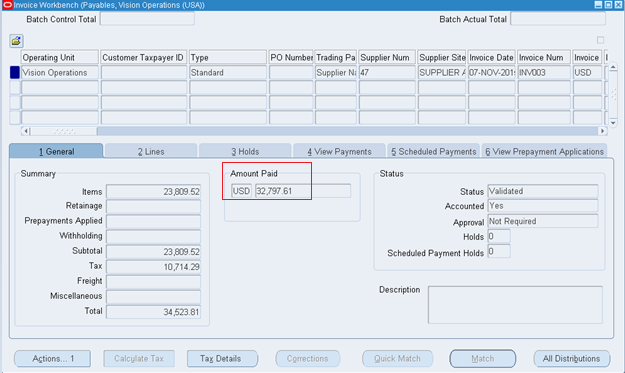
 Click on Actions…1 >> Create Accounting >> Final >> Ok >> The Accounting value has to be Processed
Go to Tools menu >> View Accounting Events >> View Journal Entries
Click on Actions…1 >> Create Accounting >> Final >> Ok >> The Accounting value has to be Processed
Go to Tools menu >> View Accounting Events >> View Journal Entries
 The amount paid has been updated.
 After making the payment we found some damage on item, that case the supplier has to refund the amount. That case supplier issues a debit memo to us.
Credit Memo – Customer has to PAY amount to Supplier.
Debit Memo – Customer has to GET amount from Supplier.
In AP we need to enter the amount in -ve value for both credit and debit memo.
After making the payment we found some damage on item, that case the supplier has to refund the amount. That case supplier issues a debit memo to us.
Credit Memo – Customer has to PAY amount to Supplier.
Debit Memo – Customer has to GET amount from Supplier.
In AP we need to enter the amount in -ve value for both credit and debit memo.
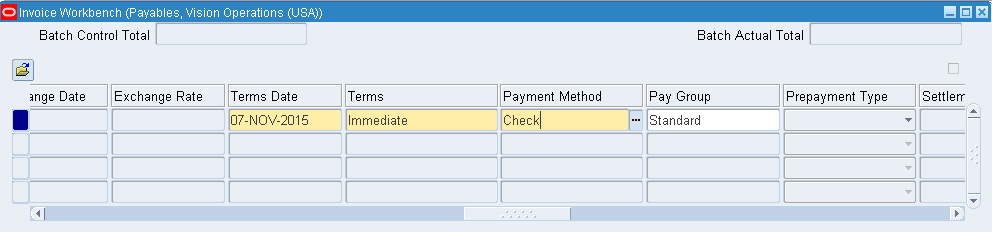
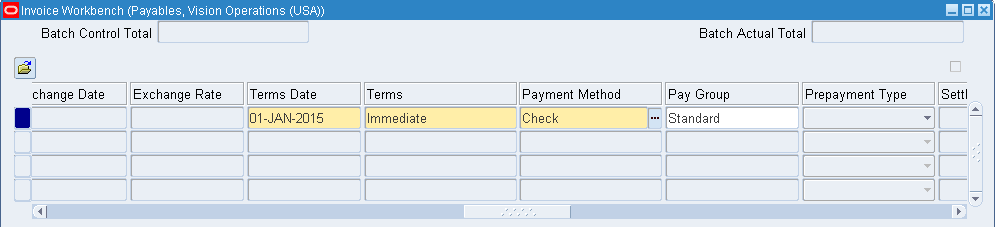
 We are asking our supplier to pay the amount immediately hence opted for Immediate Terms and change the Match Action to Invoice
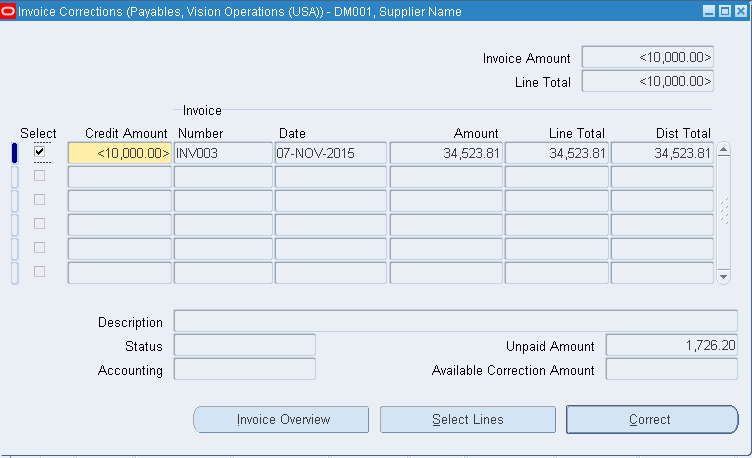
 Click on Corrections button >> Enter the invoice number and click on Find >> Enter the refund amount and click on Correct
 Go to Actions…1 >> Validate >> Once validated check Pay in Full.
8. Recurring Invoice When we purchase same product, same quantity and same amount very often from supplier then we go with Recurring invoice. We can create invoices in advance. Say we purchase items on a monthly basis and all 12 invoices can be created on Jan. When we enter into particular month, open the invoice, validate and make the payment. Setup >> Calendar >> Special Calendar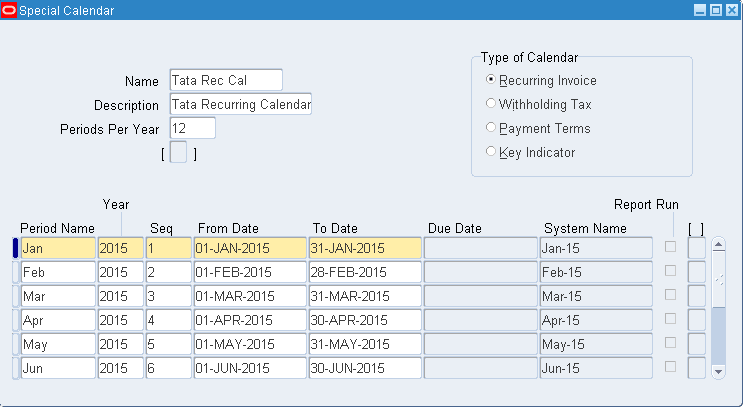 Invoices >> Entry >> Recurring Invoices
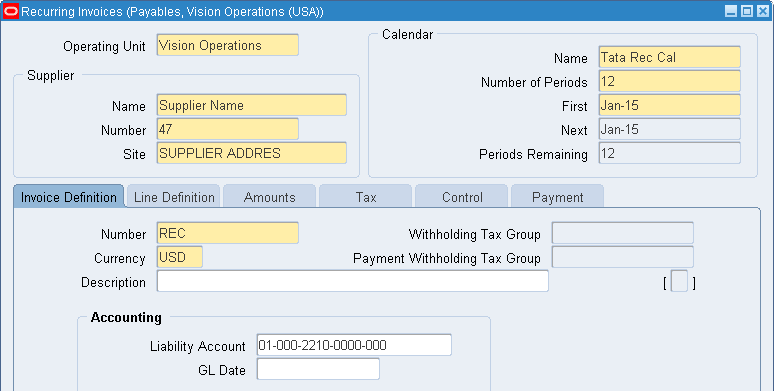 In Line Definition tab enter distribution name (Tata Distribution Set).
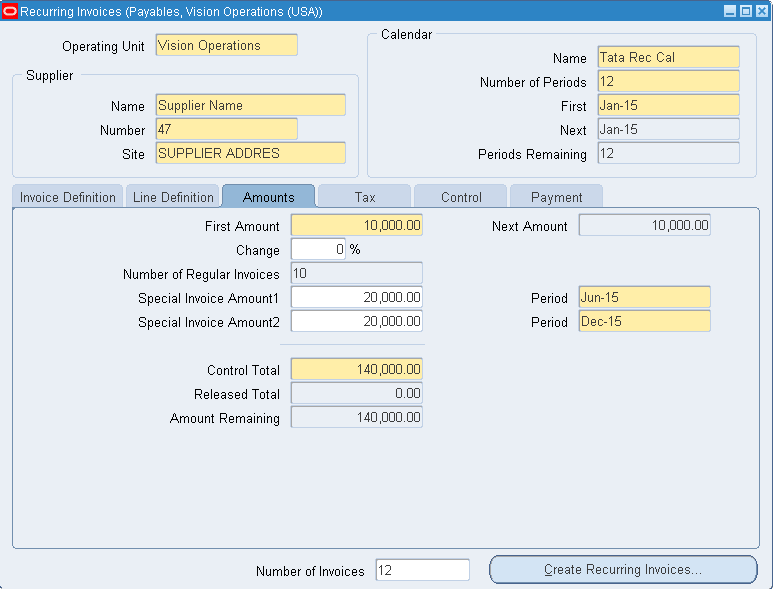 Click on Create Recurring Invoices >> Ok >> Save
Now go to invoice and search with REC% and you should be able to view all invoices with never validated status.
Click on Create Recurring Invoices >> Ok >> Save
Now go to invoice and search with REC% and you should be able to view all invoices with never validated status.
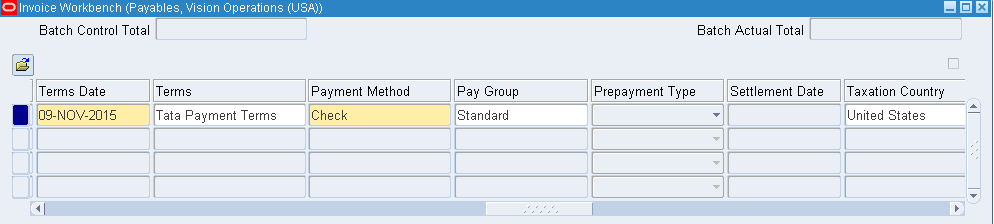
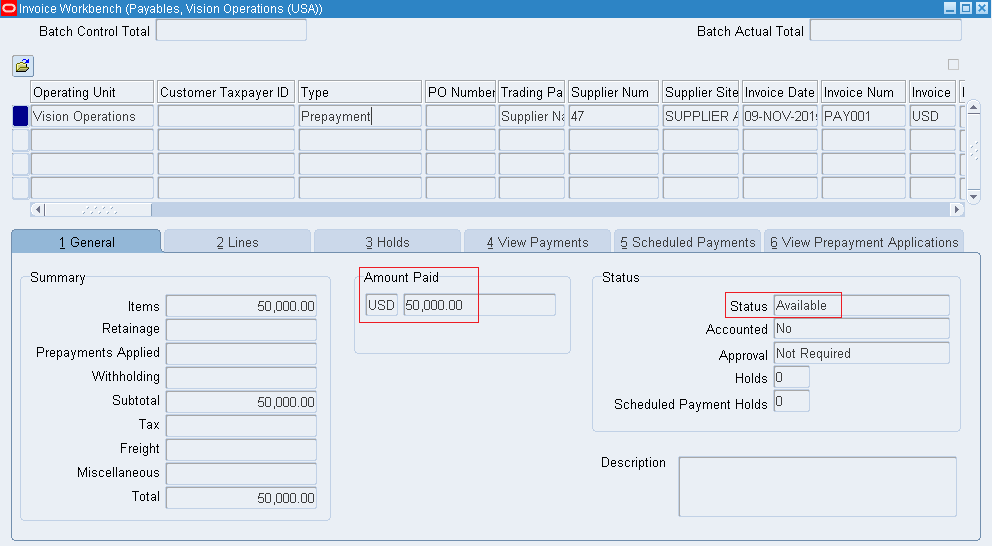
9. Pre-Payment to Supplier Payables responsibility >> Invoices >> Entry >> Invoices >> Select type as ‘Prepayment’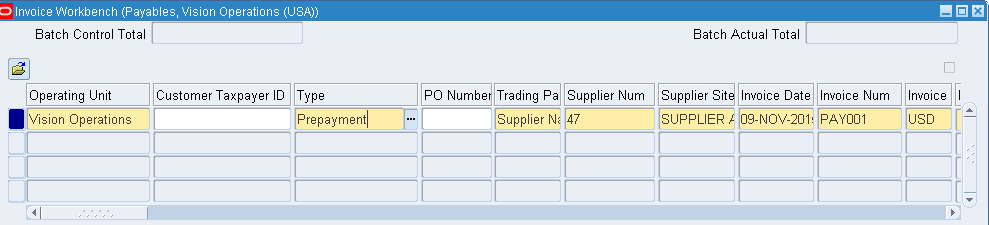
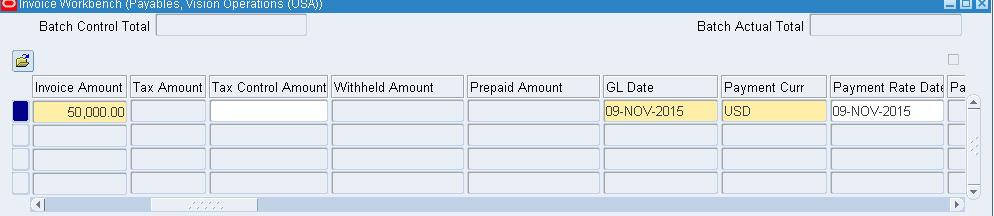
 In lines tab >> Enter the Amount 50000 >> Save >> Go to Distributions and check the distributed amount >> Here the status will be Unvalidated.
Go to Actions…1 >> Validate >> Now the status will be Unpaid (Unpaid = Validated but not paid)
Go to Actions…1 >> Pay in Full >> This goes to Payment window where all details will be pre-defined >> Enter other mandatory details >> Save >> Actions…1 >> Check Create Accounting with Final status >> Ok >> The Accounting status has to be Processed from Unprocessed
Finally you should have below image with Accounted ‘Yes’ -- Though No here due to some issues… :(
In lines tab >> Enter the Amount 50000 >> Save >> Go to Distributions and check the distributed amount >> Here the status will be Unvalidated.
Go to Actions…1 >> Validate >> Now the status will be Unpaid (Unpaid = Validated but not paid)
Go to Actions…1 >> Pay in Full >> This goes to Payment window where all details will be pre-defined >> Enter other mandatory details >> Save >> Actions…1 >> Check Create Accounting with Final status >> Ok >> The Accounting status has to be Processed from Unprocessed
Finally you should have below image with Accounted ‘Yes’ -- Though No here due to some issues… :(
 Create a new invoice and apply the invoice amount against the pre-payment invoice. In Actions…1 tab use Apply/ Unapply Prepayment >> Apply the amount which you want to pay.
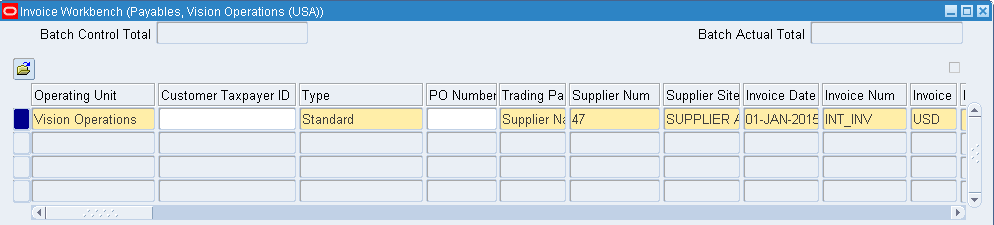
10. Interest Invoice Payables >> Setup >> Options >> Payables Options >> In Interest tab enable Allow Interest Invoices Now go to Supplier’s page >> Invoice Management >> check Create Interest Invoice >> Save
Go to Setup >> Payment >> Interest Rates >> Enter % and effective dates
Create a Standard invoice with some previous date
Now go to Supplier’s page >> Invoice Management >> check Create Interest Invoice >> Save
Go to Setup >> Payment >> Interest Rates >> Enter % and effective dates
Create a Standard invoice with some previous date
 Lines >> Enter amount 25,000 >> Distributions and check the distribution total >> Next go to Actions…1 and Validate >> Status will be Validated >> Again Actions…1 and Create Accounting with Final status >> Status will be Validated and Accounted will be Yes >> Actions…1 and Pay in Full >> Once we populate the Payment Date, the Payment Amount automatically triggers with interest amount >> Save
 We will be having two records underneath describing the intrest amount and actual amount.
Go to Actions…1 >> Creating Accounting with Final status
Imp Note: We wont be able to apply interest specific to Supplier. The interest rate which is defined above will be considered for all Suppliers.
We will be having two records underneath describing the intrest amount and actual amount.
Go to Actions…1 >> Creating Accounting with Final status
Imp Note: We wont be able to apply interest specific to Supplier. The interest rate which is defined above will be considered for all Suppliers.
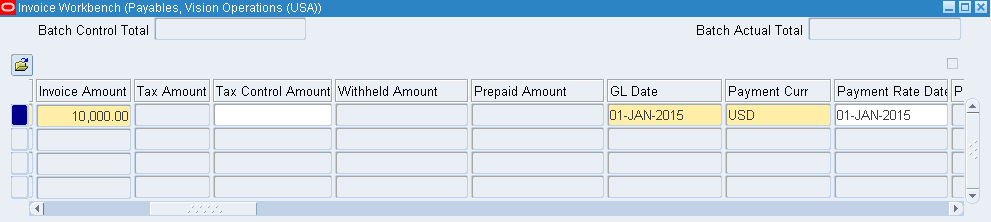
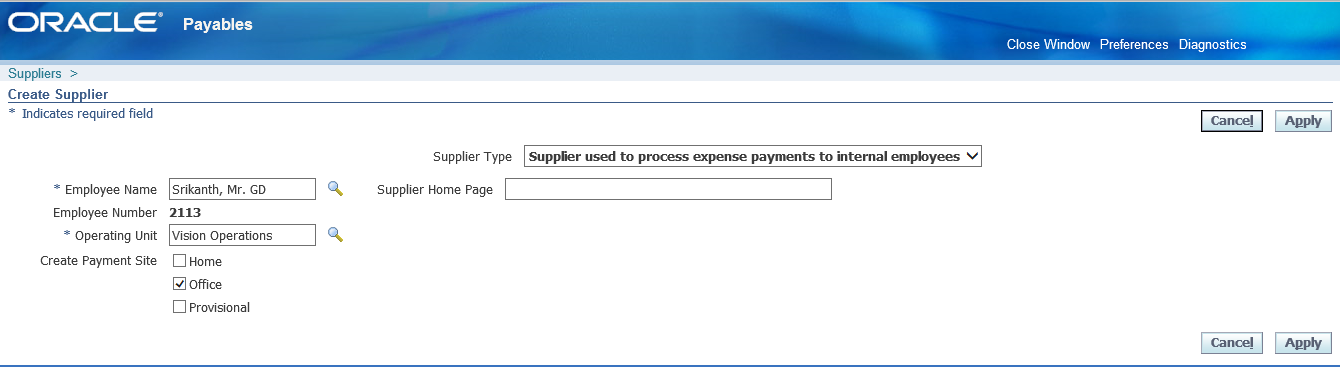
11. Pre-Payment to Employee First create an Employee Go to US HRMS Manager responsibility >> People >> Enter and Maintain >> New >> Enter details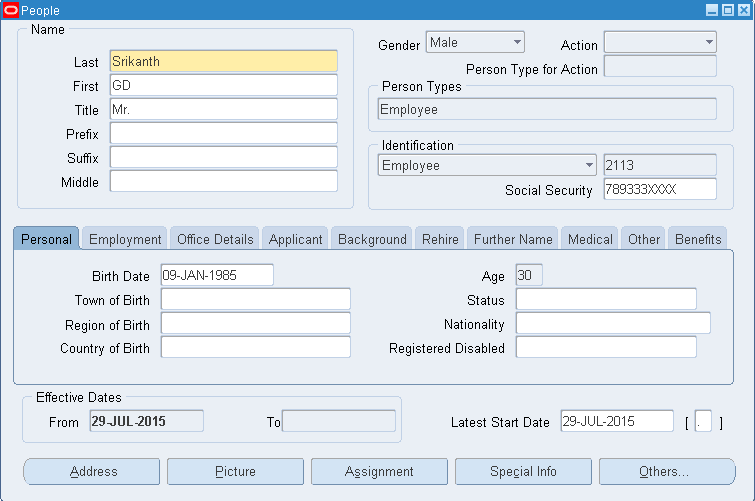 Now go to Payables >> Suppliers >> Entry >> Create Supplier >> Enter details as below >> Apply >> Close Window
 Go to Invoices >> Entry >> Invoices
 Go to Lines tab and enter the amount as 10,000 >> Save >> Check in Distributions . Here the type should be Miscellaneous rather than item.
Next Validate >> Create Accounting >> Pay in Full for final settlement
Go to Lines tab and enter the amount as 10,000 >> Save >> Check in Distributions . Here the type should be Miscellaneous rather than item.
Next Validate >> Create Accounting >> Pay in Full for final settlement
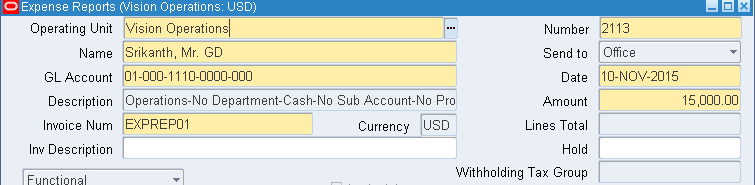
12. Expense Report Setup >> Invoice >> Expense Report Templates >> Create new expense template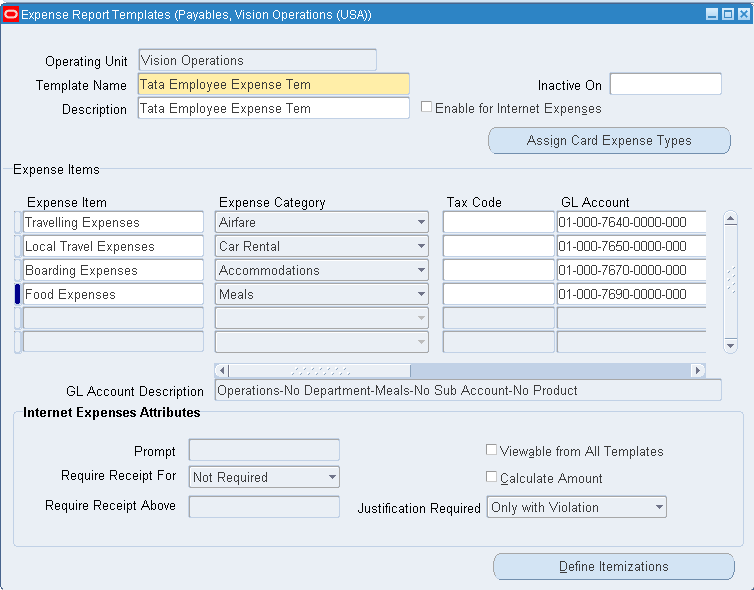 Now go to Invoices >> Entry >> Expense Reports >> Ensure Date = Pre-Payment Employee Invoice Date
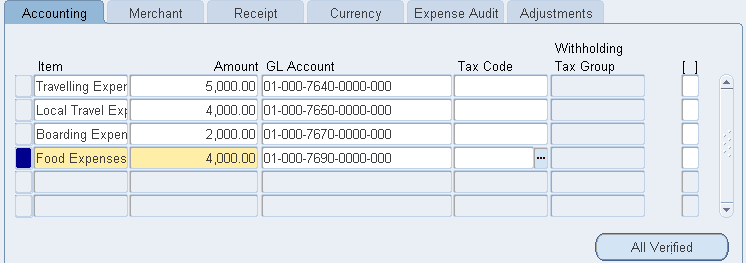
 We will be able to apply advances only when the pre-payment employee invoice has type as Temporary. If it is permanent, we wont be able to make any adjustments >> Check Apply Advances >> Enter pre-payment number (PREEMP01) under Number and pre-payment employee invoice amount 10,000 >> Under Template select the template which we created above >> Under Accounting tab enter the details as below.
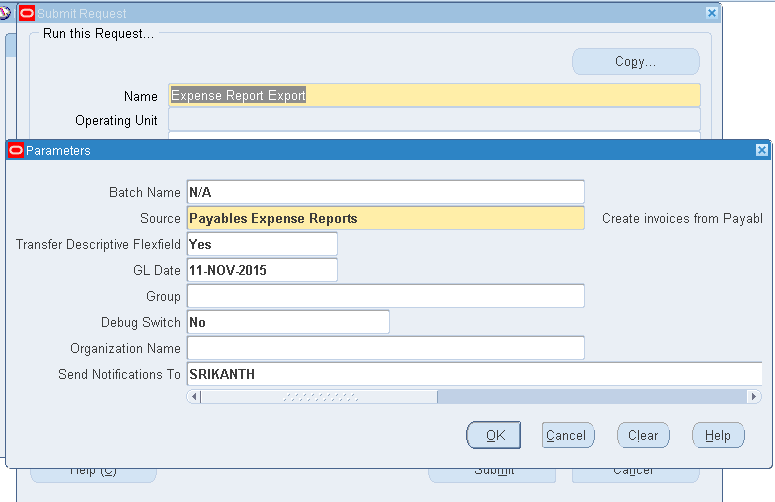
 Save >> Now we need run a program >> Other >> Requests >> Run >> Expense Report Export
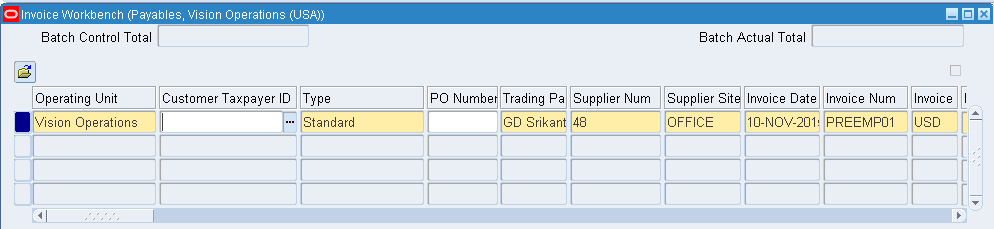
 After the successful completion of program go to Invoices >> Entry >> Invoices and query with Type as expense Report and trading partner as %Srikanth% here you will be able to find the balance amount which need to be paid to Employee >> Again query new invoice with type as %Pre% and trading partner as %Srikanth% >> Status will be fully applied. Means the prepayment amount of 10,000 has been applied to employee.
Pre-Payment type as Permanent — Say I took a building for lease for 10 years for an amount of 50 Lakhs. I paid the whole amount on day one. After 10 years I wont get this 50 Lakhs then we create permanent pre-payment type.
After the successful completion of program go to Invoices >> Entry >> Invoices and query with Type as expense Report and trading partner as %Srikanth% here you will be able to find the balance amount which need to be paid to Employee >> Again query new invoice with type as %Pre% and trading partner as %Srikanth% >> Status will be fully applied. Means the prepayment amount of 10,000 has been applied to employee.
Pre-Payment type as Permanent — Say I took a building for lease for 10 years for an amount of 50 Lakhs. I paid the whole amount on day one. After 10 years I wont get this 50 Lakhs then we create permanent pre-payment type.
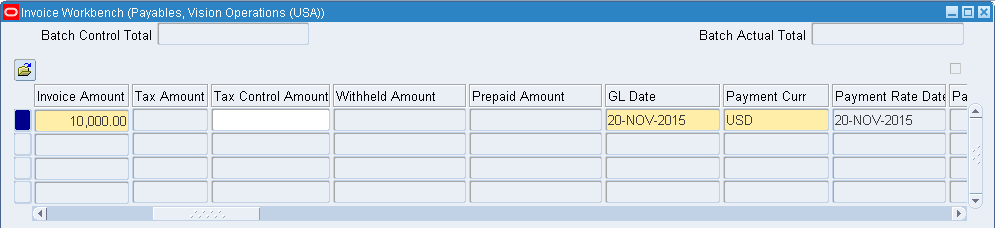
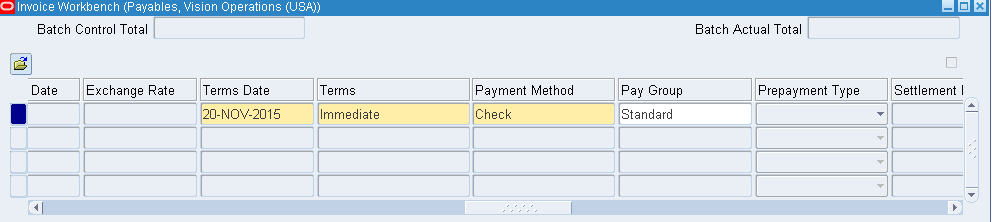
13. Tax Withholding Instead of paying tax amount which is quoted by Supplier, we hold the tax amount and pay to government directly. Very few suppliers accept this. Payables >> Setup >> Options >> Payables Options >> Enter OU as Vision Operations >> Withholding Tax tab >> Check Use Withholding Tax >> Under Apply Withholding Tax select At Invoice Validation Time (X) and under Create Withholding Invoice select At Invoice Validation Time. Here we are applying the withholding amount during creation of invoice itself.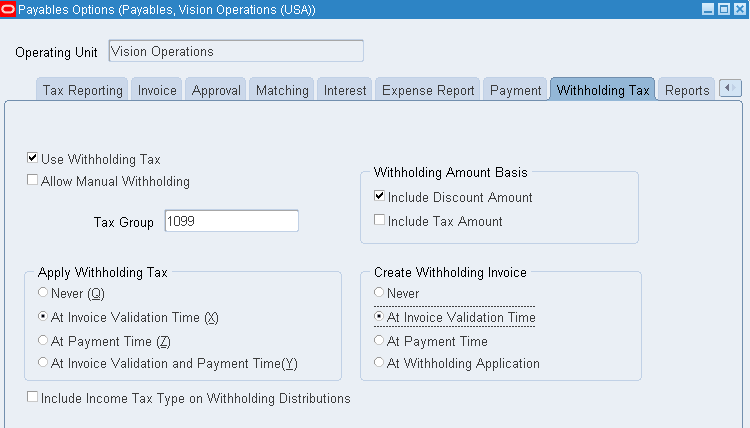 Suppliers >> Entry >> Query for Supplier >> Organization tab >> Modify the Type from Supplier to Tax Authority >> Save >> Go to Tax Details tab >> Under Income Tax – Check Withholding Tax >> Under Supplier Sites – Check Withholding Tax >> Save
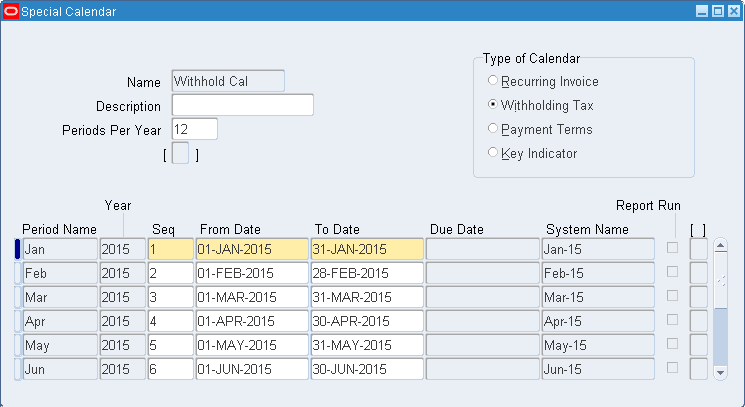
For withholding we need to create a separate calendar. Go to Setup >> Calendar >> Special Calendar >> Create Calendar as below
Suppliers >> Entry >> Query for Supplier >> Organization tab >> Modify the Type from Supplier to Tax Authority >> Save >> Go to Tax Details tab >> Under Income Tax – Check Withholding Tax >> Under Supplier Sites – Check Withholding Tax >> Save
For withholding we need to create a separate calendar. Go to Setup >> Calendar >> Special Calendar >> Create Calendar as below
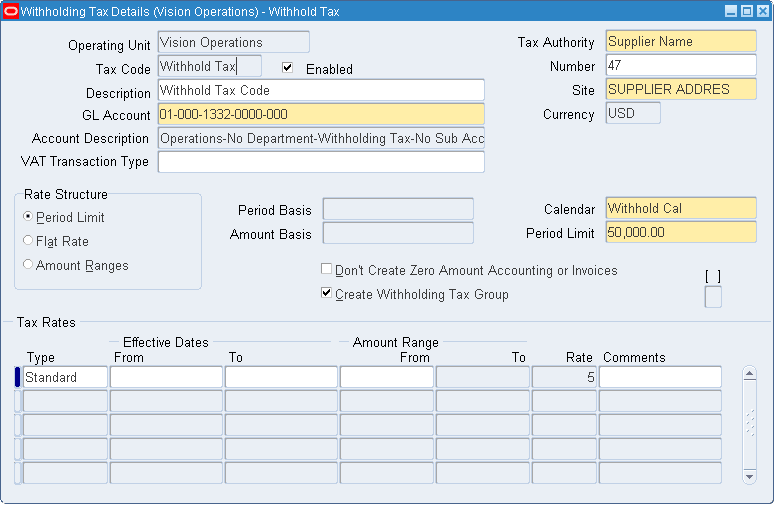
 Now go to Setup >> Tax >> Codes >> Create as below. Here period limit signifies the max tax amount which we can hold without paying to supplier for a particular month. In our case its 50,000/-.
 Now go to supplier and query for our supplier >> Tax Details tab >> Under Income Tax – Invoice Withholding Tax Group enter newly created ‘Withhold Tax’ and under Supplier Sites – Invoice Withholding Tax Group enter newly created ‘Withhold Tax’ >> Save
Now create an invoice to test the withhold tax scenario
Now go to supplier and query for our supplier >> Tax Details tab >> Under Income Tax – Invoice Withholding Tax Group enter newly created ‘Withhold Tax’ and under Supplier Sites – Invoice Withholding Tax Group enter newly created ‘Withhold Tax’ >> Save
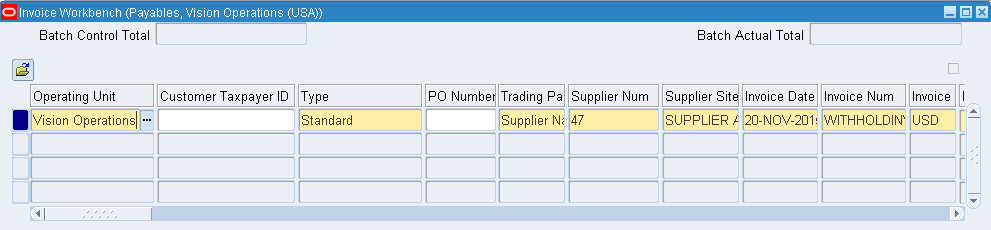
Now create an invoice to test the withhold tax scenario
 Lines >> Enter amount as 10,000/- >> Distribution set
 Now validate the invoice. Withhold of 5% applied since we selected the option above.
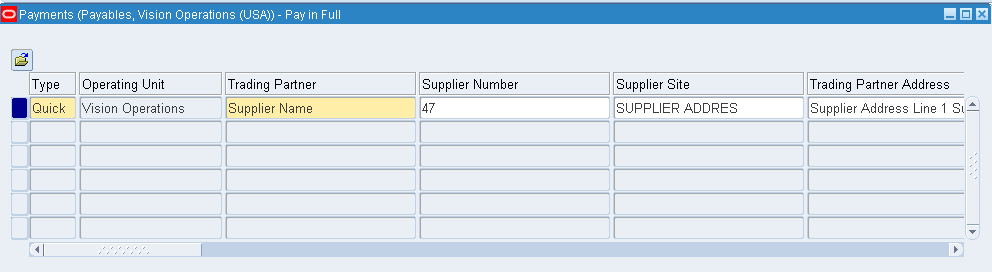
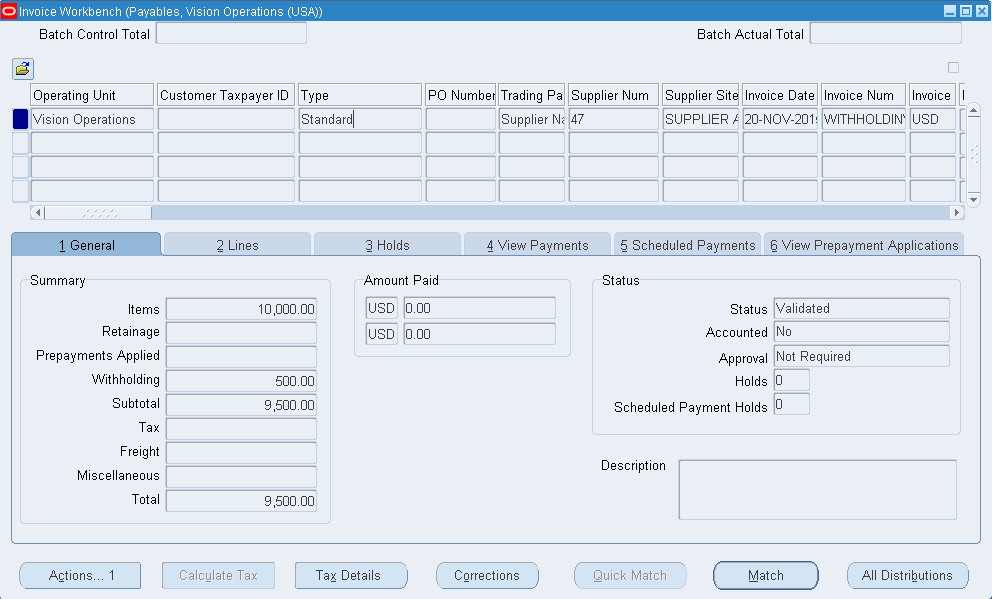 Under header level we get withheld amount as 500. Now create accounting the invoice. Accounted has to changed to Yes from No. Now pay in full which triggers payment window.
 Save the form. Go to Actions and create accounting – final. Ensure the Accounting is modified to Processed.
Now verify the withholding invoice which gets created for an amount of 500. Query for invoice with Type as Withholding Tax and your trading partner. Here we get withholding invoice.
Save the form. Go to Actions and create accounting – final. Ensure the Accounting is modified to Processed.
Now verify the withholding invoice which gets created for an amount of 500. Query for invoice with Type as Withholding Tax and your trading partner. Here we get withholding invoice.
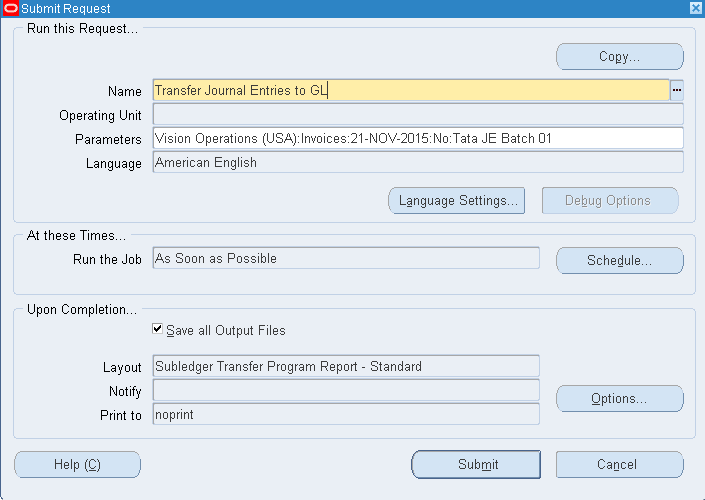
14. Integration of SLA with Payable 4th C – Accounting Convention = Sub Ledger Accounting (SLA) Query for invoice >> Tools – View Accounting Events >> View Journal Entries >> Here the Accounted Dr value should match Accounted Cr. The default liability account is 2210. Convention are of two types: 1. Cash Basis : As on when transaction took place. Immediate settlement. 2. Accrual Basis: Not immediate settlement. Pay later. Say we have three Supplier Types. 1) Supplier 2) Government 3) Contractor and for all these supplier types we have liability account as 2210. Now for each supplier we would like to have different liability account like for Supplier its 2210, for Government its 2220 and for Contractor its 2230 Assigning different (liability) account to different suppliers is termed as SLA. Payables >> Others >> Requests >> Run >> Transfer Journal Entries to GL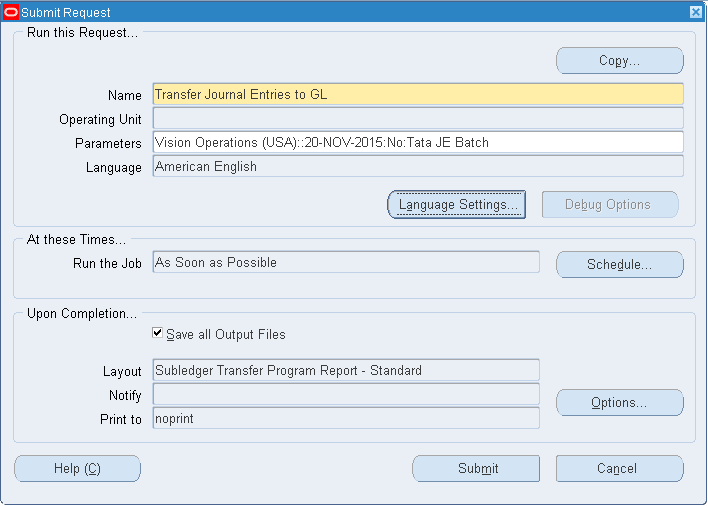 The ‘Transfer Journal Entries to GL’ program will move all the entries to GL. This program auto triggers ‘Journal Import Program’. Please ensure that ‘Journal Import Program’ gets successfully completed.
Now go to General Ledger Super User >> Journals >> Enter >> Query for batch as ‘Tata JE Batch’ which was created above >> Find >> Here we find all entries with Unposted status >> Review/ Open any Journal. Here we wont find lines/ account entries >> To check those entries log out from your user and login to Operations user >> General Ledger, Vision Operations (USA) >> Journals >> Enter Query for batch as ‘Tata JE Batch’ >> Open/ Review any journal >> Review the entries >> These entries are posted from Payables from GL
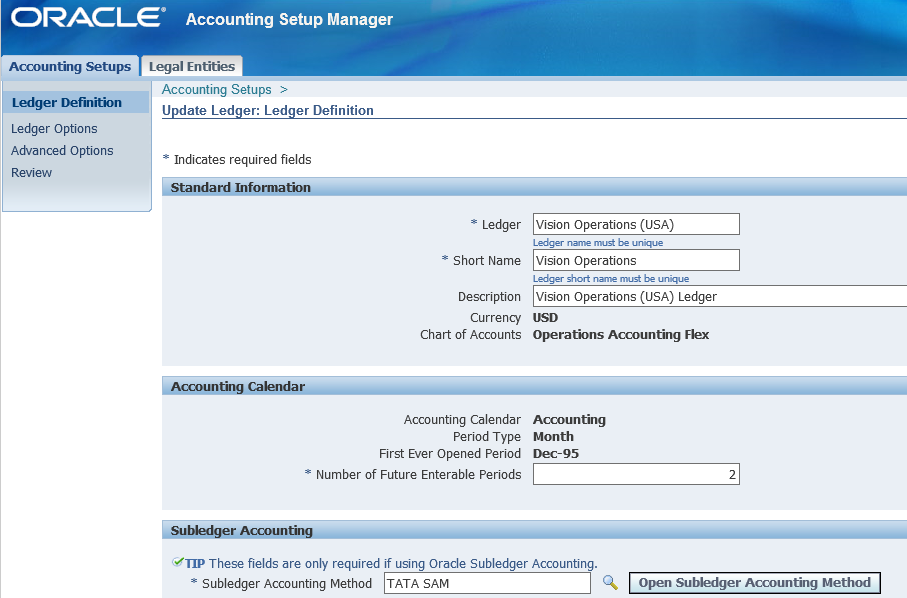
Open default ledger – GL >> Setup >> Financials >> Accounting Setup Manager >> Accounting Setups >> Query for Vision Operations (USA) >> Update Accounting Options >> Under Setup Step open *Vision Operations (USA) >> Click on Update >> Under Subledger Accounting we have * Subledger Accounting Method as Standard Accrual >> The Standard Accrual is default SLA provided by Oracle
The ‘Transfer Journal Entries to GL’ program will move all the entries to GL. This program auto triggers ‘Journal Import Program’. Please ensure that ‘Journal Import Program’ gets successfully completed.
Now go to General Ledger Super User >> Journals >> Enter >> Query for batch as ‘Tata JE Batch’ which was created above >> Find >> Here we find all entries with Unposted status >> Review/ Open any Journal. Here we wont find lines/ account entries >> To check those entries log out from your user and login to Operations user >> General Ledger, Vision Operations (USA) >> Journals >> Enter Query for batch as ‘Tata JE Batch’ >> Open/ Review any journal >> Review the entries >> These entries are posted from Payables from GL
Open default ledger – GL >> Setup >> Financials >> Accounting Setup Manager >> Accounting Setups >> Query for Vision Operations (USA) >> Update Accounting Options >> Under Setup Step open *Vision Operations (USA) >> Click on Update >> Under Subledger Accounting we have * Subledger Accounting Method as Standard Accrual >> The Standard Accrual is default SLA provided by Oracle
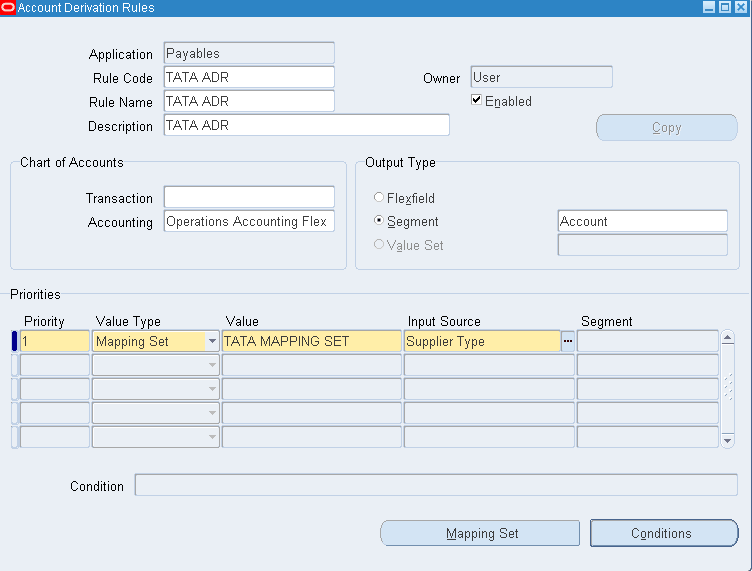
15. SLA process for Payables Manager SLA is a rule based accounting engine that defines how journals entries are generated in sub-ledger transactions in Oracle sub-ledger applications. Before we get into SLA we need to know few of the basic concepts like event types, event class etc. Event Class – Classifies transaction types for accounting rule purposes. Ex in payables, following are possible event classes: Invoice, Debit Memo, Prepayments, Payments and Refunds. Event Type – For each transaction type, defines possible actions with accounting significance. Ex in payables, following are possible event classes. AP Invoice events – Validation, Adjustment and Cancellation. Similarly we will have event types for other event classes. Step1 : Desc: Define Mapping Set Navigation: Payables >> Setup >> Accounting Setups >> Sub Ledger Accounting Setups >> Accounting Methods Builder >> Journal Entry Setups >> Mapping Sets >> New >> As below if the Supplier type is Contractor then instead of picking 2210 as liability account, this picks 2700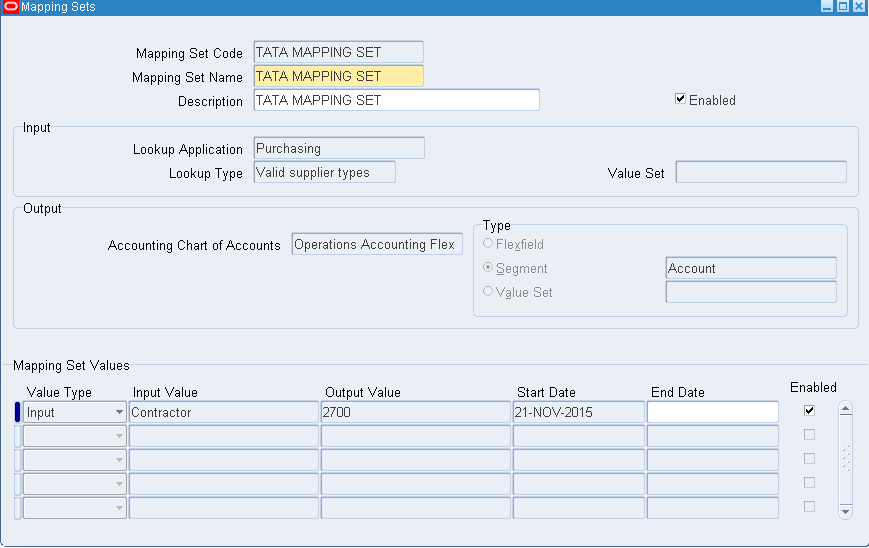 Next is Account Derivation Rule (ADR)
Payables >> Setup >> Accounting Setups >> Sub Ledger Accounting Setups >> Accounting Methods Builder >> Journal Entry Setups >> Account Derivation Rules >> New
Next is Account Derivation Rule (ADR)
Payables >> Setup >> Accounting Setups >> Sub Ledger Accounting Setups >> Accounting Methods Builder >> Journal Entry Setups >> Account Derivation Rules >> New
 After entering input source click on Conditions
 Next is Journal Line Definition (JLD)
Payables >> Setup >> Accounting Setups >> Sub Ledger Accounting Setups >> Accounting Methods Builder >> Methods and Definitions >> Journal Line Definitions >> Enter Event Class as Invoice and click on Find >> Click on Copy Definition
Next is Journal Line Definition (JLD)
Payables >> Setup >> Accounting Setups >> Sub Ledger Accounting Setups >> Accounting Methods Builder >> Methods and Definitions >> Journal Line Definitions >> Enter Event Class as Invoice and click on Find >> Click on Copy Definition
 For Journal line type – Liability, Basic, create new account segment as below
 Next is Application Accounting Definition (AAD) – Gives information about cash or accrual basis
Payables >> Setup >> Accounting Setups >> Sub Ledger Accounting Setups >> Accounting Methods Builder >> Methods and Definitions >> Application Accounting Definitions >> Enter Definition Code as ACCRUAL and Definition Name as Accrual Basis >> Find >> Copy
Next is Application Accounting Definition (AAD) – Gives information about cash or accrual basis
Payables >> Setup >> Accounting Setups >> Sub Ledger Accounting Setups >> Accounting Methods Builder >> Methods and Definitions >> Application Accounting Definitions >> Enter Definition Code as ACCRUAL and Definition Name as Accrual Basis >> Find >> Copy
 Under the Event Class – Invoice, delete the standard journal lines definition name Accrual, Invoices All >> Enter the Journal Line definition which we created earlier >> Save >> Validate >> Now the validation status will be updated to Valid
 Next is Subledger Accounting Methods
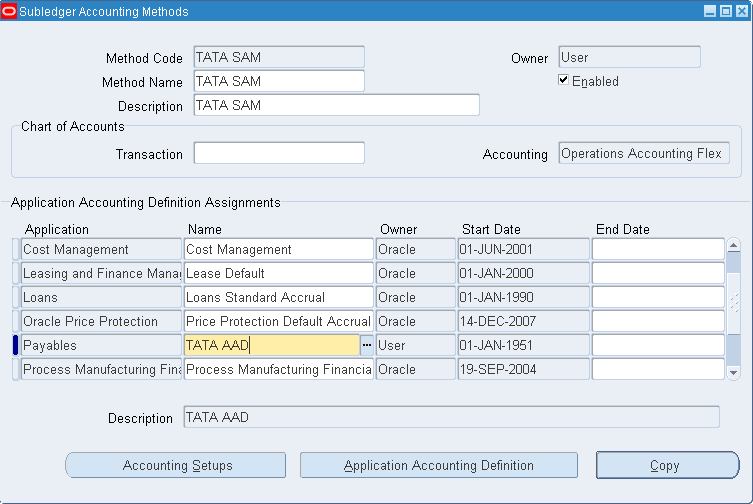
Payables >> Setup >> Accounting Setups >> Sub Ledger Accounting Setups >> Accounting Methods Builder >> Methods and Definitions >> Subledger Accounting Methods >> Enter Method Code as STANDARD_ACCRUAL >> Find >> Copy
Next is Subledger Accounting Methods
Payables >> Setup >> Accounting Setups >> Sub Ledger Accounting Setups >> Accounting Methods Builder >> Methods and Definitions >> Subledger Accounting Methods >> Enter Method Code as STANDARD_ACCRUAL >> Find >> Copy
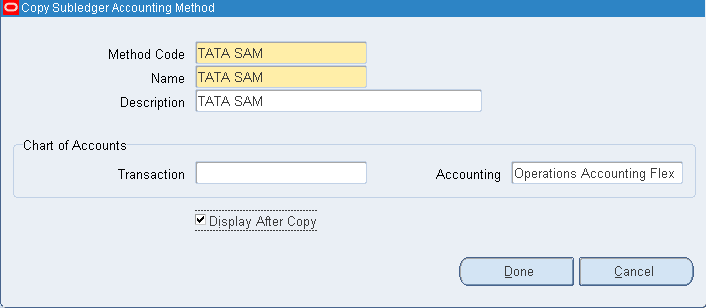 For Payables change name to TATA AAD >> Save
 Now create a AP Invoice as below
 Validate >> Create Accounting – Final >> Tools – View Accounting Events >> View Journal Entries >> Here the liability account is 2210
 Now transfer these entries to GL
Payables >> Other >> Requests >> Run Transfer Journal Entries to GL which auto triggers Journal Import Program and ensure the Journal Import Program successfully gets completed.
Now transfer these entries to GL
Payables >> Other >> Requests >> Run Transfer Journal Entries to GL which auto triggers Journal Import Program and ensure the Journal Import Program successfully gets completed.
 Now logout from your user and login to operations user to check the GL entries.
General ledger vision operations >> Journal >> Enter >> Enter batch name >> Find >> Here we get unposted journal. When we review this journal we have liability account as 2210.
Now go to Vision Operations Ledger >> Include SLA which we created earlier >> Finish
Now logout from your user and login to operations user to check the GL entries.
General ledger vision operations >> Journal >> Enter >> Enter batch name >> Find >> Here we get unposted journal. When we review this journal we have liability account as 2210.
Now go to Vision Operations Ledger >> Include SLA which we created earlier >> Finish
 Go to Payables >> Query for your supplier and change the supplier type to Contractor under organization tab
Now create an AP invoice to test. After validation and Create Accounting – Final >> Tools – View Accounting Events >> View Journal Entries >> Here the liability account is 2700 >> Run Transfer Journal Entries to GL >> Check the journal entry and we should have 2700 liability account.
This is all about Sub Ledger Accounting (SLA)
Note: For Standard type invoice we wont be able to give -ve amount and for debit memo we wont be able to give +ve amount. For mixed type invoice we can give + or – ve amount values. Example of Mixed type invoice: We know that we have entry of discount but don’t have info whether we provided discount or we got discount then such case we use Mixed type invoice.
Go to Payables >> Query for your supplier and change the supplier type to Contractor under organization tab
Now create an AP invoice to test. After validation and Create Accounting – Final >> Tools – View Accounting Events >> View Journal Entries >> Here the liability account is 2700 >> Run Transfer Journal Entries to GL >> Check the journal entry and we should have 2700 liability account.
This is all about Sub Ledger Accounting (SLA)
Note: For Standard type invoice we wont be able to give -ve amount and for debit memo we wont be able to give +ve amount. For mixed type invoice we can give + or – ve amount values. Example of Mixed type invoice: We know that we have entry of discount but don’t have info whether we provided discount or we got discount then such case we use Mixed type invoice.
16. Debit Memo & Credit Memo Debit Memo: Customer will create a debit memo with negative balance to return the items back to Supplier. Credit Memo: Supplier will create a credit memo.
1. Distribution Set Public Sector Payables Manager responsibility >> Invoice >> Distribution Sets >> Enter values as below
Here we have type as Full since we considered 90, 5 and 5.
The type will be Skeleton when we have values as 0, 0 and 0. Here supplier is not going to disclose the % of amount which he will charge.
2. Payment Terms Public Sector Payables Manager >> Setup >> Invoice >> Payment Terms We have two installments. 50% of amount has be paid by 30 days and rest 50% by 60th day
Also we can apply discounts. First 5% discount on or before 10th day. After 30th day, second payment we get 5% discount on or before 20th day.
Second 3% discount on or before 15th day
Third 2% discount on or before 20th day
3. Creation of Bank and Branches We require: 1. Bank details (Corporate office) 2. Bank branch details (Branch) 3. Accounting information (A/C details) 4. Cheque book information (Payment document) Setup >> Payment >> Banks and Bank Branches >> go to Banks menu >> Create
Save and Next >> Create >> Enter address details and Apply
Save and Next >> Create Contact
Click on Apply and Finish in next page
Now creation of bank branch. Go to Bank Branches menu >> Create
Continue
ABA = American Banking Association = Standard Chartered Bank/ Royal Bank of Scotland
SWIFT = Society for World wide inter financial telecommunication = Any branch having ATM or net banking facility
EDI = Electronic data interchange
EFT = Electronic funds transfer
Save and Next >> Create branch address and Apply
Save and Next >> Create Contact
Click Apply and Finish
Creation of Bank Account
Setup >> Payment >> Bank Accounts >> Create
Continue
Next
Save and Next
Save and Next
Click on Add Organization Access
Continue
Apply
Save and Next
Create Contact
Apply and Finish
Now cheque book (payment document creation)
Select the particular account and click on Manage Payment Documents
Create
Apply. With this we are done with Bank, Bank branch, Bank account and Cheque book creation
4. Creation of Vendor/ Supplier In Public Sector Payables Manager >> Suppliers >> Entry >> Create Supplier (or) In Purchasing Super User >> Supply Base >> Suppliers >> Create Supplier
 Apply. The supplier number and registry id gets auto generated.
 In the same page, Click on Address book which is at left list >> Create
 Continue >> Check Supplier Address for Vision Operations >> Apply
 In case we want to go with creation of more sites then go with Manage sites.
Now go to Quick Update
(FOB = Free on Board = The point where supplier responsibility ends)
Save and go to Key Payment Setups tab
Payment priority = 99 = Low priority; 01 = High priority payment has to be done
In case we want to go with creation of more sites then go with Manage sites.
Now go to Quick Update
(FOB = Free on Board = The point where supplier responsibility ends)
Save and go to Key Payment Setups tab
Payment priority = 99 = Low priority; 01 = High priority payment has to be done
 Save
Now go to Organization which is at left list
Save
Now go to Organization which is at left list
 Save
Go to Contact Directory >> Create >> Fill details and Apply
Save
Go to Contact Directory >> Create >> Fill details and Apply
 Go to Banking Details >> Create >> Enter details as below >> Apply >> Save
 Go to Receiving >> Enter details as below >> Save
 Go to Payment Details >> Select the Payment Method as Check >> Save
Go to Invoice Management >> Enter details >> Save
Go to Payment Details >> Select the Payment Method as Check >> Save
Go to Invoice Management >> Enter details >> Save
 With this the supplier creation completed.
For creation of PO, Receipt, Invoice and Invoice payment refer to P2P page.
Whenever we enter invoice and match with PO then no need to go with distribution set in invoice window.
Whenever we enter invoice and doesn’t match with PO then we need to opt distribution set in invoice window.
With this the supplier creation completed.
For creation of PO, Receipt, Invoice and Invoice payment refer to P2P page.
Whenever we enter invoice and match with PO then no need to go with distribution set in invoice window.
Whenever we enter invoice and doesn’t match with PO then we need to opt distribution set in invoice window.
5. Payables Invoice Types 1. Standard 2. Credit Memo 3. Debit Memo 4. Expense Report 5. Prepayment 6. Retainage Release 7. Transportation Invoices 8. Withholding Tax 9. Mixed
6. Create a Manual Invoice


 Go to Lines menu >> Enter amount as 25000 and click on Distributions
 System automatically generates based on distribution set.
 Close the window >> Actions…1 >> Validate >> Ok >> The status has to be validated. Here we have status as Needs Revalidation. Go to Actions…1 >> Enter below image details >> Ok

 In case still hold doesn’t get released and we have hold message as ‘Total of Invoice Lines does not equal Invoice Amount’ then modify the invoice amount = Total
 After validation >> Click Actions…1 >> Check Create Accounting with Final. The Accounted status is modified to Yes
 Go to Tools menu >> Click on View Accounting Events >> Click on View Journal Entries - Entered DR = Entered CR


7. Payment of Invoice We can pay either opting Scheduled Payments tab >> click on Pay…1 Or Click on Actions…1 >> check Pay in Full >> New payment window appears. We have three payment types 1. Manual – Transaction occurred outside of Oracle applications. Example issuance of cheque or net banking. Here user has to enter manual details. 2. Quick – Generation of payment using Oracle applications. Here we generate cheque through Oracle application 3. Refund – We doesn’t satisfy with the item provided by supplier and return the good. That case supplier provide refund amount/ cheque.


 We are paying the amount in two installments as below.
 Click on Actions…1 >> Create Accounting >> Final >> Ok >> The Accounting value has to be Processed
Go to Tools menu >> View Accounting Events >> View Journal Entries
Click on Actions…1 >> Create Accounting >> Final >> Ok >> The Accounting value has to be Processed
Go to Tools menu >> View Accounting Events >> View Journal Entries
 The amount paid has been updated.
 After making the payment we found some damage on item, that case the supplier has to refund the amount. That case supplier issues a debit memo to us.
Credit Memo – Customer has to PAY amount to Supplier.
Debit Memo – Customer has to GET amount from Supplier.
In AP we need to enter the amount in -ve value for both credit and debit memo.
After making the payment we found some damage on item, that case the supplier has to refund the amount. That case supplier issues a debit memo to us.
Credit Memo – Customer has to PAY amount to Supplier.
Debit Memo – Customer has to GET amount from Supplier.
In AP we need to enter the amount in -ve value for both credit and debit memo.
 We are asking our supplier to pay the amount immediately hence opted for Immediate Terms and change the Match Action to Invoice
 Click on Corrections button >> Enter the invoice number and click on Find >> Enter the refund amount and click on Correct
 Go to Actions…1 >> Validate >> Once validated check Pay in Full.
8. Recurring Invoice When we purchase same product, same quantity and same amount very often from supplier then we go with Recurring invoice. We can create invoices in advance. Say we purchase items on a monthly basis and all 12 invoices can be created on Jan. When we enter into particular month, open the invoice, validate and make the payment. Setup >> Calendar >> Special Calendar
Invoices >> Entry >> Recurring Invoices
 In Line Definition tab enter distribution name (Tata Distribution Set).
Click on Create Recurring Invoices >> Ok >> Save
Now go to invoice and search with REC% and you should be able to view all invoices with never validated status.
In Line Definition tab enter distribution name (Tata Distribution Set).
Click on Create Recurring Invoices >> Ok >> Save
Now go to invoice and search with REC% and you should be able to view all invoices with never validated status.
9. Pre-Payment to Supplier Payables responsibility >> Invoices >> Entry >> Invoices >> Select type as ‘Prepayment’
In lines tab >> Enter the Amount 50000 >> Save >> Go to Distributions and check the distributed amount >> Here the status will be Unvalidated.
Go to Actions…1 >> Validate >> Now the status will be Unpaid (Unpaid = Validated but not paid)
Go to Actions…1 >> Pay in Full >> This goes to Payment window where all details will be pre-defined >> Enter other mandatory details >> Save >> Actions…1 >> Check Create Accounting with Final status >> Ok >> The Accounting status has to be Processed from Unprocessed
Finally you should have below image with Accounted ‘Yes’ -- Though No here due to some issues… :(
Create a new invoice and apply the invoice amount against the pre-payment invoice. In Actions…1 tab use Apply/ Unapply Prepayment >> Apply the amount which you want to pay.
10. Interest Invoice Payables >> Setup >> Options >> Payables Options >> In Interest tab enable Allow Interest Invoices
Now go to Supplier’s page >> Invoice Management >> check Create Interest Invoice >> Save
Go to Setup >> Payment >> Interest Rates >> Enter % and effective dates
Create a Standard invoice with some previous date
Lines >> Enter amount 25,000 >> Distributions and check the distribution total >> Next go to Actions…1 and Validate >> Status will be Validated >> Again Actions…1 and Create Accounting with Final status >> Status will be Validated and Accounted will be Yes >> Actions…1 and Pay in Full >> Once we populate the Payment Date, the Payment Amount automatically triggers with interest amount >> Save
We will be having two records underneath describing the intrest amount and actual amount.
Go to Actions…1 >> Creating Accounting with Final status
Imp Note: We wont be able to apply interest specific to Supplier. The interest rate which is defined above will be considered for all Suppliers.
11. Pre-Payment to Employee First create an Employee Go to US HRMS Manager responsibility >> People >> Enter and Maintain >> New >> Enter details
Now go to Payables >> Suppliers >> Entry >> Create Supplier >> Enter details as below >> Apply >> Close Window
Go to Invoices >> Entry >> Invoices
Go to Lines tab and enter the amount as 10,000 >> Save >> Check in Distributions . Here the type should be Miscellaneous rather than item.
Next Validate >> Create Accounting >> Pay in Full for final settlement
12. Expense Report Setup >> Invoice >> Expense Report Templates >> Create new expense template
Now go to Invoices >> Entry >> Expense Reports >> Ensure Date = Pre-Payment Employee Invoice Date
We will be able to apply advances only when the pre-payment employee invoice has type as Temporary. If it is permanent, we wont be able to make any adjustments >> Check Apply Advances >> Enter pre-payment number (PREEMP01) under Number and pre-payment employee invoice amount 10,000 >> Under Template select the template which we created above >> Under Accounting tab enter the details as below.
Save >> Now we need run a program >> Other >> Requests >> Run >> Expense Report Export
After the successful completion of program go to Invoices >> Entry >> Invoices and query with Type as expense Report and trading partner as %Srikanth% here you will be able to find the balance amount which need to be paid to Employee >> Again query new invoice with type as %Pre% and trading partner as %Srikanth% >> Status will be fully applied. Means the prepayment amount of 10,000 has been applied to employee.
Pre-Payment type as Permanent — Say I took a building for lease for 10 years for an amount of 50 Lakhs. I paid the whole amount on day one. After 10 years I wont get this 50 Lakhs then we create permanent pre-payment type.
13. Tax Withholding Instead of paying tax amount which is quoted by Supplier, we hold the tax amount and pay to government directly. Very few suppliers accept this. Payables >> Setup >> Options >> Payables Options >> Enter OU as Vision Operations >> Withholding Tax tab >> Check Use Withholding Tax >> Under Apply Withholding Tax select At Invoice Validation Time (X) and under Create Withholding Invoice select At Invoice Validation Time. Here we are applying the withholding amount during creation of invoice itself.
Suppliers >> Entry >> Query for Supplier >> Organization tab >> Modify the Type from Supplier to Tax Authority >> Save >> Go to Tax Details tab >> Under Income Tax – Check Withholding Tax >> Under Supplier Sites – Check Withholding Tax >> Save
For withholding we need to create a separate calendar. Go to Setup >> Calendar >> Special Calendar >> Create Calendar as below
Now go to Setup >> Tax >> Codes >> Create as below. Here period limit signifies the max tax amount which we can hold without paying to supplier for a particular month. In our case its 50,000/-.
Now go to supplier and query for our supplier >> Tax Details tab >> Under Income Tax – Invoice Withholding Tax Group enter newly created ‘Withhold Tax’ and under Supplier Sites – Invoice Withholding Tax Group enter newly created ‘Withhold Tax’ >> Save
Now create an invoice to test the withhold tax scenario
Lines >> Enter amount as 10,000/- >> Distribution set
Now validate the invoice. Withhold of 5% applied since we selected the option above.
Under header level we get withheld amount as 500. Now create accounting the invoice. Accounted has to changed to Yes from No. Now pay in full which triggers payment window.
Save the form. Go to Actions and create accounting – final. Ensure the Accounting is modified to Processed.
Now verify the withholding invoice which gets created for an amount of 500. Query for invoice with Type as Withholding Tax and your trading partner. Here we get withholding invoice.
14. Integration of SLA with Payable 4th C – Accounting Convention = Sub Ledger Accounting (SLA) Query for invoice >> Tools – View Accounting Events >> View Journal Entries >> Here the Accounted Dr value should match Accounted Cr. The default liability account is 2210. Convention are of two types: 1. Cash Basis : As on when transaction took place. Immediate settlement. 2. Accrual Basis: Not immediate settlement. Pay later. Say we have three Supplier Types. 1) Supplier 2) Government 3) Contractor and for all these supplier types we have liability account as 2210. Now for each supplier we would like to have different liability account like for Supplier its 2210, for Government its 2220 and for Contractor its 2230 Assigning different (liability) account to different suppliers is termed as SLA. Payables >> Others >> Requests >> Run >> Transfer Journal Entries to GL
The ‘Transfer Journal Entries to GL’ program will move all the entries to GL. This program auto triggers ‘Journal Import Program’. Please ensure that ‘Journal Import Program’ gets successfully completed.
Now go to General Ledger Super User >> Journals >> Enter >> Query for batch as ‘Tata JE Batch’ which was created above >> Find >> Here we find all entries with Unposted status >> Review/ Open any Journal. Here we wont find lines/ account entries >> To check those entries log out from your user and login to Operations user >> General Ledger, Vision Operations (USA) >> Journals >> Enter Query for batch as ‘Tata JE Batch’ >> Open/ Review any journal >> Review the entries >> These entries are posted from Payables from GL
Open default ledger – GL >> Setup >> Financials >> Accounting Setup Manager >> Accounting Setups >> Query for Vision Operations (USA) >> Update Accounting Options >> Under Setup Step open *Vision Operations (USA) >> Click on Update >> Under Subledger Accounting we have * Subledger Accounting Method as Standard Accrual >> The Standard Accrual is default SLA provided by Oracle
15. SLA process for Payables Manager SLA is a rule based accounting engine that defines how journals entries are generated in sub-ledger transactions in Oracle sub-ledger applications. Before we get into SLA we need to know few of the basic concepts like event types, event class etc. Event Class – Classifies transaction types for accounting rule purposes. Ex in payables, following are possible event classes: Invoice, Debit Memo, Prepayments, Payments and Refunds. Event Type – For each transaction type, defines possible actions with accounting significance. Ex in payables, following are possible event classes. AP Invoice events – Validation, Adjustment and Cancellation. Similarly we will have event types for other event classes. Step1 : Desc: Define Mapping Set Navigation: Payables >> Setup >> Accounting Setups >> Sub Ledger Accounting Setups >> Accounting Methods Builder >> Journal Entry Setups >> Mapping Sets >> New >> As below if the Supplier type is Contractor then instead of picking 2210 as liability account, this picks 2700
Next is Account Derivation Rule (ADR)
Payables >> Setup >> Accounting Setups >> Sub Ledger Accounting Setups >> Accounting Methods Builder >> Journal Entry Setups >> Account Derivation Rules >> New
After entering input source click on Conditions
Next is Journal Line Definition (JLD)
Payables >> Setup >> Accounting Setups >> Sub Ledger Accounting Setups >> Accounting Methods Builder >> Methods and Definitions >> Journal Line Definitions >> Enter Event Class as Invoice and click on Find >> Click on Copy Definition
For Journal line type – Liability, Basic, create new account segment as below
Next is Application Accounting Definition (AAD) – Gives information about cash or accrual basis
Payables >> Setup >> Accounting Setups >> Sub Ledger Accounting Setups >> Accounting Methods Builder >> Methods and Definitions >> Application Accounting Definitions >> Enter Definition Code as ACCRUAL and Definition Name as Accrual Basis >> Find >> Copy
Under the Event Class – Invoice, delete the standard journal lines definition name Accrual, Invoices All >> Enter the Journal Line definition which we created earlier >> Save >> Validate >> Now the validation status will be updated to Valid
Next is Subledger Accounting Methods
Payables >> Setup >> Accounting Setups >> Sub Ledger Accounting Setups >> Accounting Methods Builder >> Methods and Definitions >> Subledger Accounting Methods >> Enter Method Code as STANDARD_ACCRUAL >> Find >> Copy
For Payables change name to TATA AAD >> Save
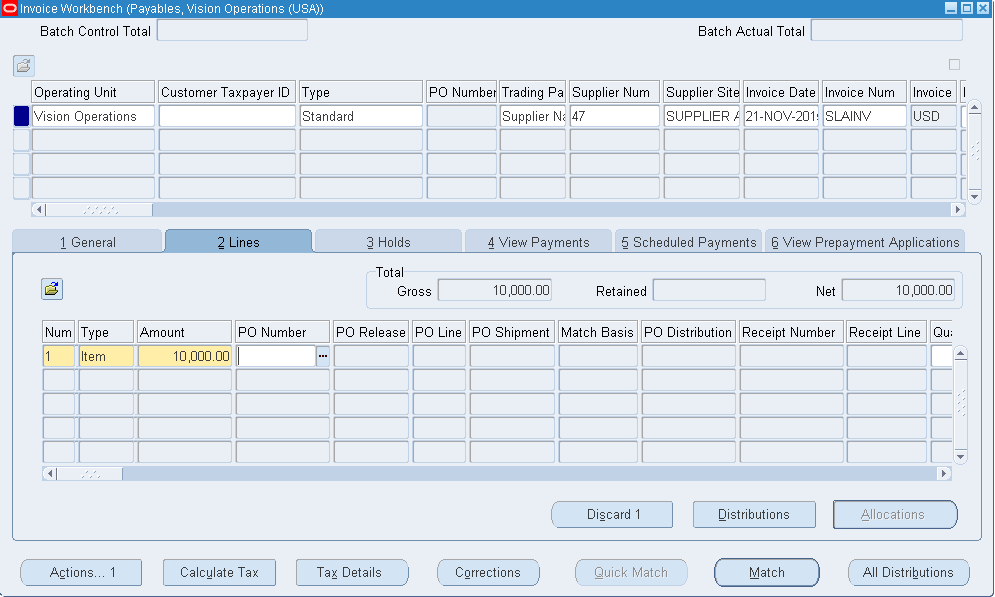
Now create a AP Invoice as below
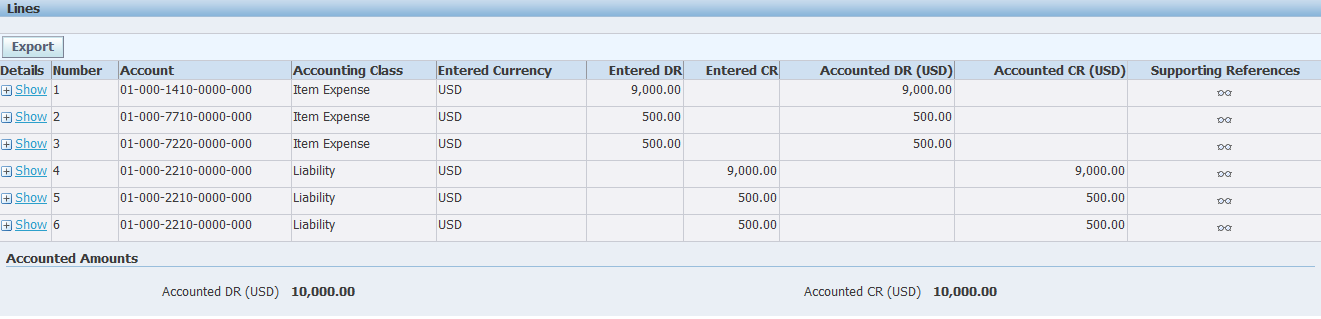
Validate >> Create Accounting – Final >> Tools – View Accounting Events >> View Journal Entries >> Here the liability account is 2210
Now transfer these entries to GL
Payables >> Other >> Requests >> Run Transfer Journal Entries to GL which auto triggers Journal Import Program and ensure the Journal Import Program successfully gets completed.
Now logout from your user and login to operations user to check the GL entries.
General ledger vision operations >> Journal >> Enter >> Enter batch name >> Find >> Here we get unposted journal. When we review this journal we have liability account as 2210.
Now go to Vision Operations Ledger >> Include SLA which we created earlier >> Finish
Go to Payables >> Query for your supplier and change the supplier type to Contractor under organization tab
Now create an AP invoice to test. After validation and Create Accounting – Final >> Tools – View Accounting Events >> View Journal Entries >> Here the liability account is 2700 >> Run Transfer Journal Entries to GL >> Check the journal entry and we should have 2700 liability account.
This is all about Sub Ledger Accounting (SLA)
Note: For Standard type invoice we wont be able to give -ve amount and for debit memo we wont be able to give +ve amount. For mixed type invoice we can give + or – ve amount values. Example of Mixed type invoice: We know that we have entry of discount but don’t have info whether we provided discount or we got discount then such case we use Mixed type invoice.
16. Debit Memo & Credit Memo Debit Memo: Customer will create a debit memo with negative balance to return the items back to Supplier. Credit Memo: Supplier will create a credit memo.