Fusion General Ledger
Last updated: 2/1/2026
Fusion GL Configurations
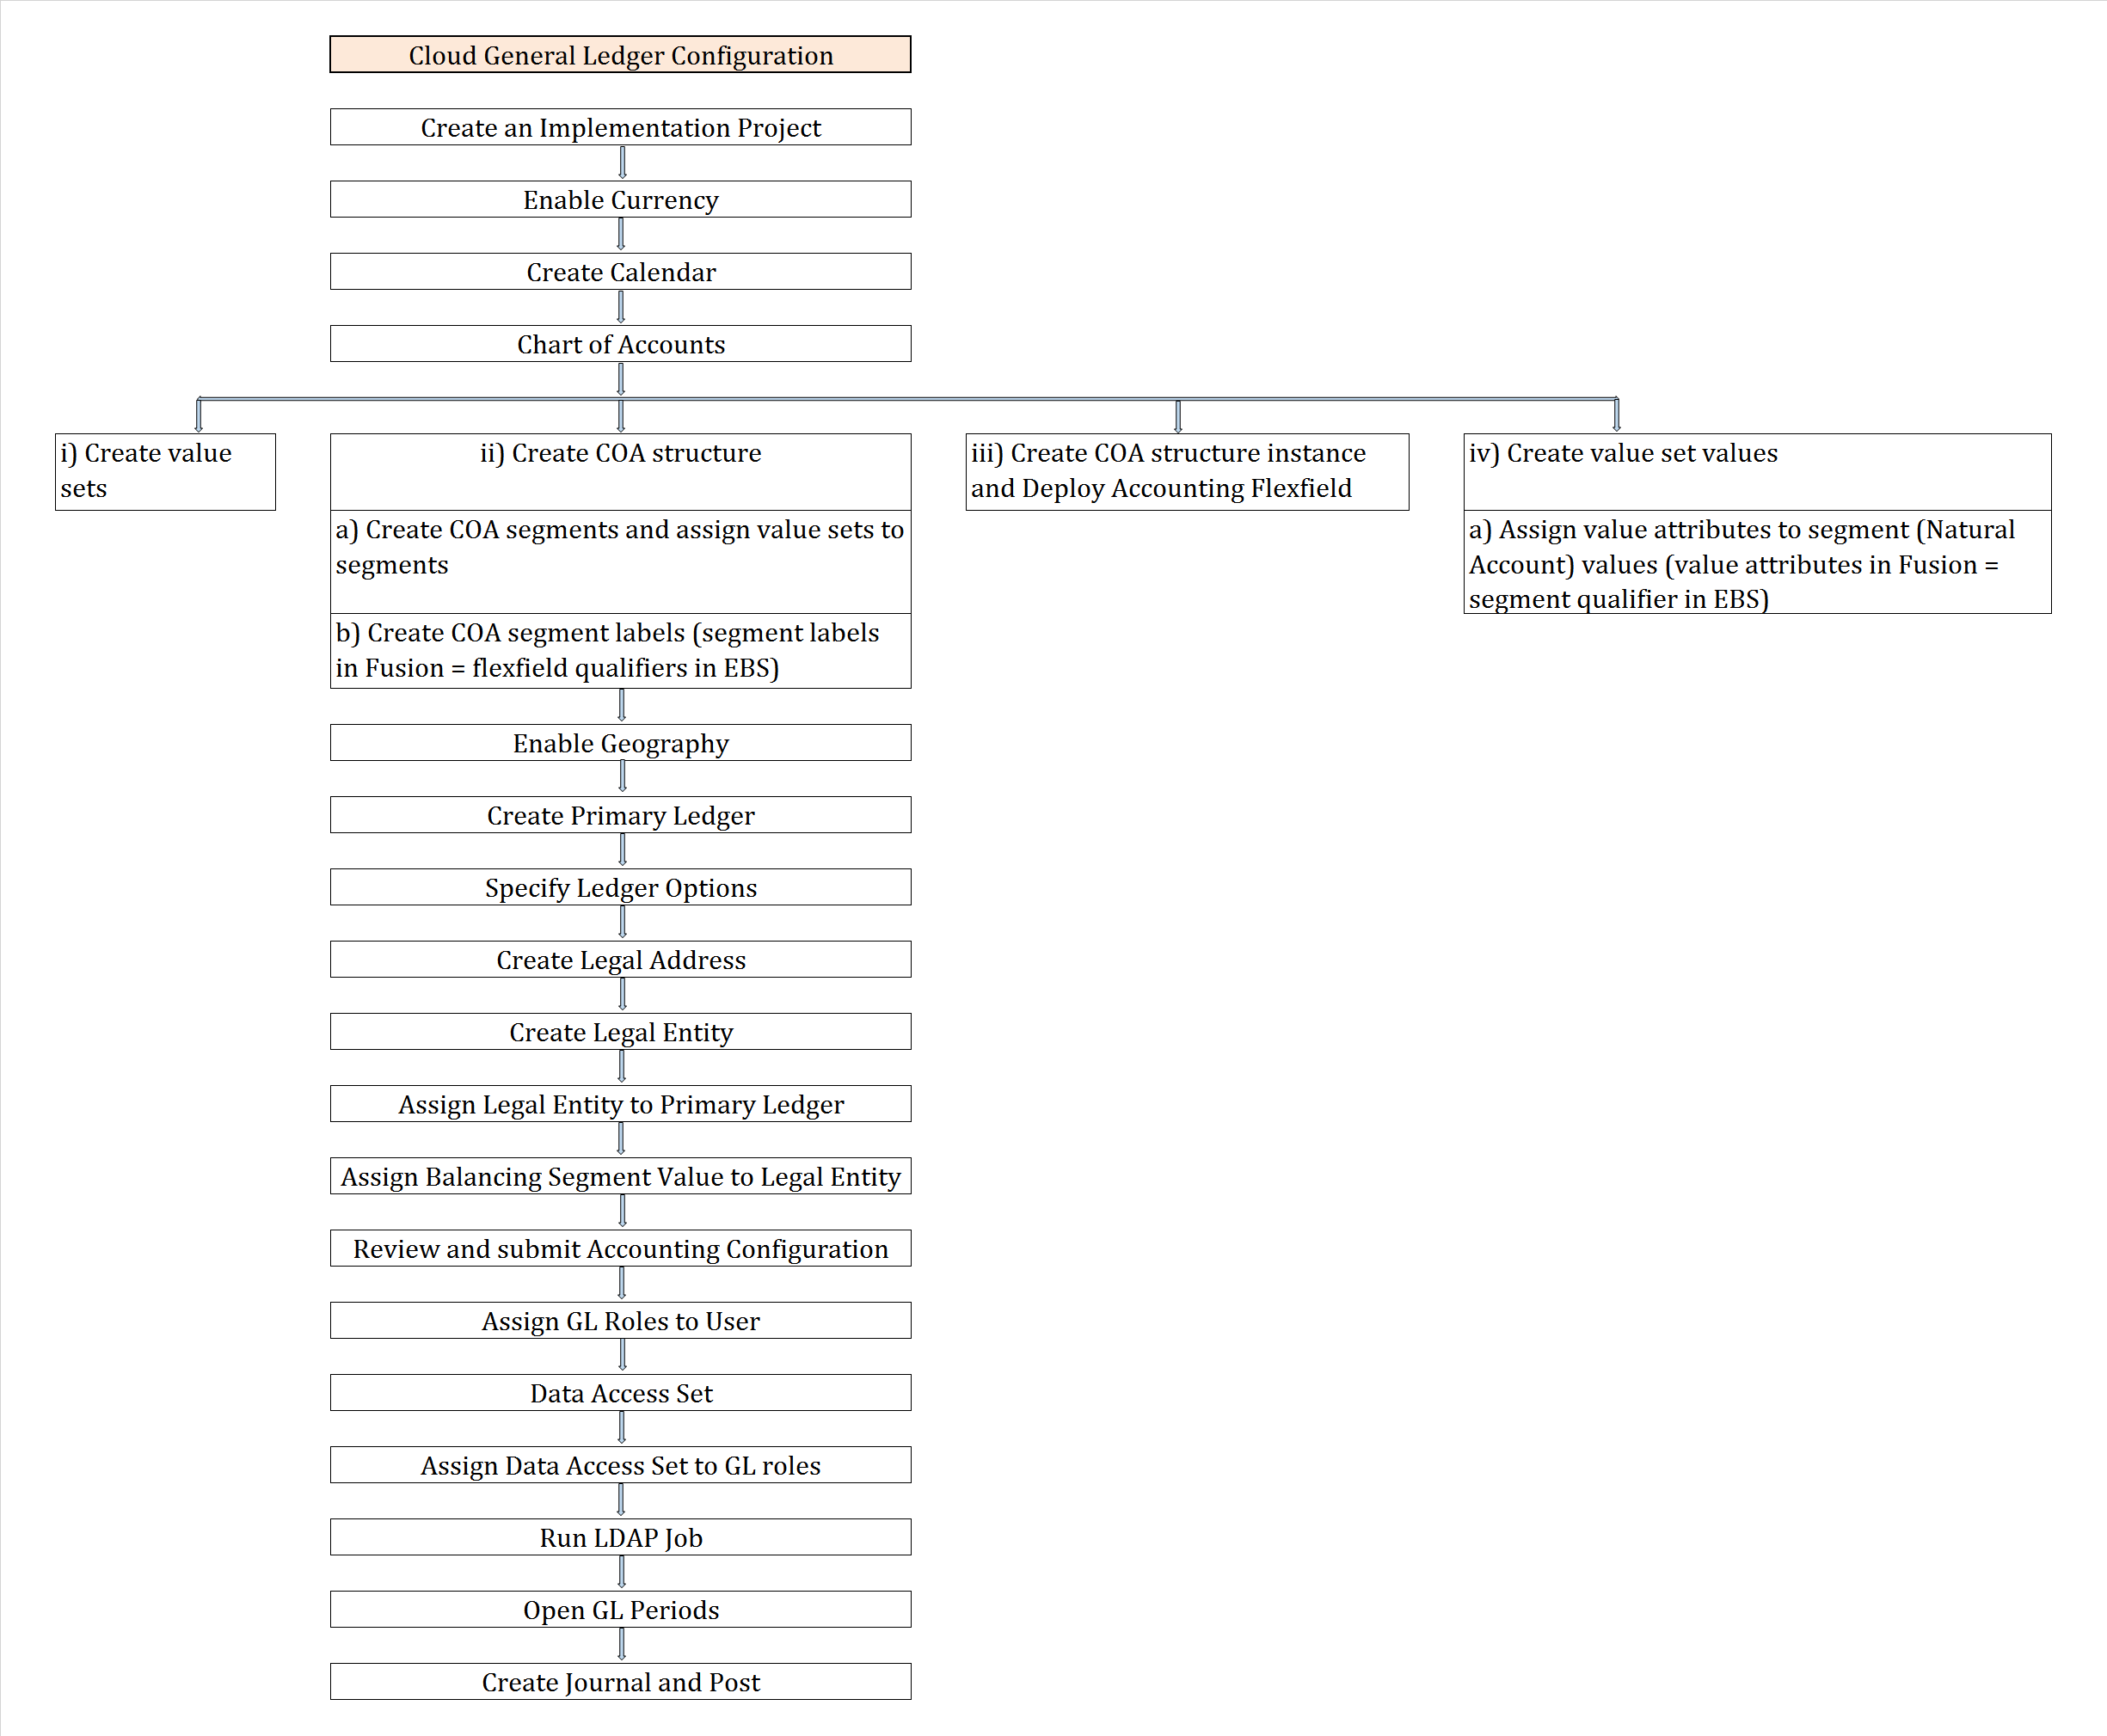 1. Create Implementation Project by selecting Offerings/ Options
2. Enable Geographies
3. Create Accounting Calendar
4. Currencies
5. Chart of Accounts (COA)
i) Create value sets
ii) Create COA structure
a) Create COA segments and assign value sets to segments
b) Create COA segment labels (segment labels in Fusion = flexfield qualifiers in EBS)
iii) Create COA structure instance and Deploy Accounting Flexfield
iv) Create value set values
a) Assign value attributes to segment (Natural Account) values (value attributes in Fusion = segment qualifier in EBS)
6. Create 'Primary Ledger'
7. Specify 'Ledger Options'
8. Create 'Legal Address'
9. Create 'Legal Entity'
10. Assign 'Legal Entity' to 'Primary Ledger'
11. Assign 'Balancing Segment Values' to 'Legal Entity'
12. Review and submit 'Accounting Configuration'
13. Assign GL Roles to User
14. Assign 'Data Access Set' to GL roles
15. Run LDAP Job
16. Open GL Periods
17. Create Journal and Post
18. Rapid Implementation
19. Foreign Currency Journals creation
20. Reverse Journals
21. Data Access Set
22. Cross Validation Rules
23. Security Rules
24. Create Ledger Set
25. Creation of Reporting Ledger
26. Creation of Secondary Ledger
27. Auto Posting
28. Auto Reversal
29. Create Budget
30. Journal Approval
31. 1z0-960 dumps
1. Create Implementation Project by selecting Offerings/ Options
2. Enable Geographies
3. Create Accounting Calendar
4. Currencies
5. Chart of Accounts (COA)
i) Create value sets
ii) Create COA structure
a) Create COA segments and assign value sets to segments
b) Create COA segment labels (segment labels in Fusion = flexfield qualifiers in EBS)
iii) Create COA structure instance and Deploy Accounting Flexfield
iv) Create value set values
a) Assign value attributes to segment (Natural Account) values (value attributes in Fusion = segment qualifier in EBS)
6. Create 'Primary Ledger'
7. Specify 'Ledger Options'
8. Create 'Legal Address'
9. Create 'Legal Entity'
10. Assign 'Legal Entity' to 'Primary Ledger'
11. Assign 'Balancing Segment Values' to 'Legal Entity'
12. Review and submit 'Accounting Configuration'
13. Assign GL Roles to User
14. Assign 'Data Access Set' to GL roles
15. Run LDAP Job
16. Open GL Periods
17. Create Journal and Post
18. Rapid Implementation
19. Foreign Currency Journals creation
20. Reverse Journals
21. Data Access Set
22. Cross Validation Rules
23. Security Rules
24. Create Ledger Set
25. Creation of Reporting Ledger
26. Creation of Secondary Ledger
27. Auto Posting
28. Auto Reversal
29. Create Budget
30. Journal Approval
31. 1z0-960 dumps
1. 'Implementation Project' creation Navigation: User Name >> Setup and Maintenance >> Tasks >> Manage Implementation Projects >> Click on create (+) icon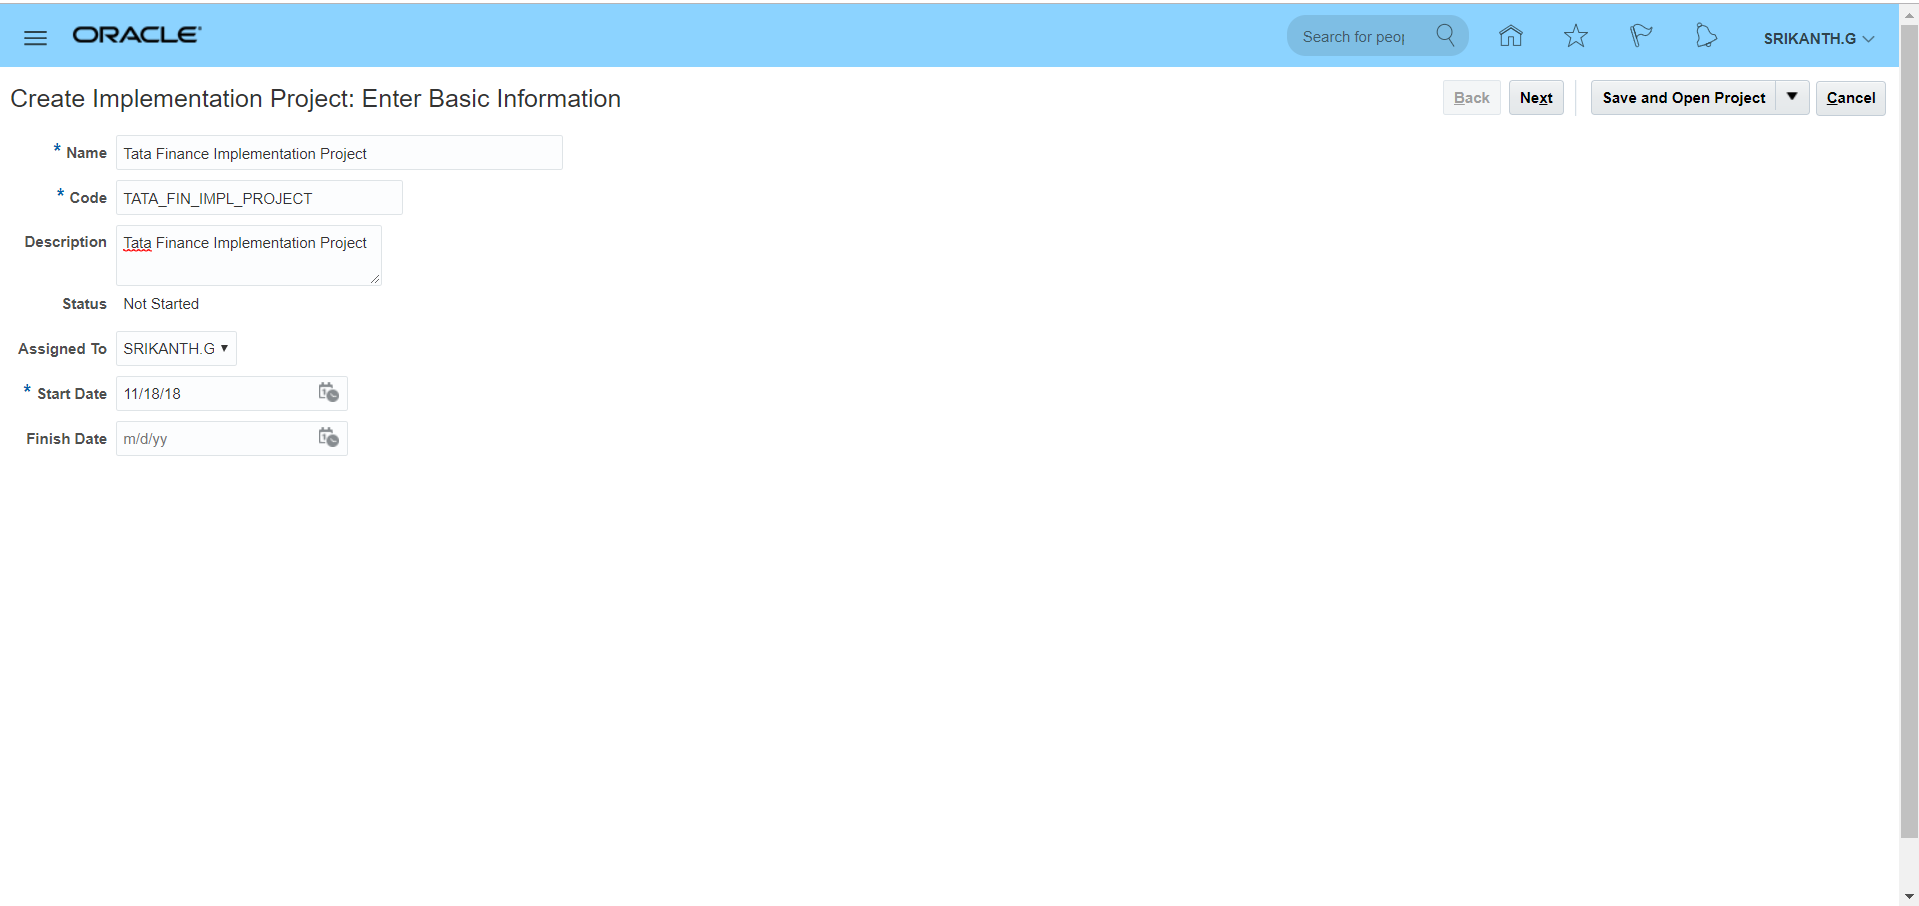 **One project will be assigned to only one user. The offerings and options within the project can be assigned to multiple users.
Next >> Check 'Financials' offerings and select all options >> Also check 'Procurement' offerings and select all options >> Save and Open Project
**One project will be assigned to only one user. The offerings and options within the project can be assigned to multiple users.
Next >> Check 'Financials' offerings and select all options >> Also check 'Procurement' offerings and select all options >> Save and Open Project
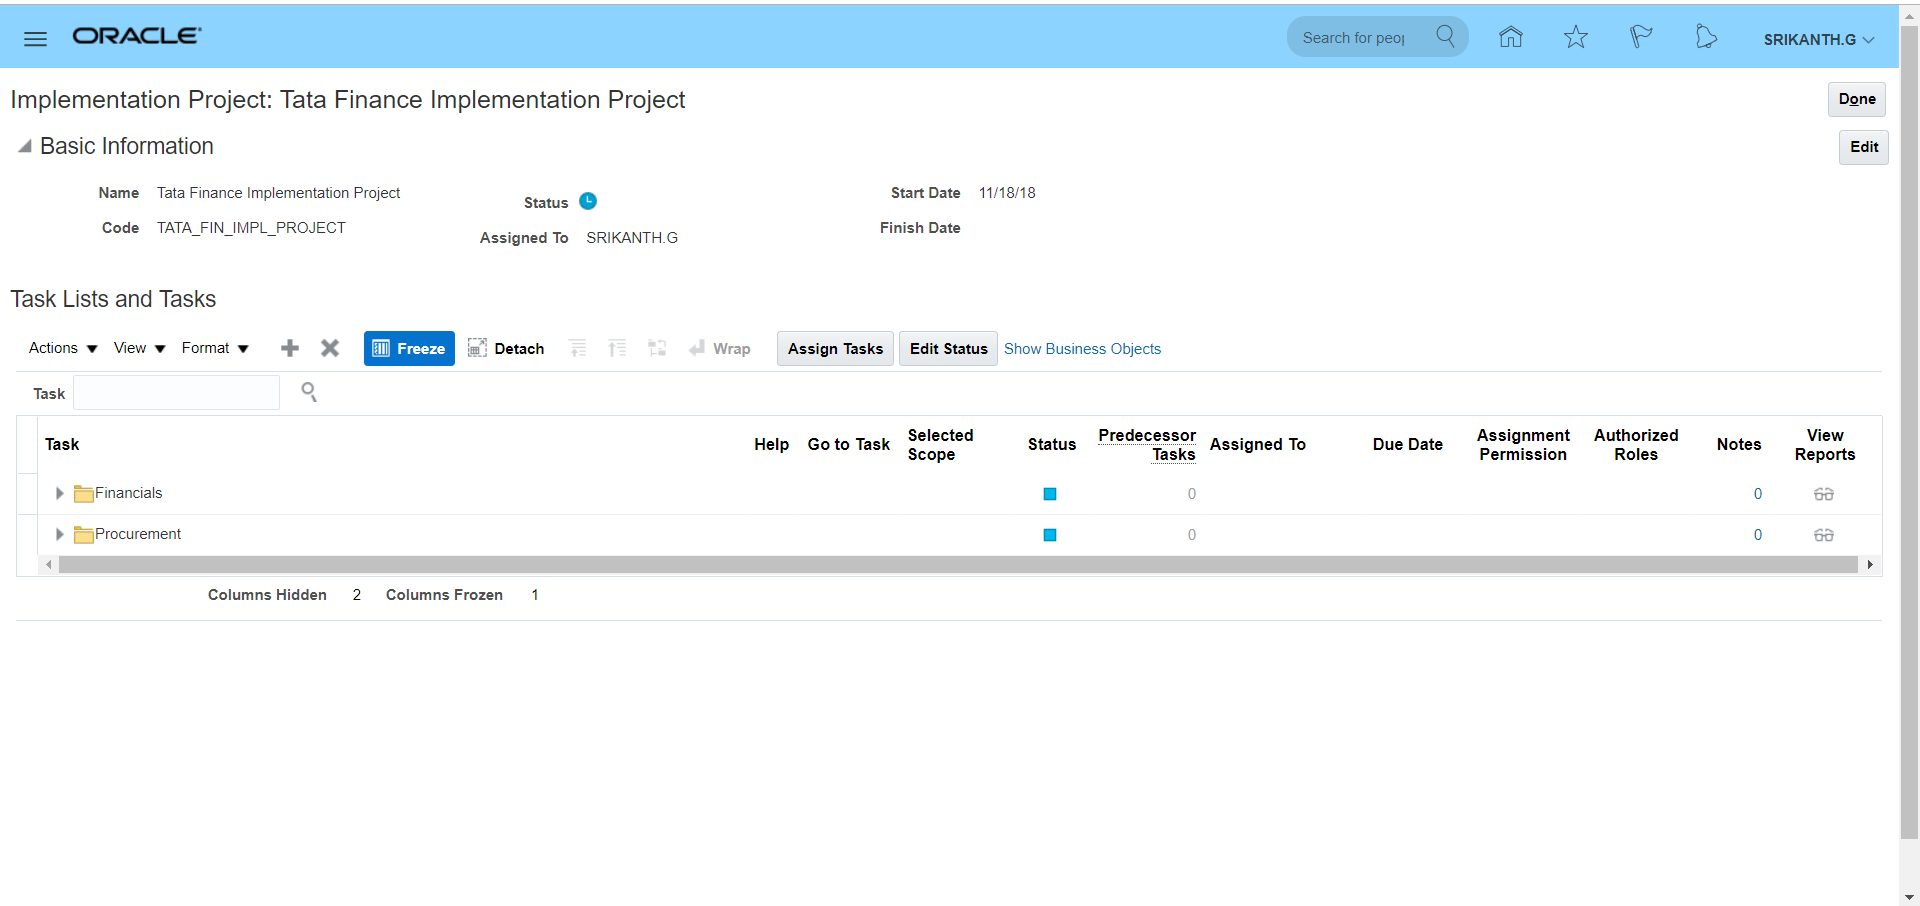 System automatically creates 'Task Lists and Tasks' (List of setups).
We can change status from 'Not Started' to 'In Progress' click on 'Edit' and change status accordingly.
Different statuses at 'Task Lists and Tasks' level: Not Started, In Progress, Completed, Execution Frozen, Completed with Errors.
System automatically creates 'Task Lists and Tasks' (List of setups).
We can change status from 'Not Started' to 'In Progress' click on 'Edit' and change status accordingly.
Different statuses at 'Task Lists and Tasks' level: Not Started, In Progress, Completed, Execution Frozen, Completed with Errors.
2. Geographies Search for task 'Manage Geographies' in implementation project (Tata Finance Implementation Project).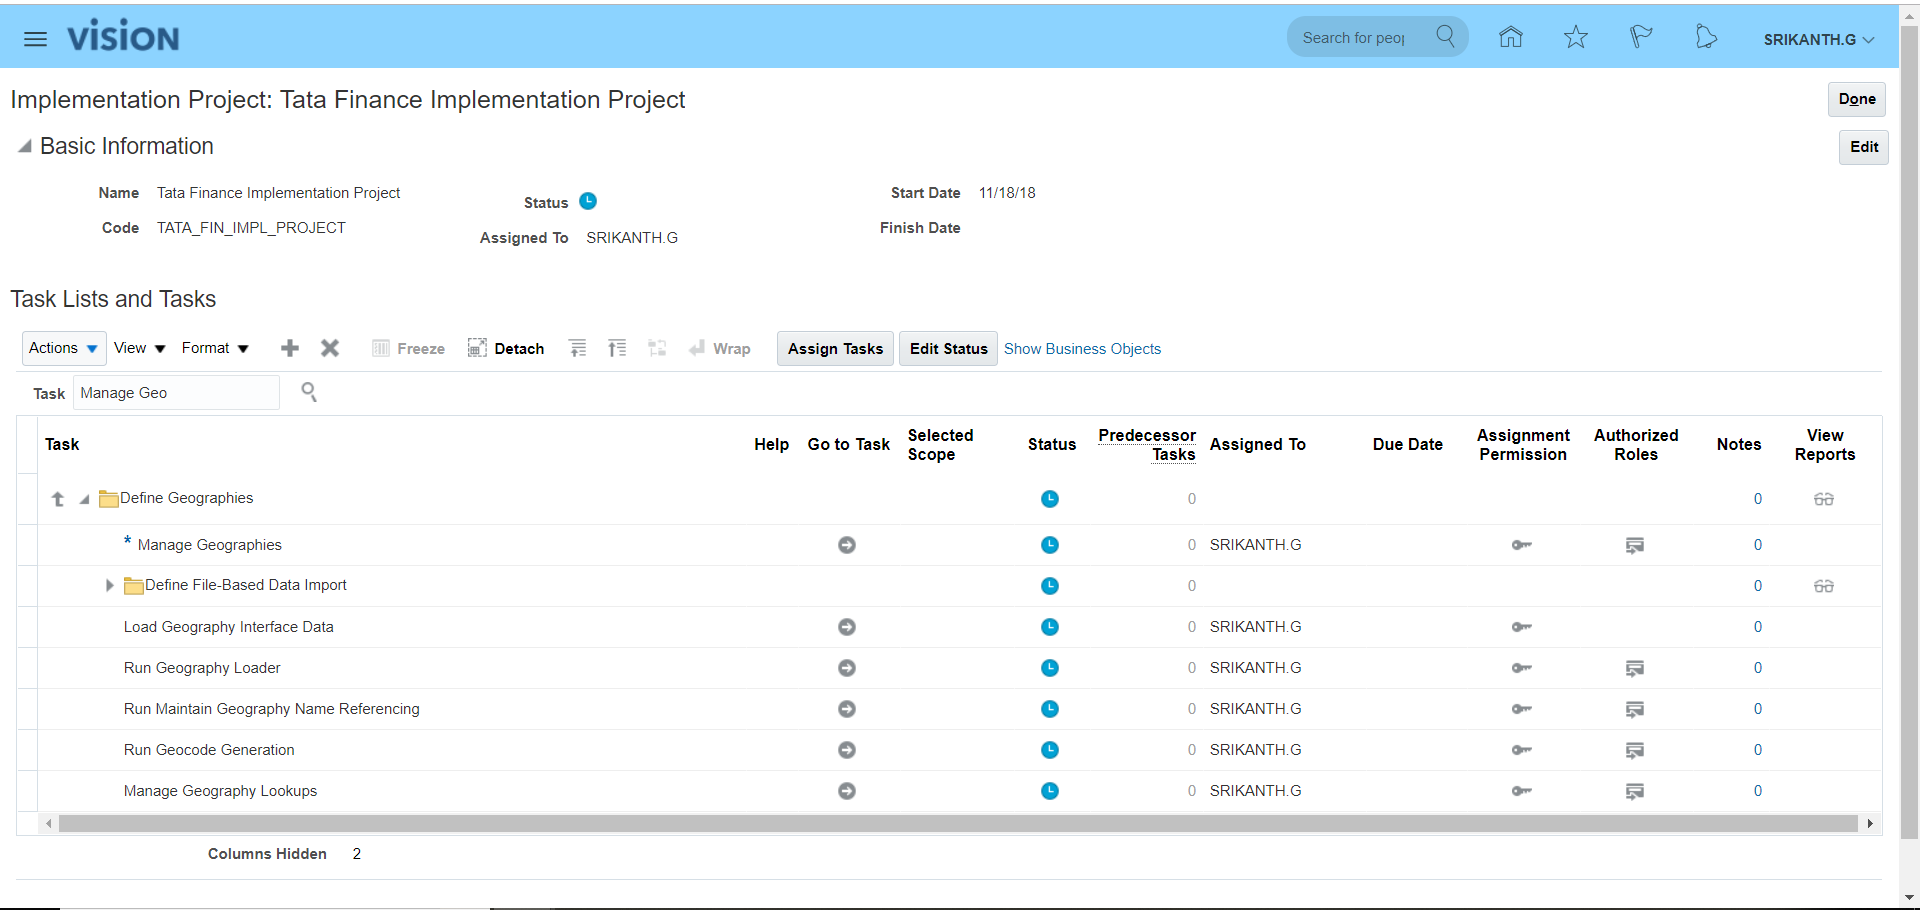 Click on 'Go to Task' >> Search for Country Code >> Here for GB all the validations are completed.
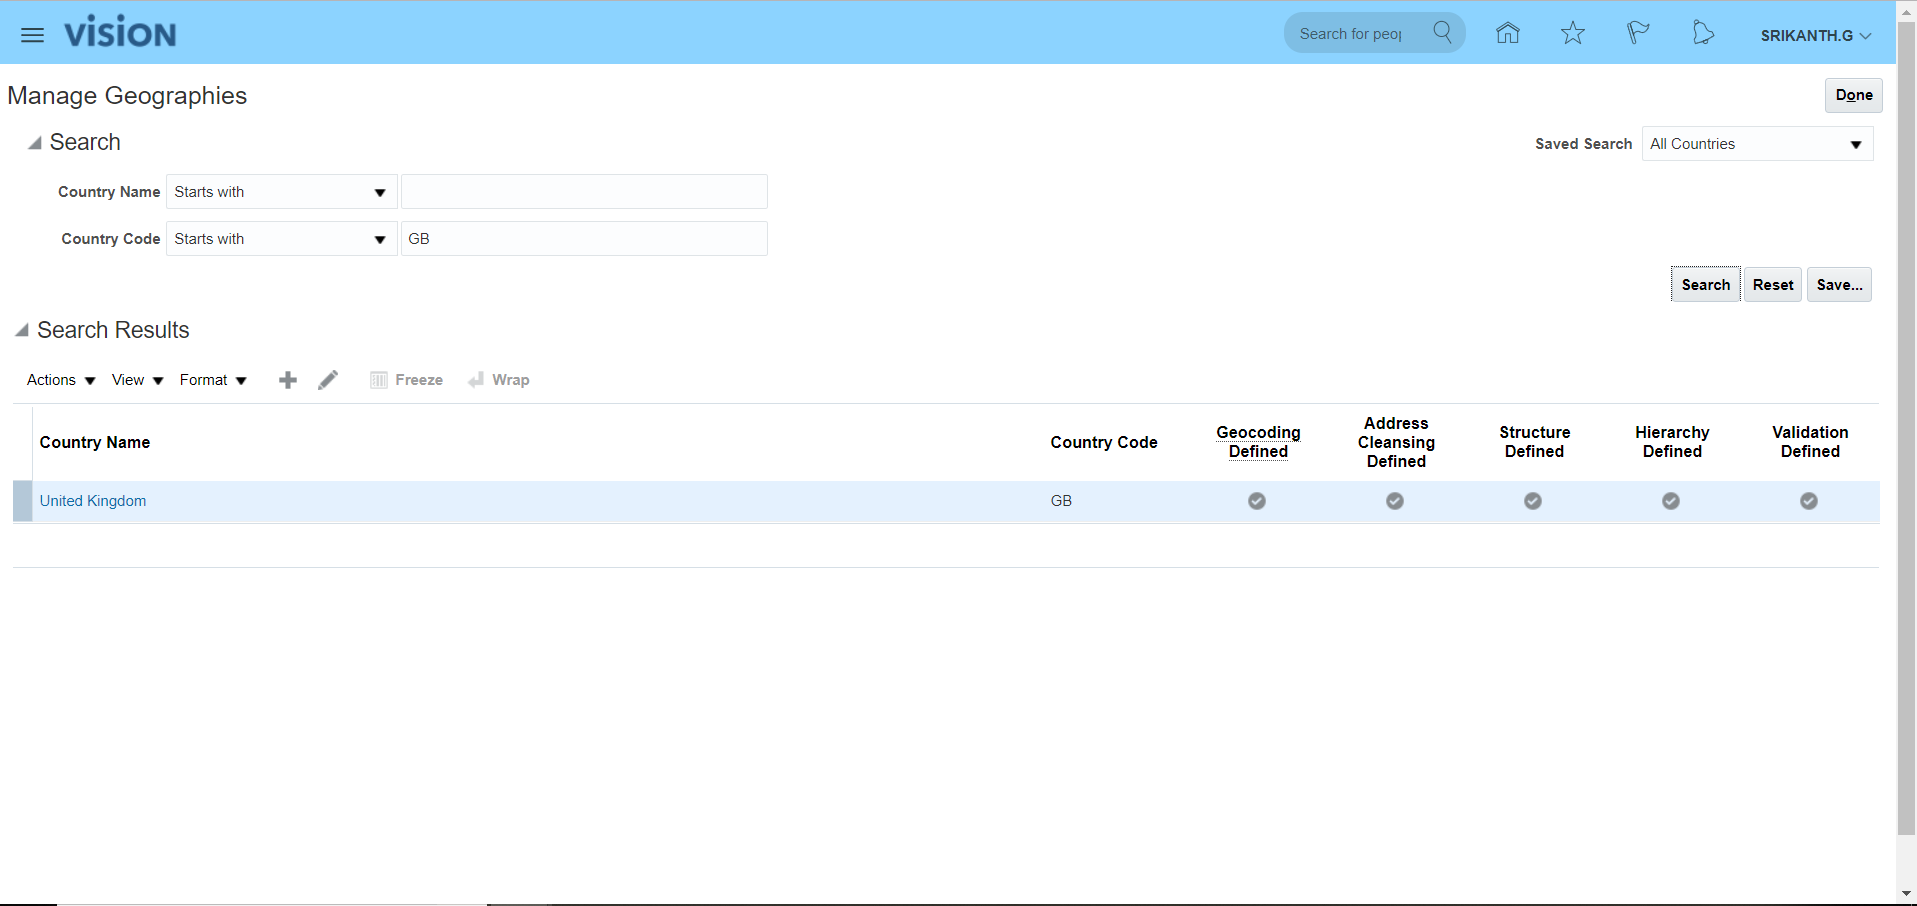 Here 'Structure Defined', 'Hierarchy Defined' and 'Validation Defined' are important tasks. The 'Geography Type' which is defined in 'Structure Defined' reflects in 'Hierarchy Defined'.
In case 'Geocoding Defined' is disabled then enable 'Geocoding Defined' and 'Address Cleansing Defined. Later go to Actions and click on 'Import Nokia Data' (R13 old name) or 'Import Geography Data' (R13 new name). System will automatically upload the required Geography data. Few countries do not have this option then we have to complete these steps manually.
Here 'Structure Defined', 'Hierarchy Defined' and 'Validation Defined' are important tasks. The 'Geography Type' which is defined in 'Structure Defined' reflects in 'Hierarchy Defined'.
In case 'Geocoding Defined' is disabled then enable 'Geocoding Defined' and 'Address Cleansing Defined. Later go to Actions and click on 'Import Nokia Data' (R13 old name) or 'Import Geography Data' (R13 new name). System will automatically upload the required Geography data. Few countries do not have this option then we have to complete these steps manually.
3. Accounting Calendar Navigation: UserName >> Setup and Maintenance >> Tasks >> Manage Implementation Projects >> Search for your implementation project - Tata Finance Implementation Project >>Search for task 'Manage Accounting Calendars' (Select Financials offerings path)>> Go to Task >> Click on create icon >> Enter details as below >> Next >> Save and Close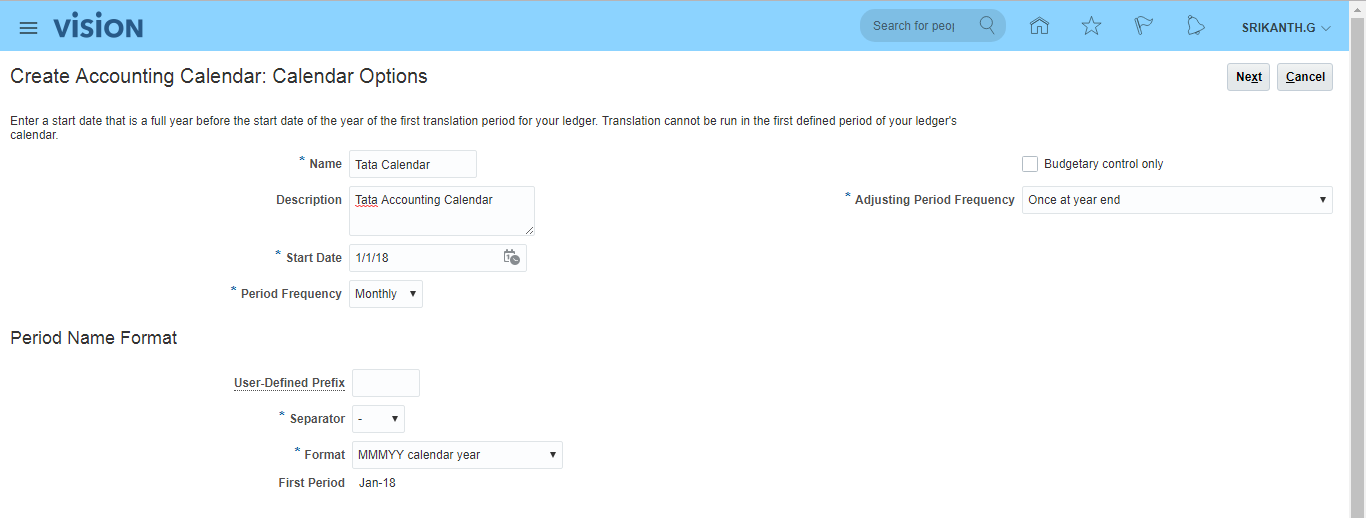 **In EBS, we used to have same accounting calendar for 'Budgetary Control' whereas in Fusion we can have another calendar for 'Budgetary Control' (enable check box).
Next >> Just go through Period Details >> Save and Close.
To open next year period simply click on 'Add Year'.
**In EBS, we used to have same accounting calendar for 'Budgetary Control' whereas in Fusion we can have another calendar for 'Budgetary Control' (enable check box).
Next >> Just go through Period Details >> Save and Close.
To open next year period simply click on 'Add Year'.
4. Currencies In Fusion all the currencies are enabled by default. Navigation: UserName >> Setup and Maintenance >> Tasks >> Manage Implementation Projects >> Search for your implementation project - Tata Finance Implementation Project >>Search for task 'Manage Currencies'. Most of the standard currencies will be enabled by default.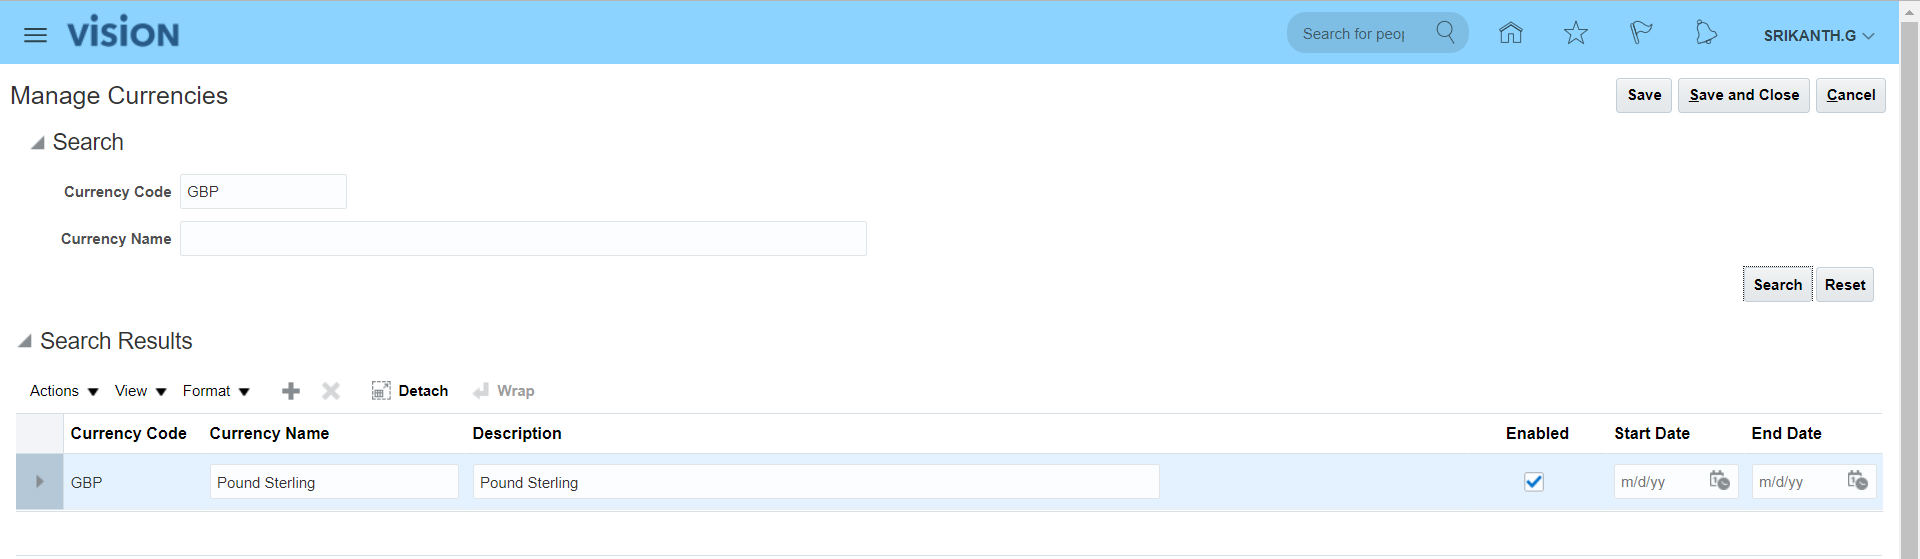
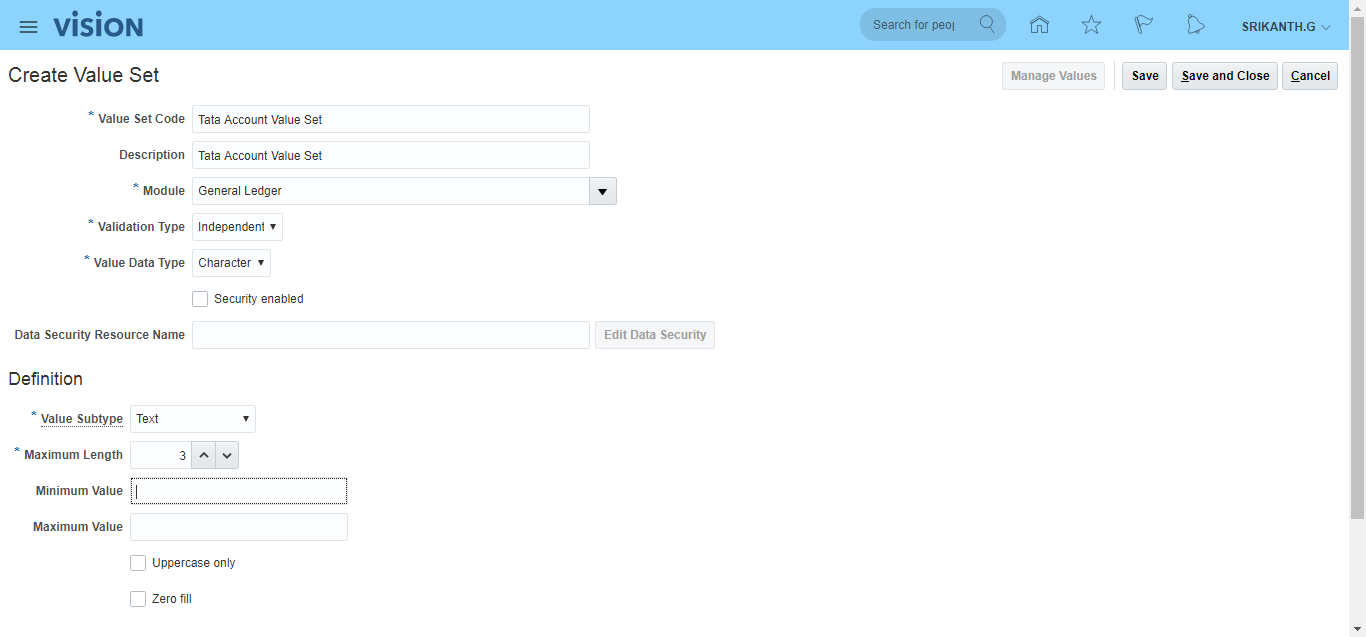
5. Chart of Accounts (COA) i) Create value sets Navigation: UserName >> Setup and Maintenance >> Tasks >> Manage Implementation Projects >> Search for your implementation project - Tata Finance Implementation Project >>Search for task 'Manage Chart of Accounts Value Sets' >> Go to Task >> Click on create (+) icon. **The pre-defined value sets provided by Oracle as 'Corporate Company', 'Corporate Account' and so on.... Lets create Company, Department and Account value set

ii) Create COA structure a) Create COA segments and assign value sets to segments b) Create COA segment labels (segment labels in Fusion = flexfield qualifiers in EBS). Flexfield Qualifier = Defines behavior of each segment. Search for task 'Manage Chart of Accounts Structures' >> Go to Task >> Search Key Flexfield Name with 'Accounting Flexfield' >> Click on 'Manage Structures' >> Click on Create icon (+).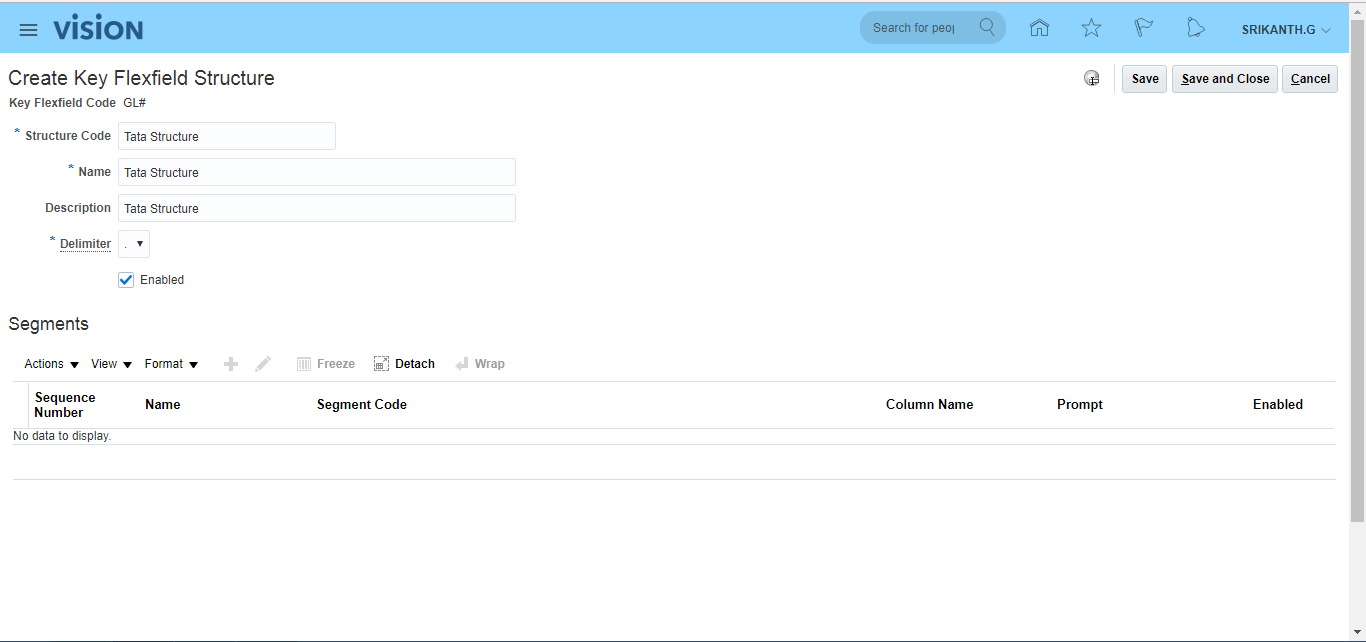 After entering above details click on save to enter segment details.

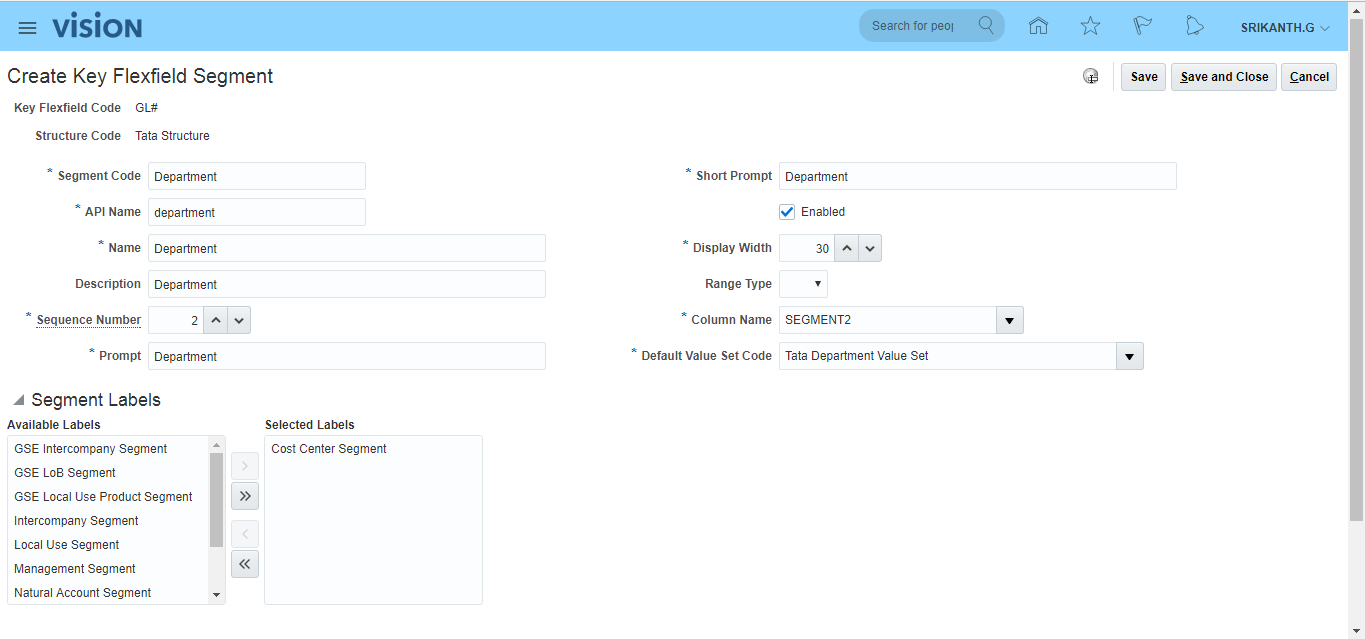
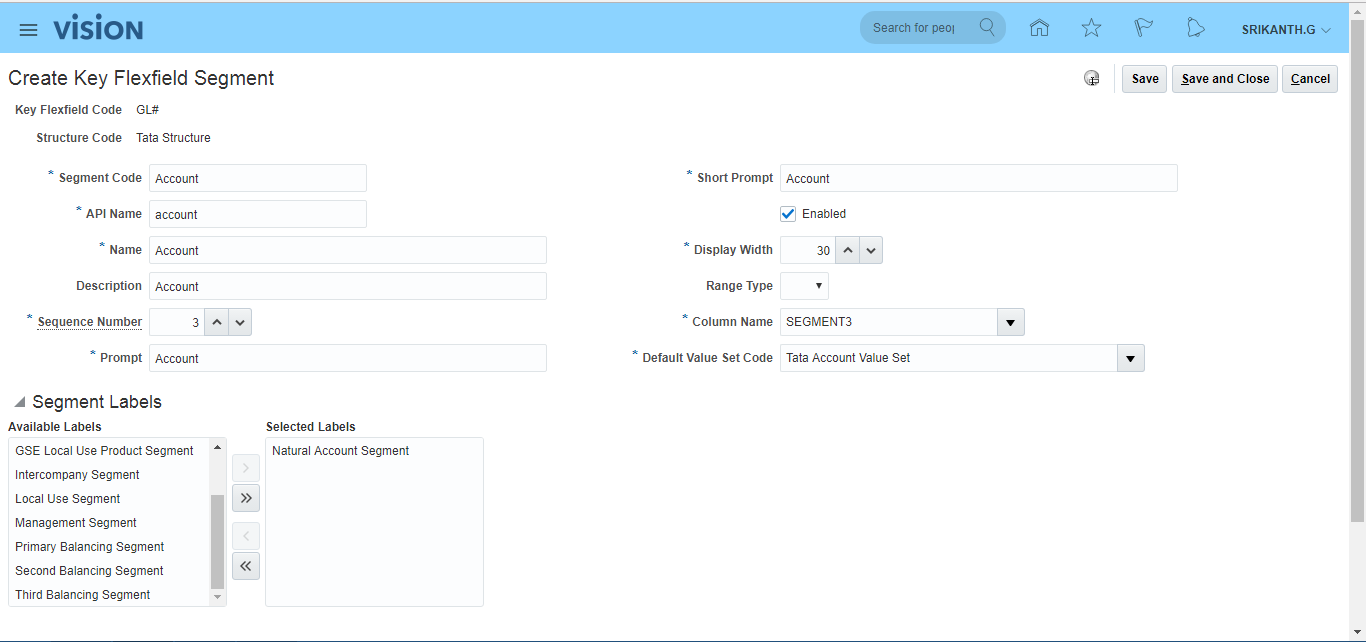
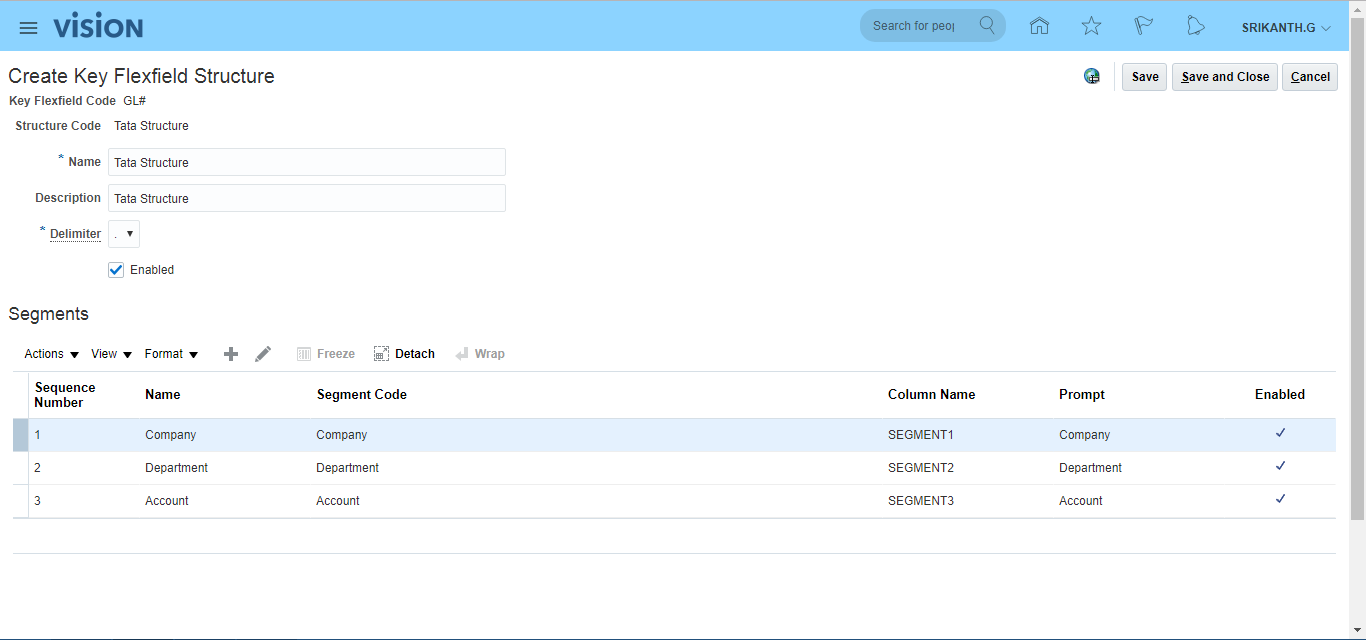 Save and Close
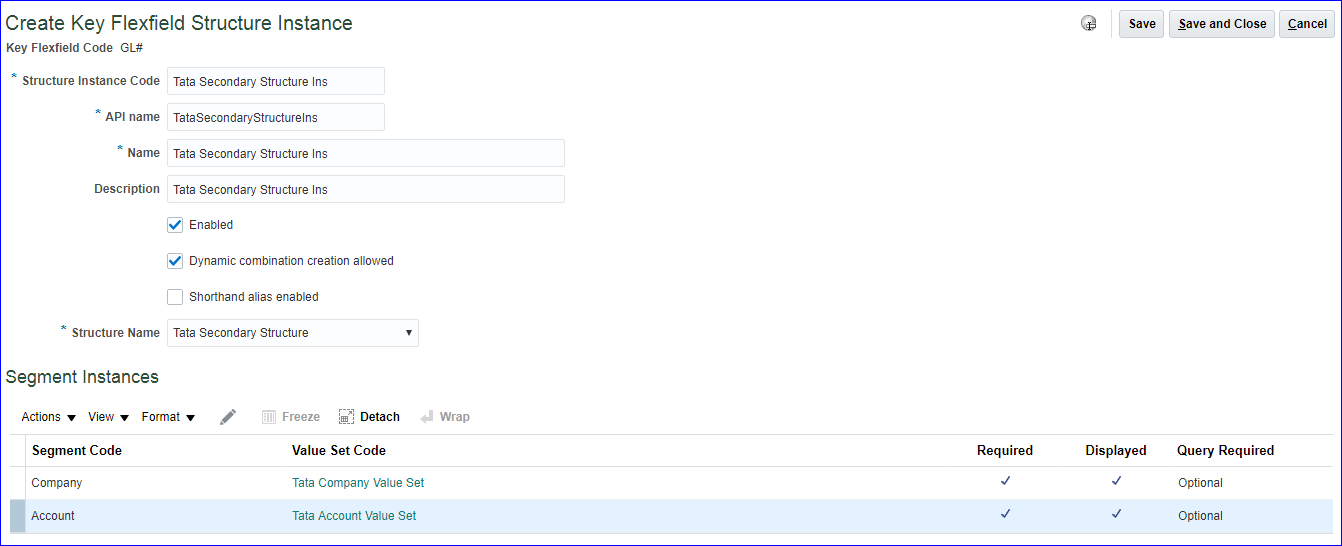
iii) Create COA structure instance and Deploy Accounting Flexfield Search for task 'Manage Chart of Accounts Structure Instances' >> Search Key Flexfield Name with 'Accounting Flexfield' >> Go to 'Manage Structures Instances' >> Click on Create icon (+) >> Enter details as below and Save and Close. Select the Segment Code, click on edit and select Required to make it as required.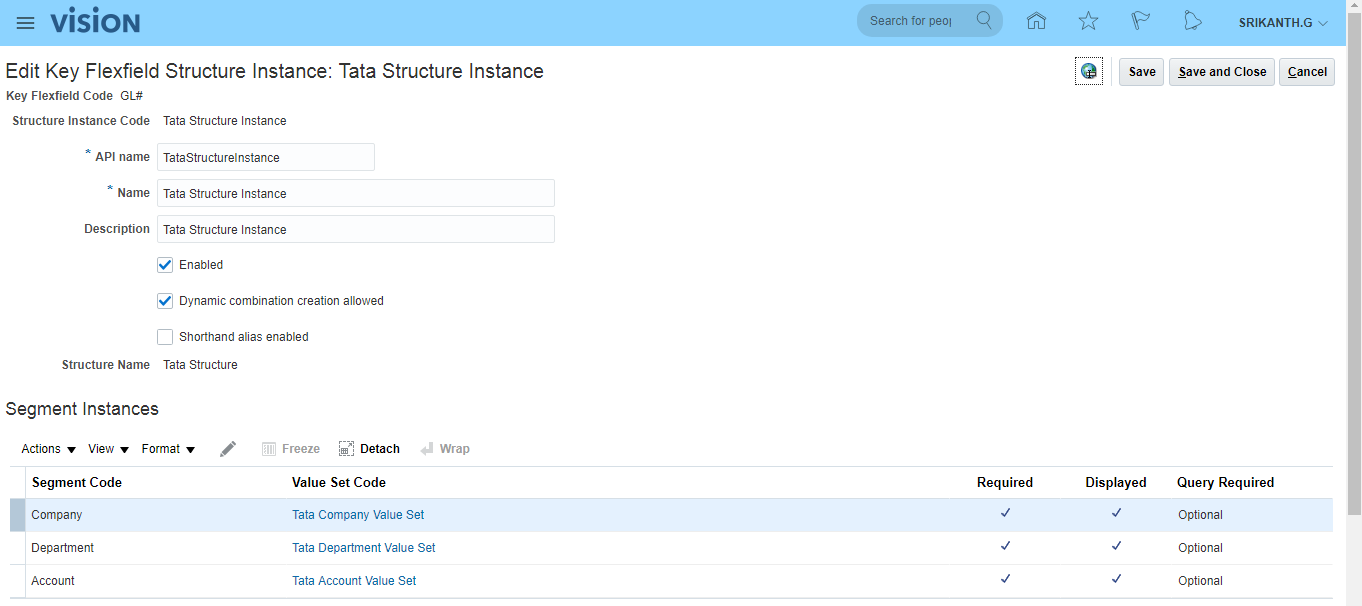 Click on 'Deploy Flexfield' tab for completion of process.
 We need to create 'Structure Instance' since we will be using at Primary Ledger creation rather than direct Structure.
With one COA Structure, we can create multiple 'Structure Instances'.
We need to create 'Structure Instance' since we will be using at Primary Ledger creation rather than direct Structure.
With one COA Structure, we can create multiple 'Structure Instances'.
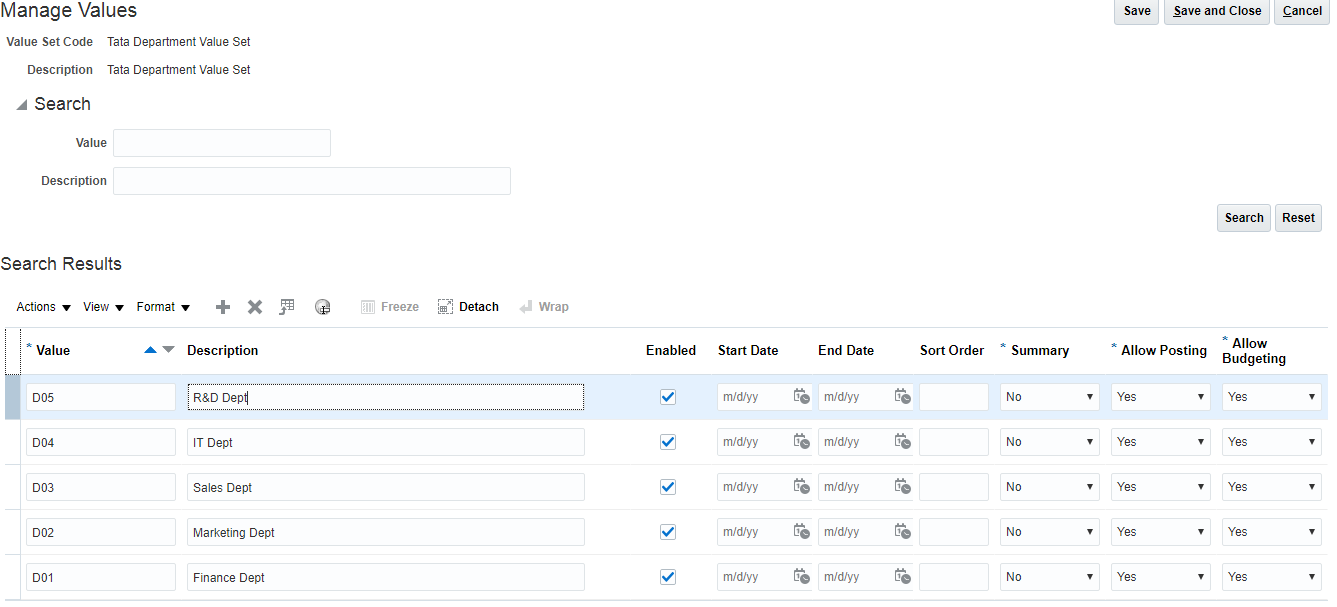
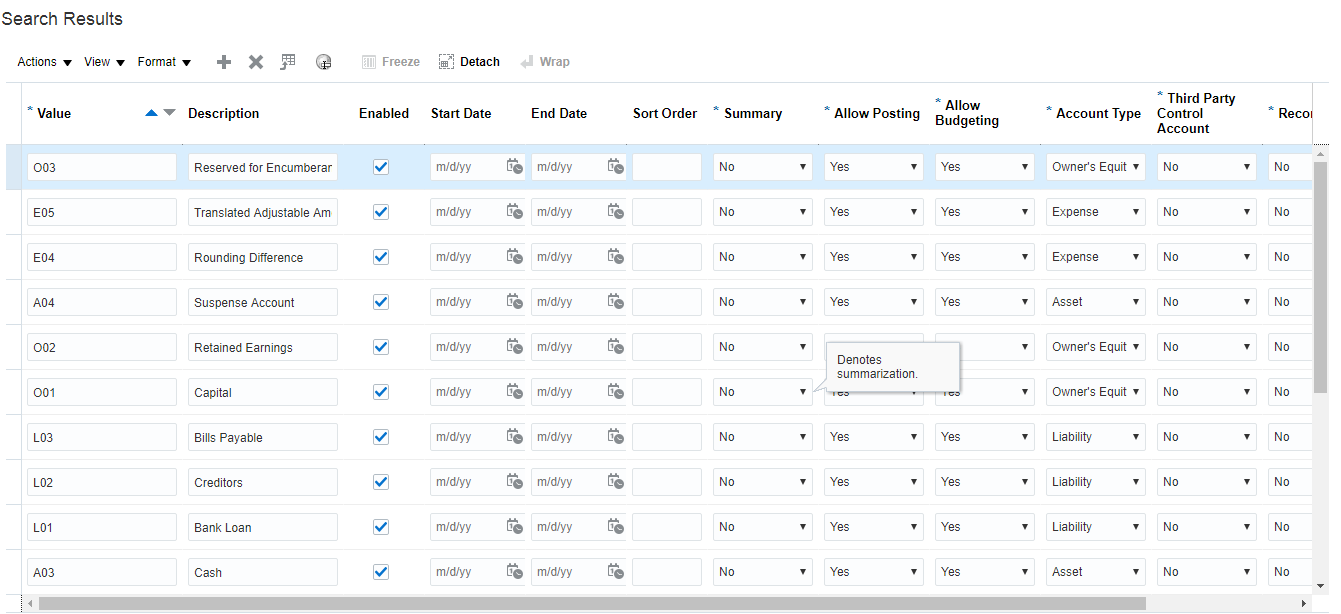
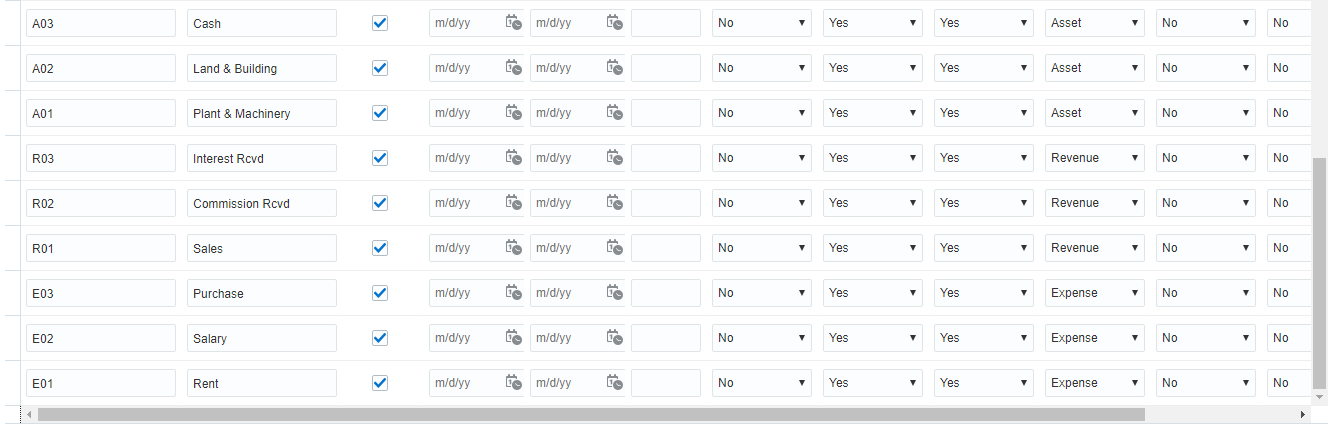
iv) Create value set values Search for task 'Manage Chart of Accounts Value Set Values' >> Click on 'Go to Task' >> Search for Value Set Code 'Tata Company Value Set' >> Click on 'Manage Values' >> Click on Create icon (+).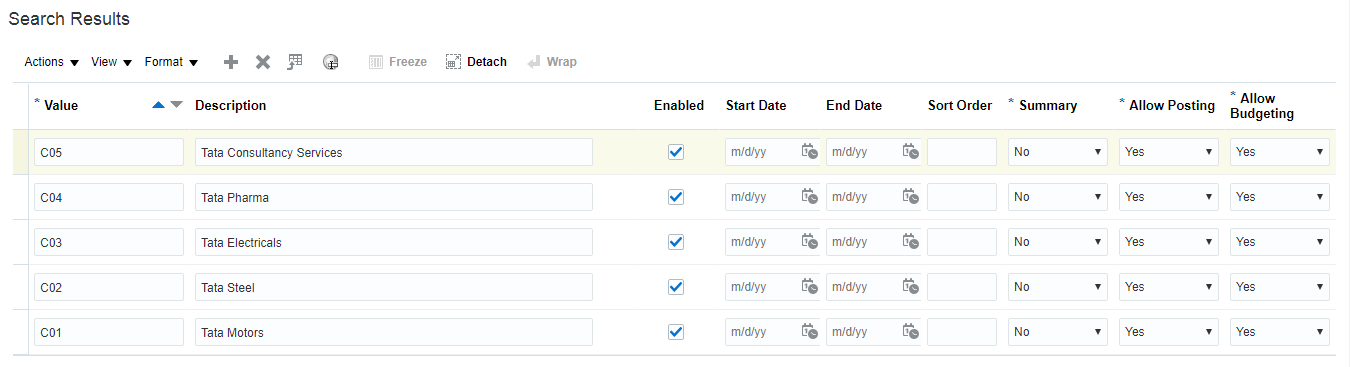
 Tata Account Value Set
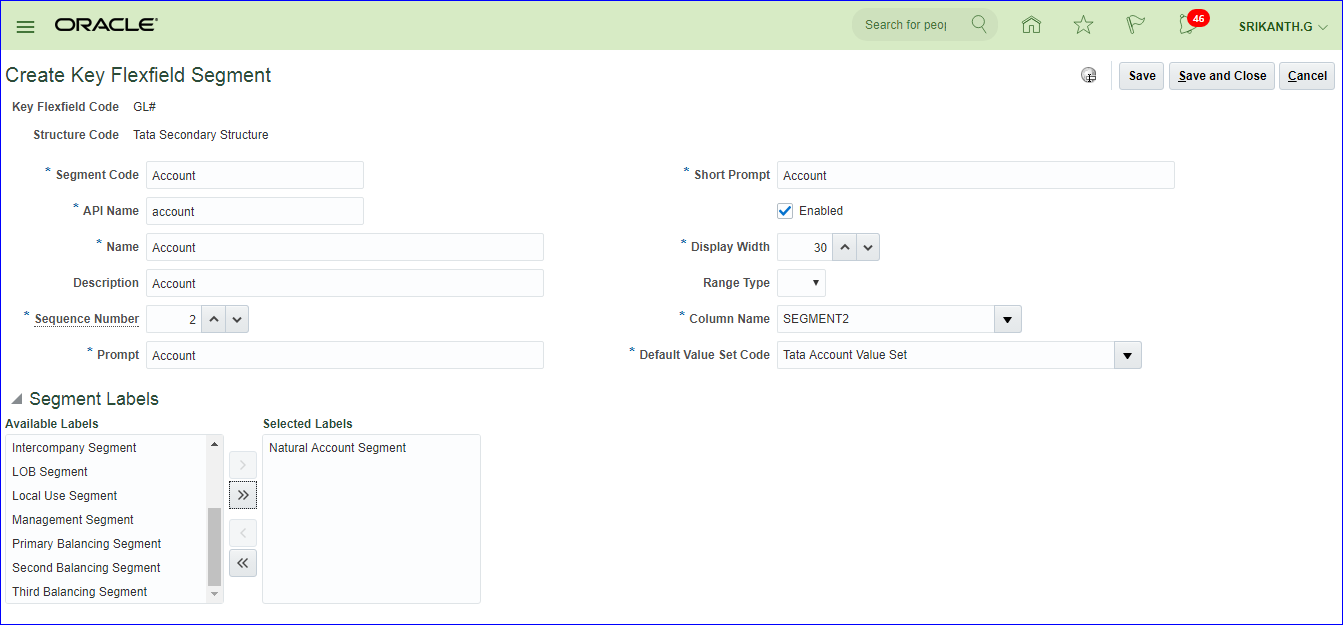
Assign value attributes to segment values (value attributes in Fusion = segment qualifier in EBS) (Segment Qualifier = Defines property of segment values). Here we have additional 4 columns (Account Type, Third Party Control Account, Reconcile, Financial Category) due to 'Natural Account Segment' Flexfield qualifier assigned to Account segment.
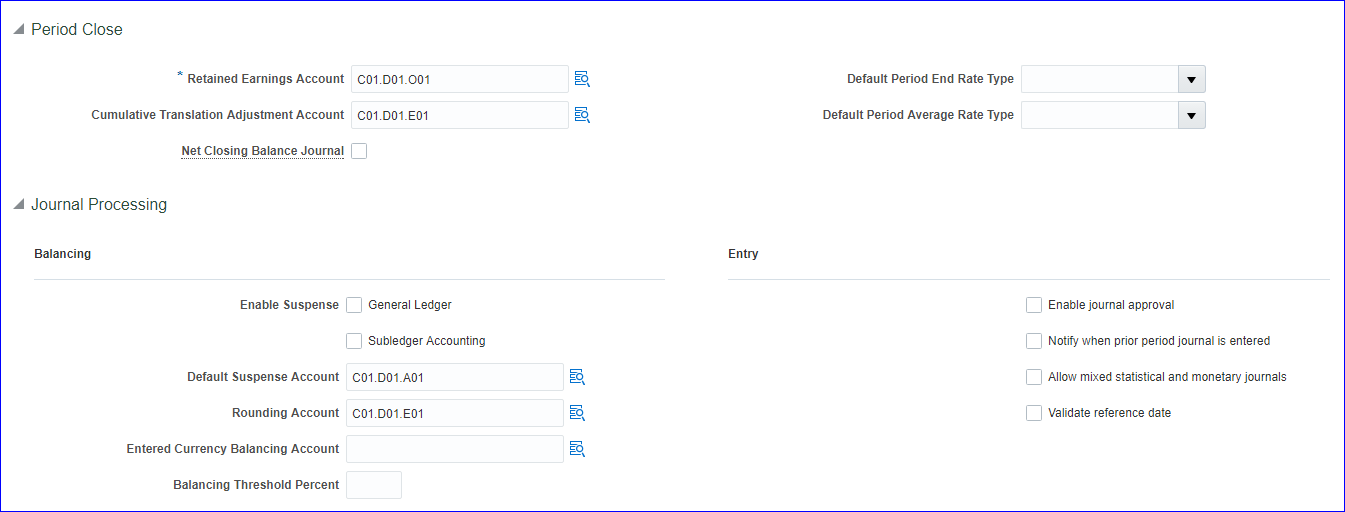
**Mandatory is 'Retained Earnings' account.
Tata Account Value Set
Assign value attributes to segment values (value attributes in Fusion = segment qualifier in EBS) (Segment Qualifier = Defines property of segment values). Here we have additional 4 columns (Account Type, Third Party Control Account, Reconcile, Financial Category) due to 'Natural Account Segment' Flexfield qualifier assigned to Account segment.
**Mandatory is 'Retained Earnings' account.
 Save and Close
6. Create 'Primary Ledger' Navigation: Go to your implementation project (Tata Finance Implementation Project) >> Search for task 'Manage Primary Ledgers' >> Click Go to Task >> Click on Create icon (+) >> Enter details as below >> Save and Close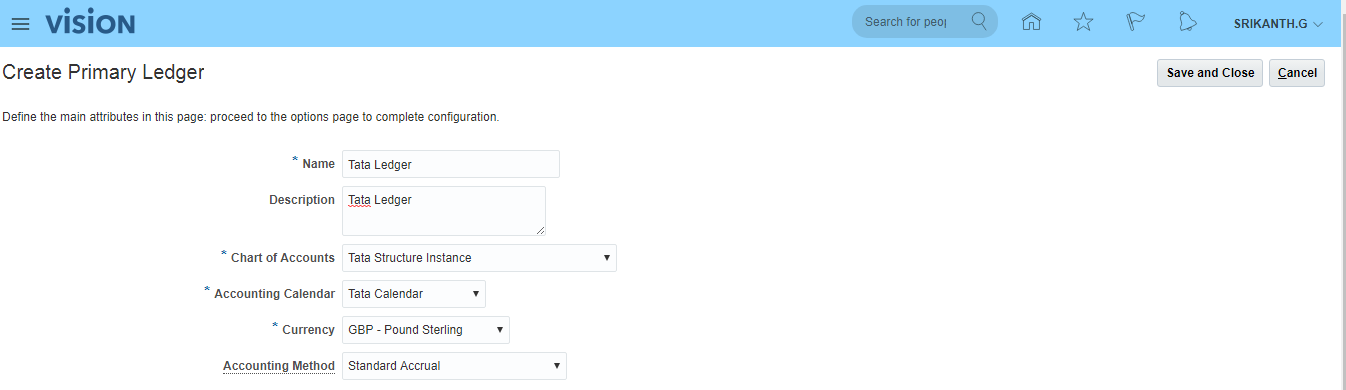 **Here Tata Structure Instance has been identified under COA. Hence instance is required.
**In case we want to record transactions only in GL then Accounting Method is not required but required when transactions happens in sub ledgers.
**Here Tata Structure Instance has been identified under COA. Hence instance is required.
**In case we want to record transactions only in GL then Accounting Method is not required but required when transactions happens in sub ledgers.
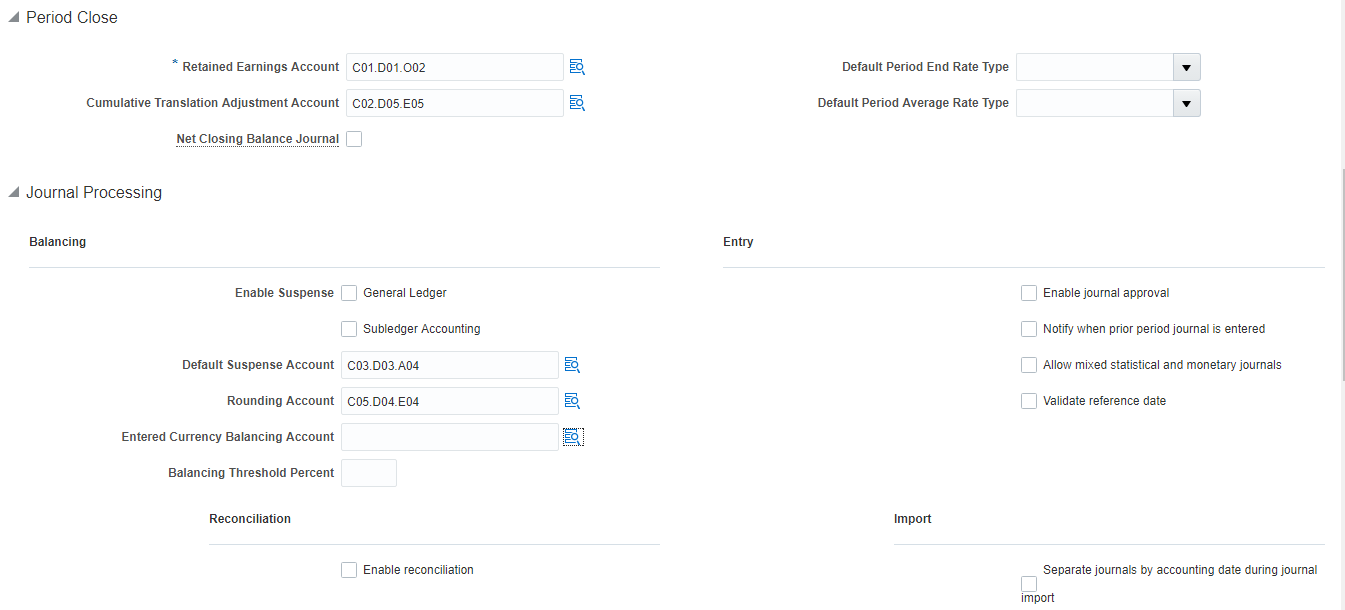
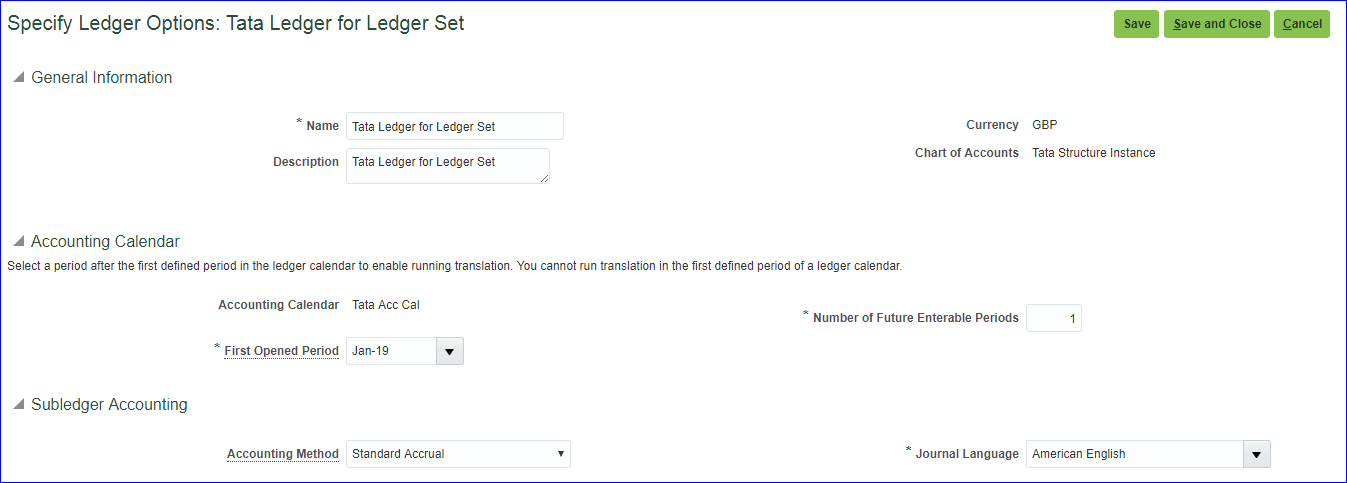
7. Specify 'Ledger Options' Search for task 'Specify Ledger Options' >> Choose path -- 'Financials>Define Common Applications Configuration for Financials>Define Ledgers>Define Accounting Configurations' >> Click 'Go to Task' >> Choose 'Specify Ledger Options' scope and Primary Ledger as 'Select and Add'>> Apply and Go to Task >>Search our Ledger (Tata Ledger) >> Save and Close >> Enter accounting values >> Save and Close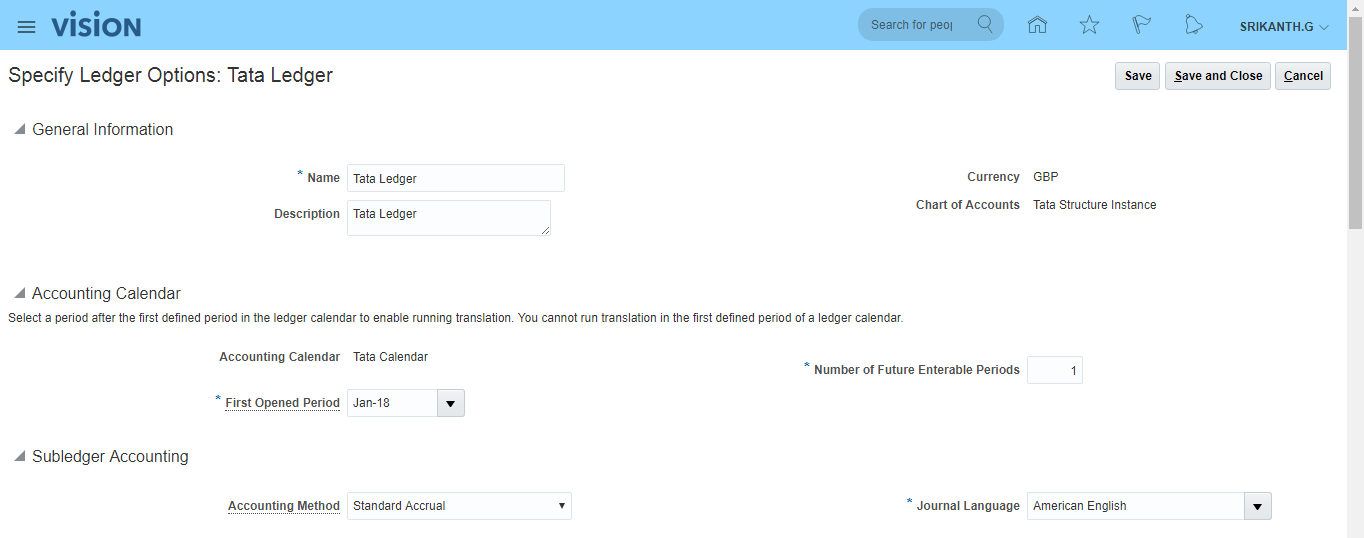
8. Create 'Legal Address' Search for task 'Manage Legal Addresses' >> Go to Task >> Click on Create(+) icon >> Enter details as below >> Save and Close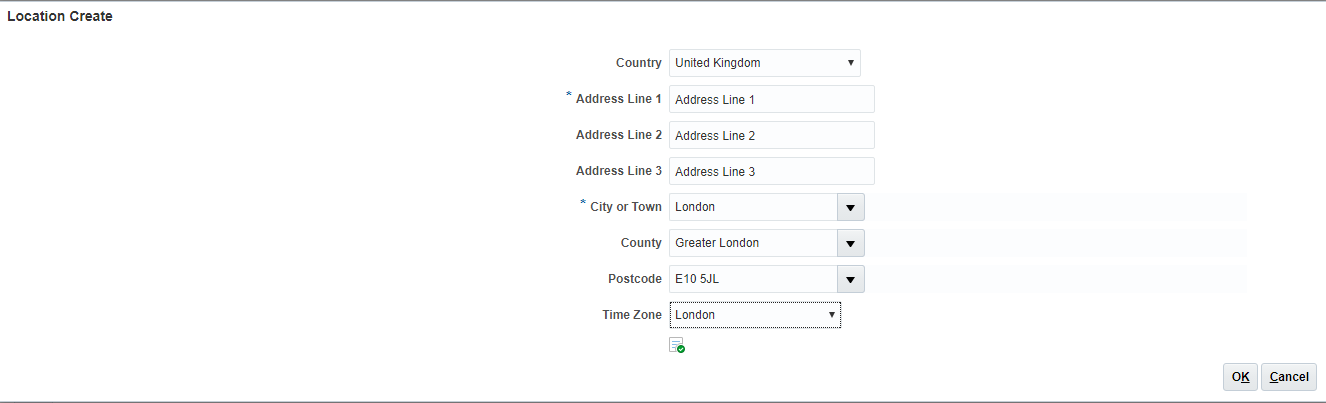
9. Create 'Legal Entity' Search for task 'Manage Legal Entity' >> Go to Task >> Select Scope: Manage Legal Entity and Legal Entity: Create New >> Apply and Go to Task >> Click on Create(+) icon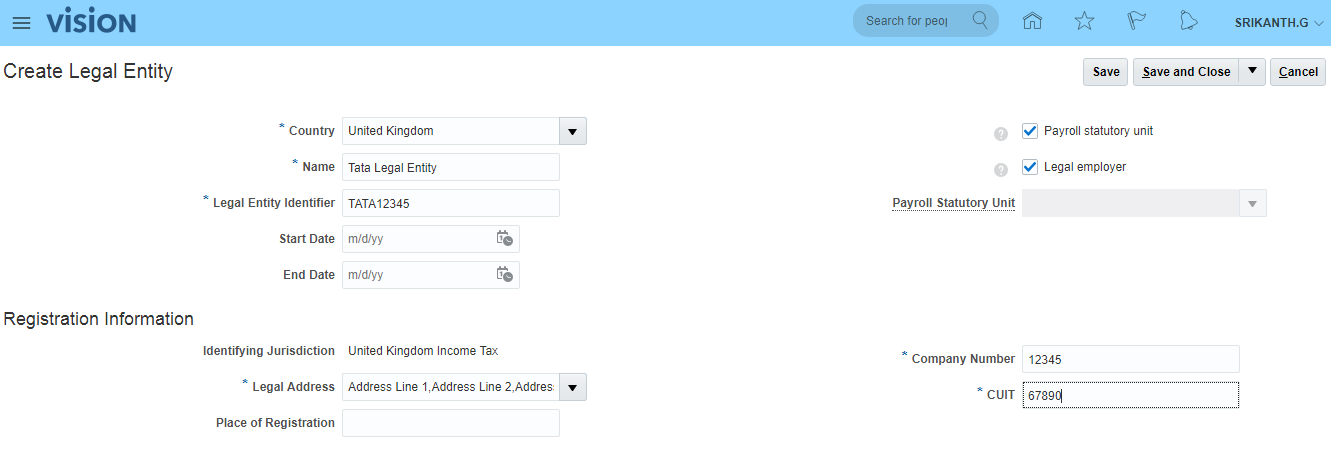
10. Assign 'Legal Entity' to 'Primary Ledger' Search for task 'Assign Legal Entities' >> Go to Task >> Click on 'Select and Add' >> Search for Legal Entity (Tata Legal Entity) >> Select >> Apply >> Done >> Save and Close
11. Assign 'Balancing Segment Values' to 'Legal Entity' Search for task 'Assign Balancing Segment Values to Legal Entities' >> Go to Task >> Click on Create(+) icon >> Select first Company Value and click on 'Save and Assign Another' >> Repeat this step for other companies as well. >> Save and Close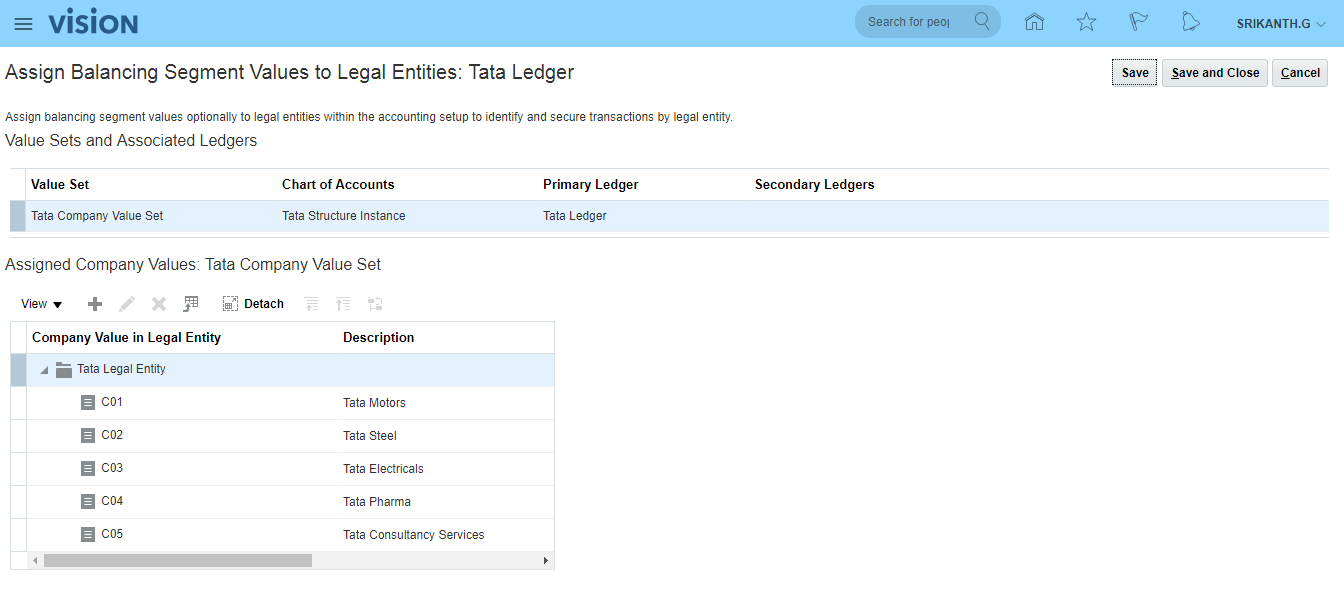
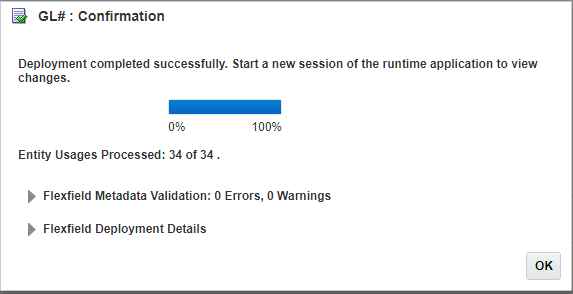
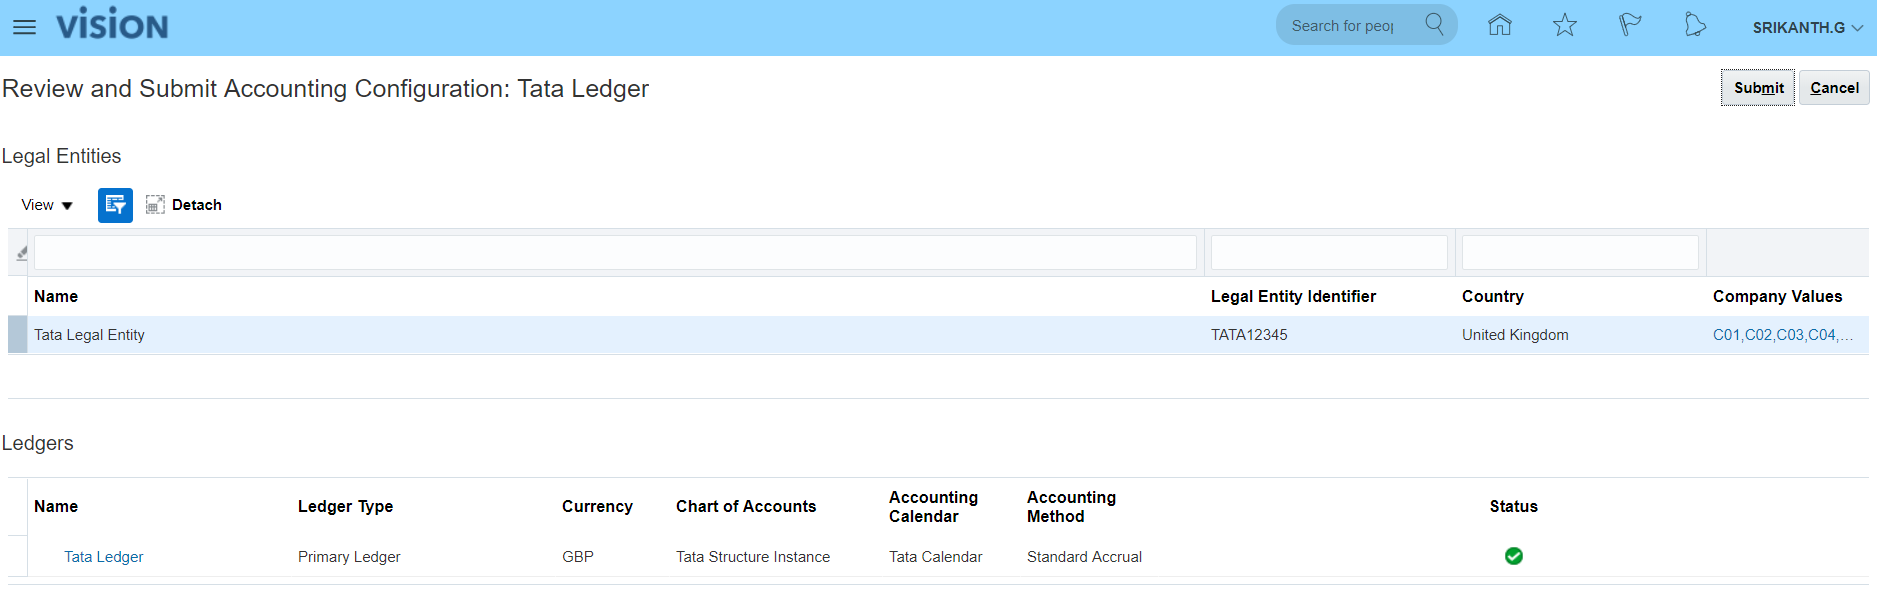
12. Review and submit 'Accounting Configuration' The primary Ledger data is stored in Oracle DB. Now this needs to be copied to Essbase Database. The whole GL set up data need to be synced with Essbase DB. For that purpose, search for task 'Review and Submit Accounting Configuration' >> Click 'Go to Task' >> Submit. After submission you can see Confirmation message as
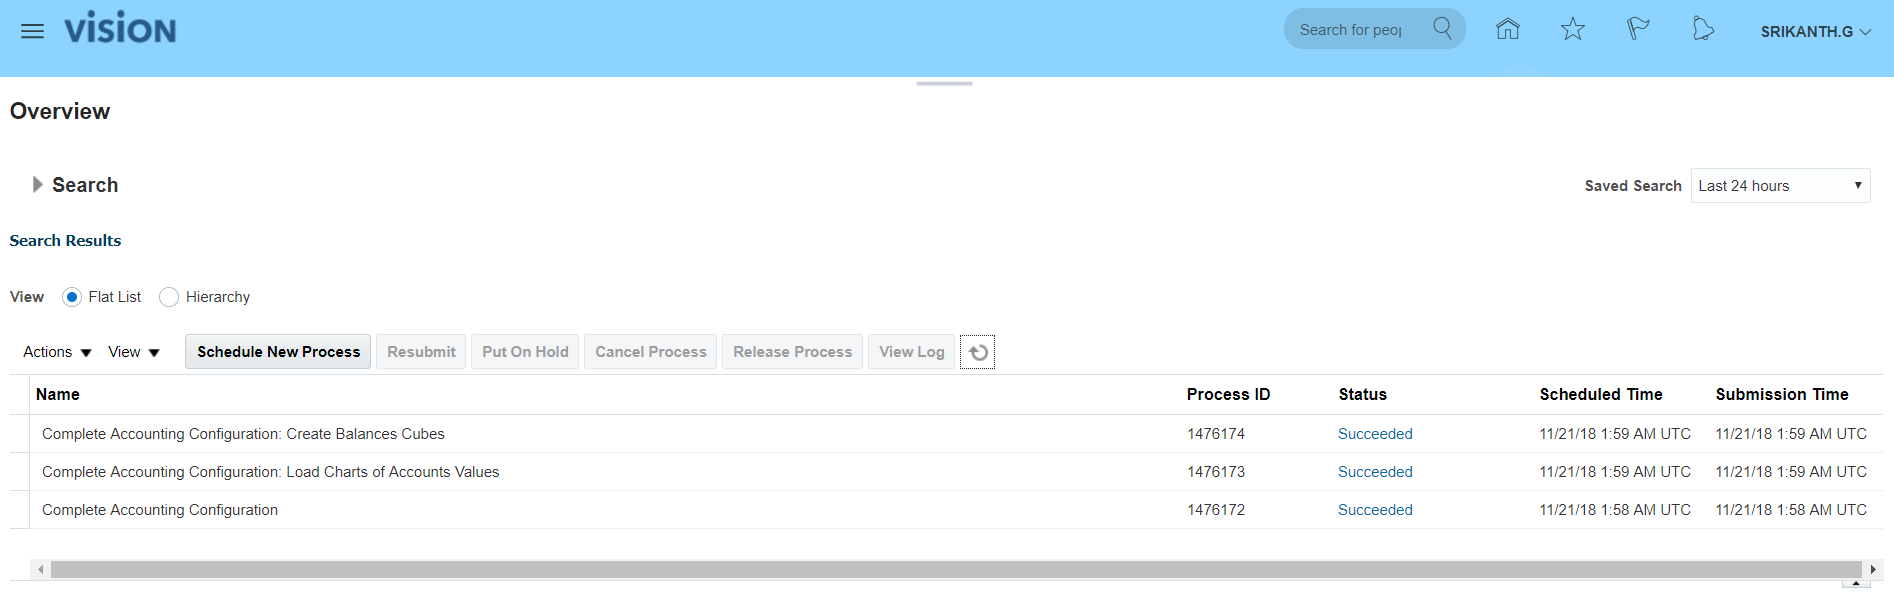
 Since we have assigned Employee Job Role to User (ORA_PER_EMPLOYEE_ABSTRACT), we should be able to see requests. Navigator >> Tools >> Scheduled Processes (This is ESS job page)>> See the Succeeded status.
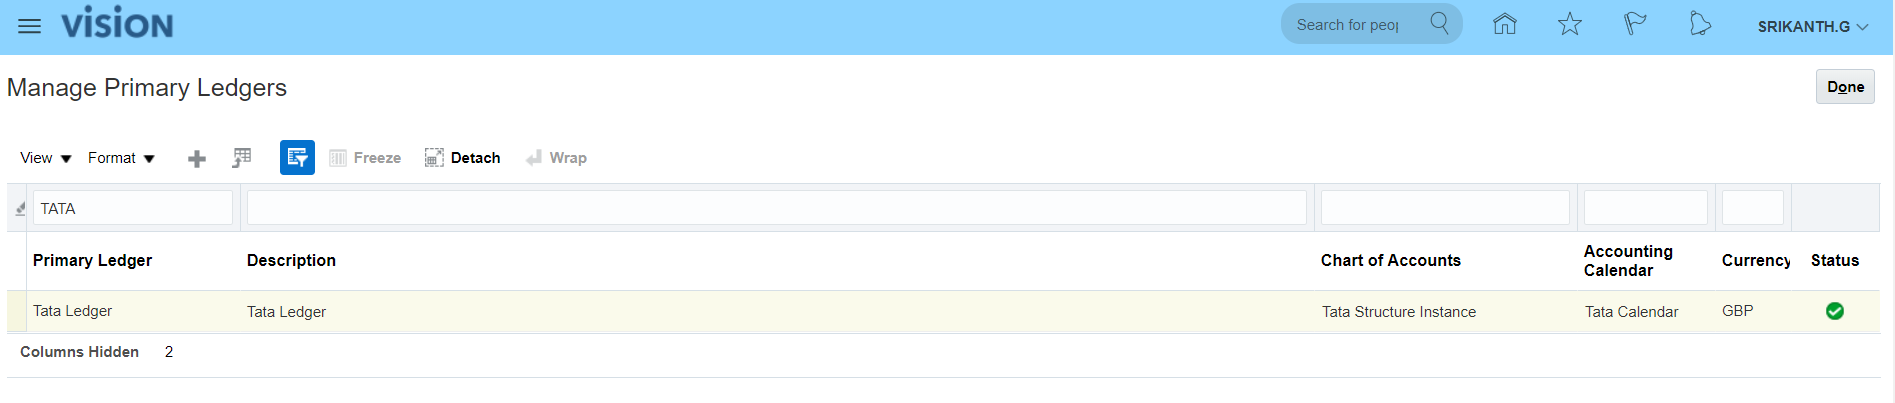
 Verify status of Primary Ledger:
Go to task 'Manage Primary Ledgers' >> Search for your Ledger (Tata Ledger) >> The status is 'Confirmed'
Verify status of Primary Ledger:
Go to task 'Manage Primary Ledgers' >> Search for your Ledger (Tata Ledger) >> The status is 'Confirmed'
13. Assign GL Roles to User We have 5 Job roles which need to be assigned to User to record the GL transactions. Navigation: Navigator >> Tools >> 'Security Console' task >> Select Users tab >> Search for your User >> Click on hyperlink (User Login) >> Click on Edit >> Add Roles >> Search for i) 'General Accountant' (Code: ORA_GL_GENERAL_ACCOUNTANT_JOB) ii) 'General Accounting Manager' (Code: GL_GENERAL_ACCOUNTING_MANAGER_JOB) iii) 'Chief Financial Officer' (Code: GL_CHIEF_FINANCIAL_OFFICER_JOB) iv) 'Controller' (Code: GL_CONTROLLER_JOB) v) 'Financial Analyst' (Code: ORA_GL_FINANCIAL_ANALYST_JOB) >> Add Role Membership >> Save and Close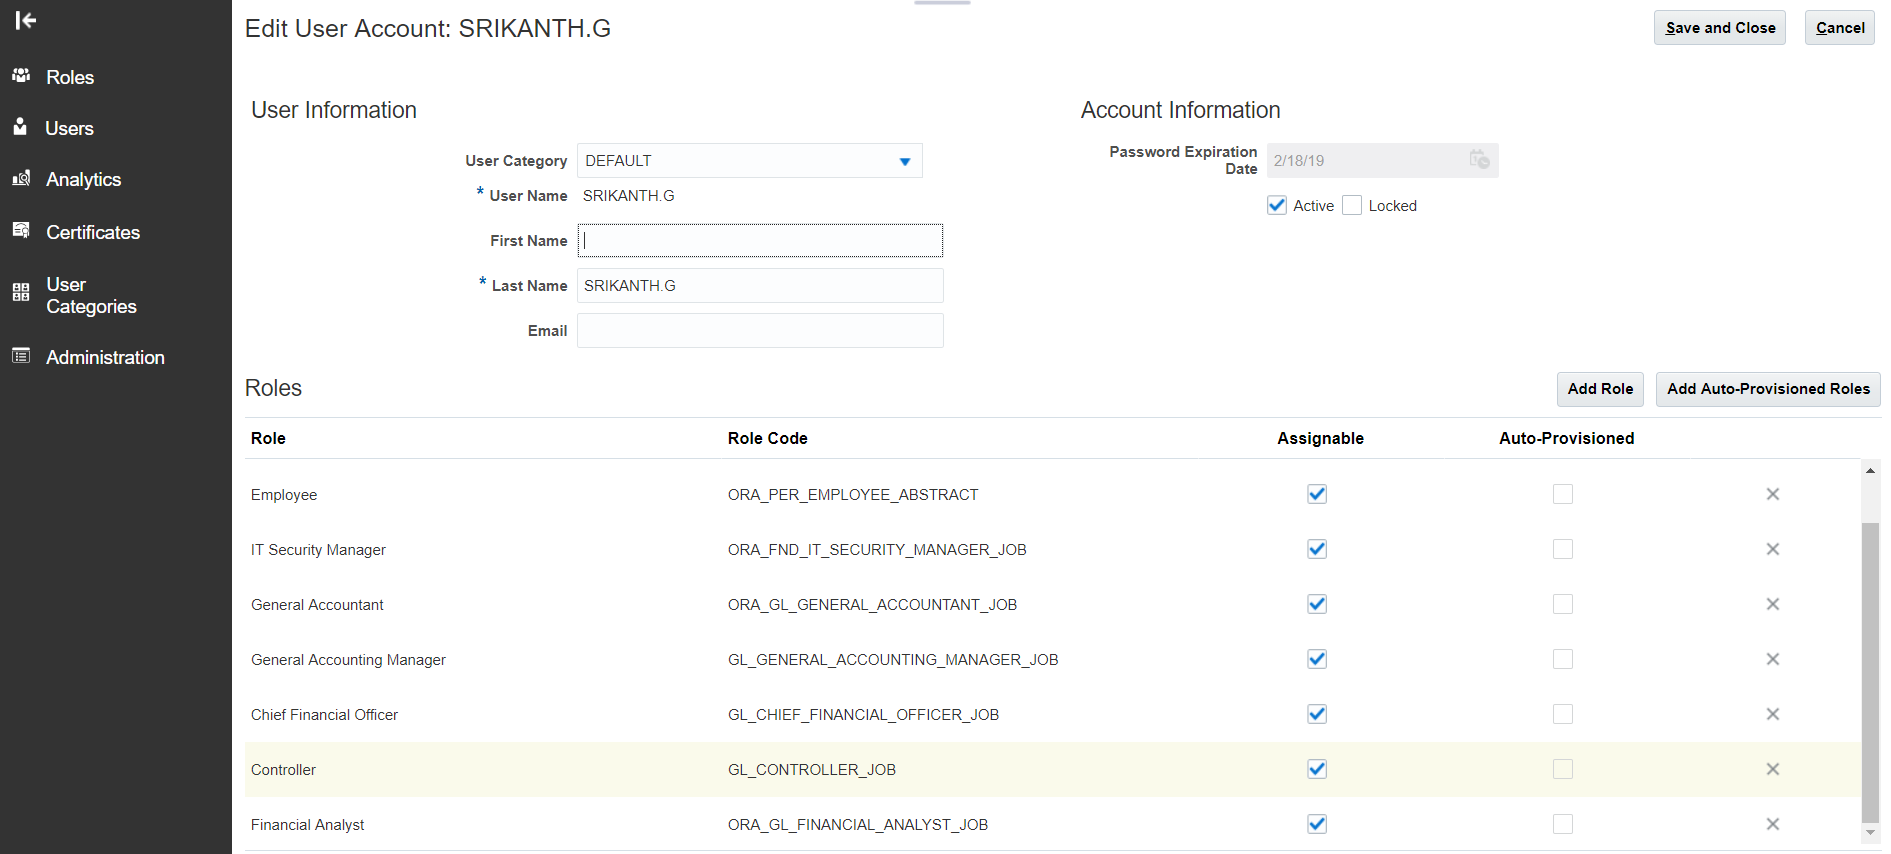
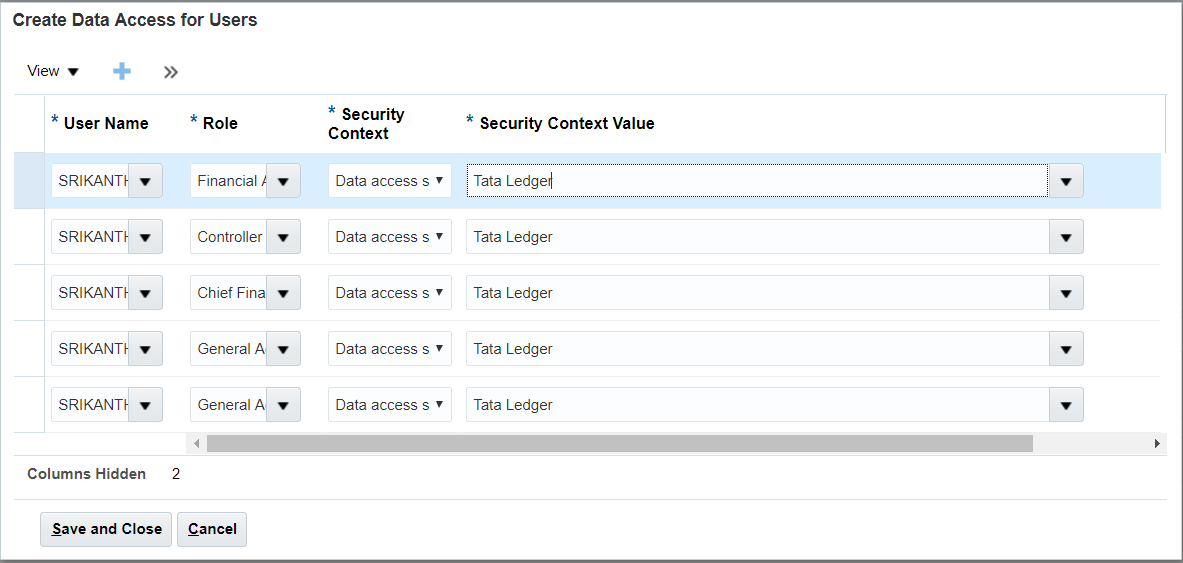
14. Assign 'Data Access Set' to GL roles In EBS, we used to assign 'Primary Ledger' value to profile option 'GL Ledger Name' at responsibility level. Additionally once the ledger creation is completed, we will assign the ledger to profile option 'GL: Data Access Set'. Now go to your implementation project and search for task 'Manage Data Access Sets' >> Go to Task >> Search for your ledger (Tata Ledger) >> Here Name reflects Data Access Set (Tata Ledger) >> Click on edit for more details.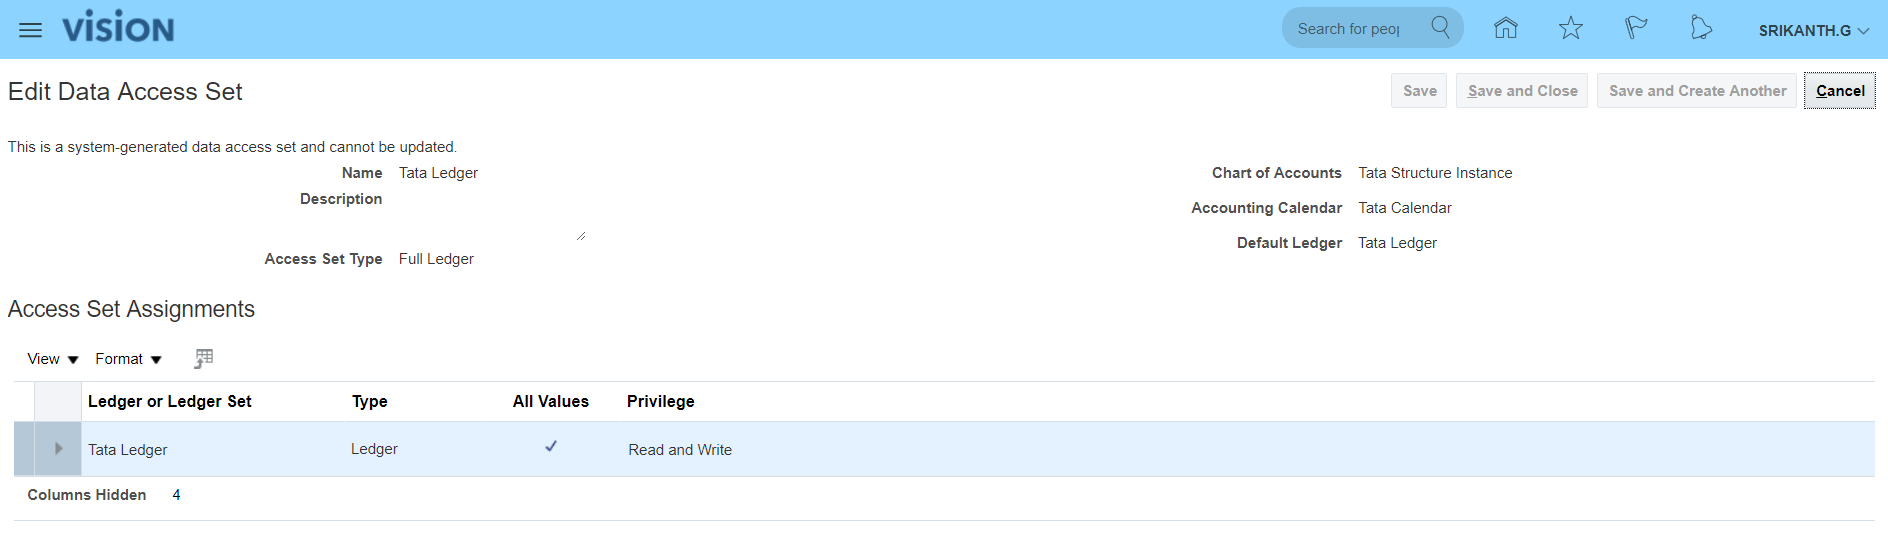 Search for task 'Manage Data Access for Users' >> Go to Task >> Create >> Select your User Name, select each 5 GL roles, Security Context: Data access set, Security Context Value: select your 'Primary Ledger' name. >> Just verify (Users without Data Access and Users with Data Access) by searching with User Name after completion of above steps.
15. Run LDAP Job Navigation: Navigator >> Tools >> Scheduled Processes >> This is ESS Job page >> Schedule New Process >> Type: Job; Name: Retrieve Latest LDAP Changes >> Submit >> Look for Succeeded status.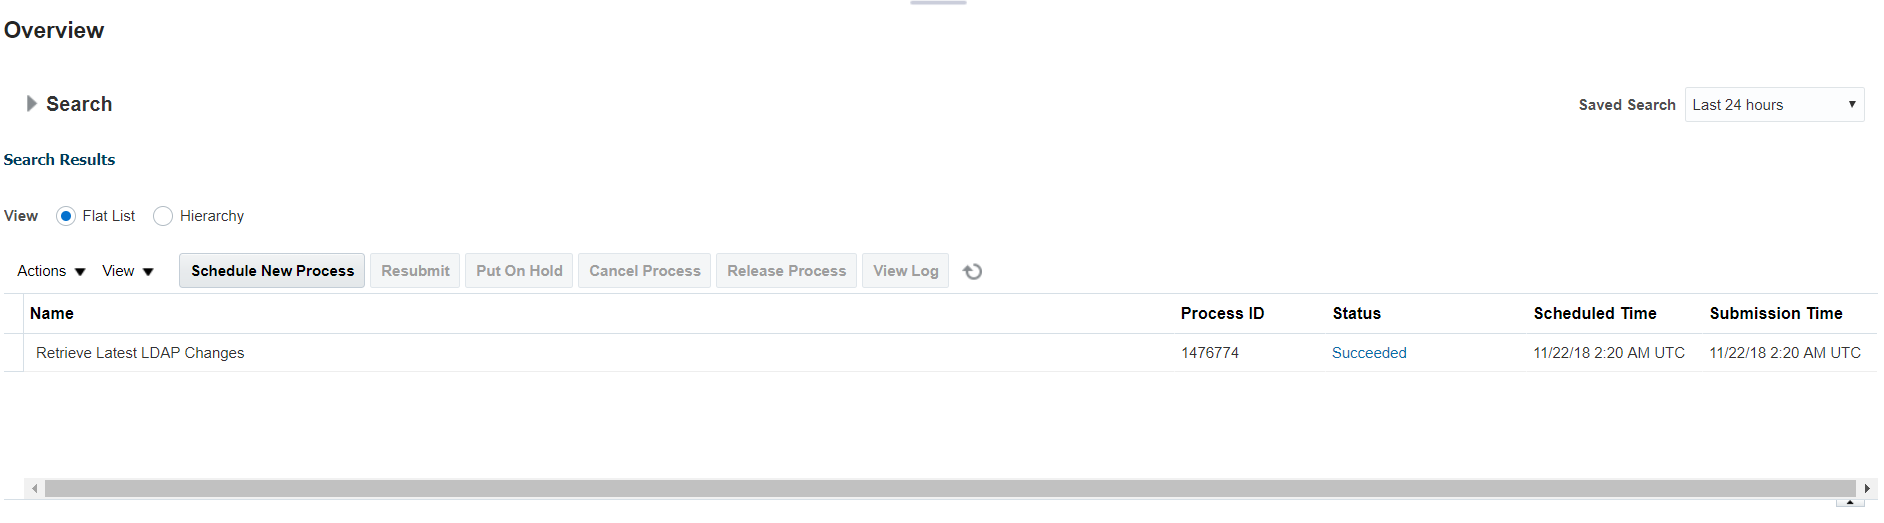
16. Open GL Periods Post above changes sign-out and sign-in again to see 'General Accounting' task in Navigator. In case you see error when you open Period Close 'GL_PLL_INVALID_DATA_ACCESS_SET.oracle.javatools.resourcebundle.ResourceBundleRT' then run the job 'Import User and Role Application Security Data'. Navigation: Navigator >> General Accounting >> Period Close >> Select your Data Access Set >> Click on General Ledger(Never Opened) icon >> Open first period and a request will be submitted>> Actions >> Open Target Period or we can open one-by-one period.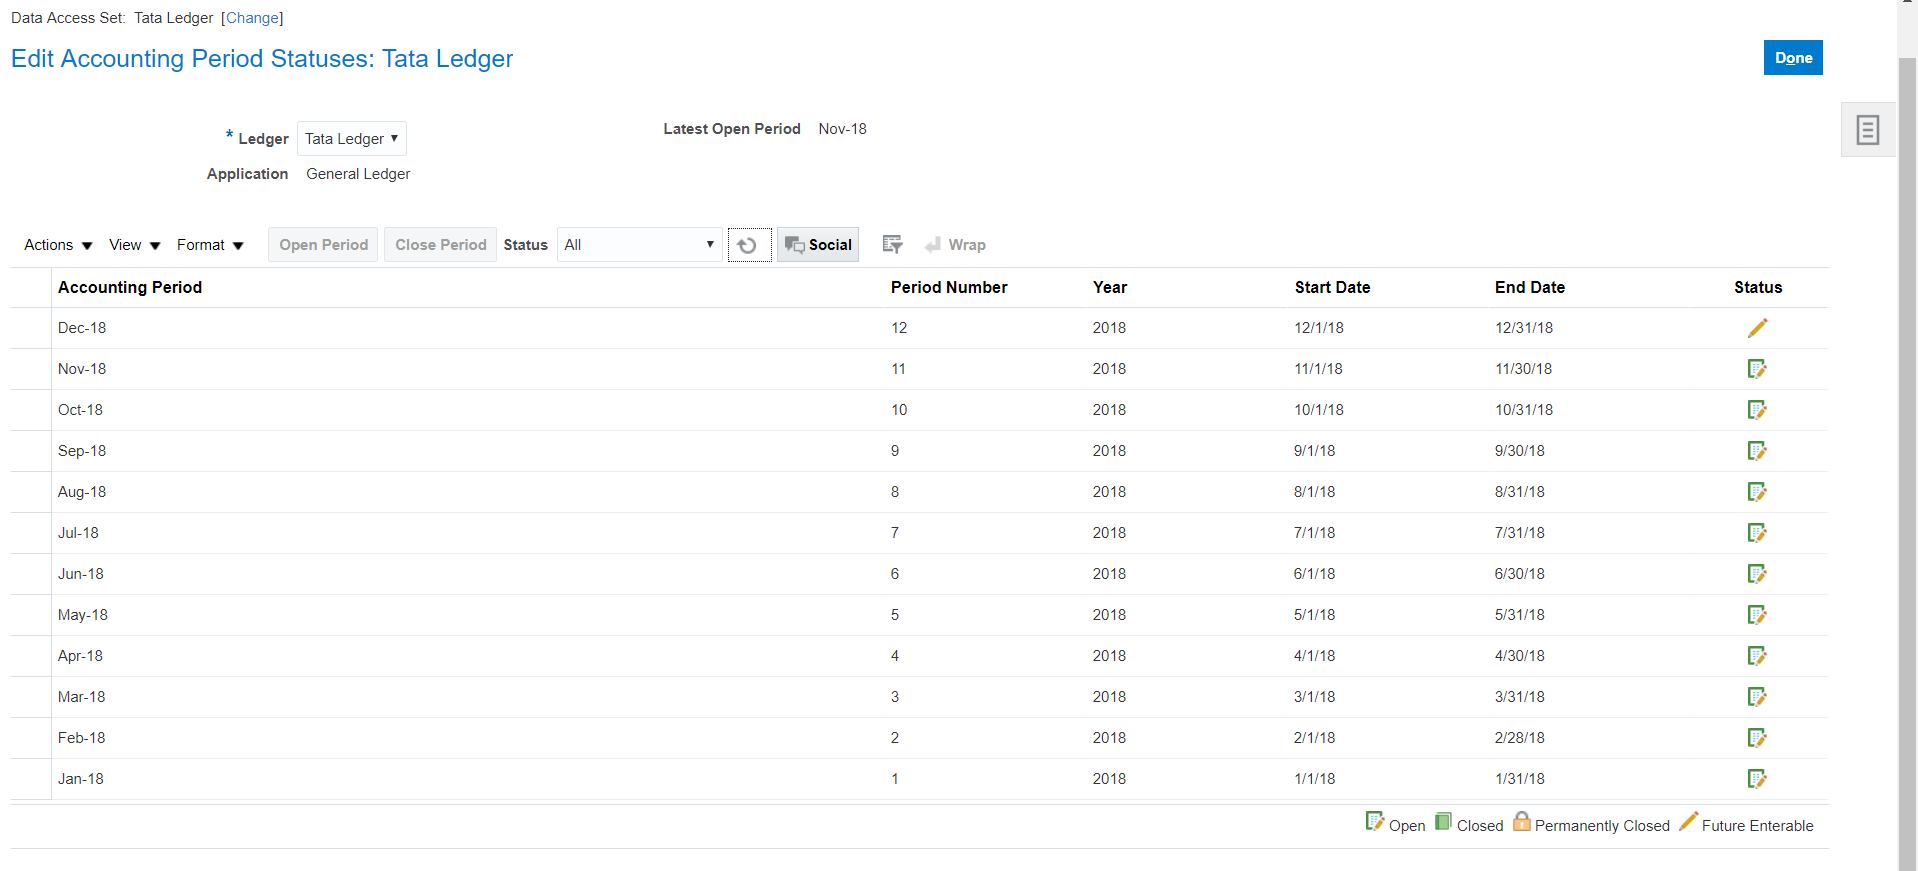
Set default 'Category' value in Journal at User level This is an optional step. We need to set profile options to achieve this activity. We can set profile option using the task - 'Manage Administrator Profile Values' Navigation: Setup and Maintenance >> Tasks Panel >> Search (The tasks which are not mandatory to create from implementation project can be created here) >> 'Manage Administrator Profile Values' >> Search for Profile Display Name: Default Journal Category >> Click on Create >> Profile Level: User, User Name: SRIKANTH.G, Profile Value: Adjustment >> Save and Close
17. Create Journal and Post Batch --> Journal --> Lines Batch is not mandatory. Even Journal name will be auto-created if not given. Navigation: Navigator >> General Accounting >> Journals >> Tasks Panel >> Create Journal Notice the Category: Payments have been defaulted due to above set up.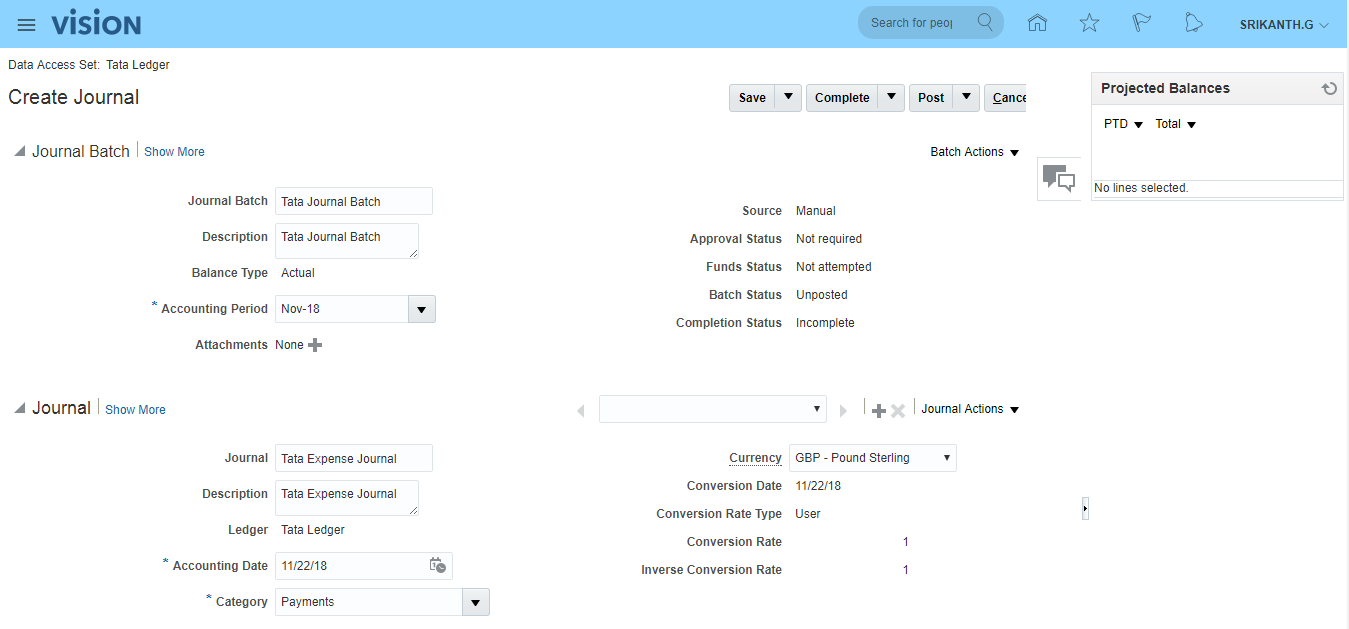
 Save >> Complete >> Post (A request will be submitted)
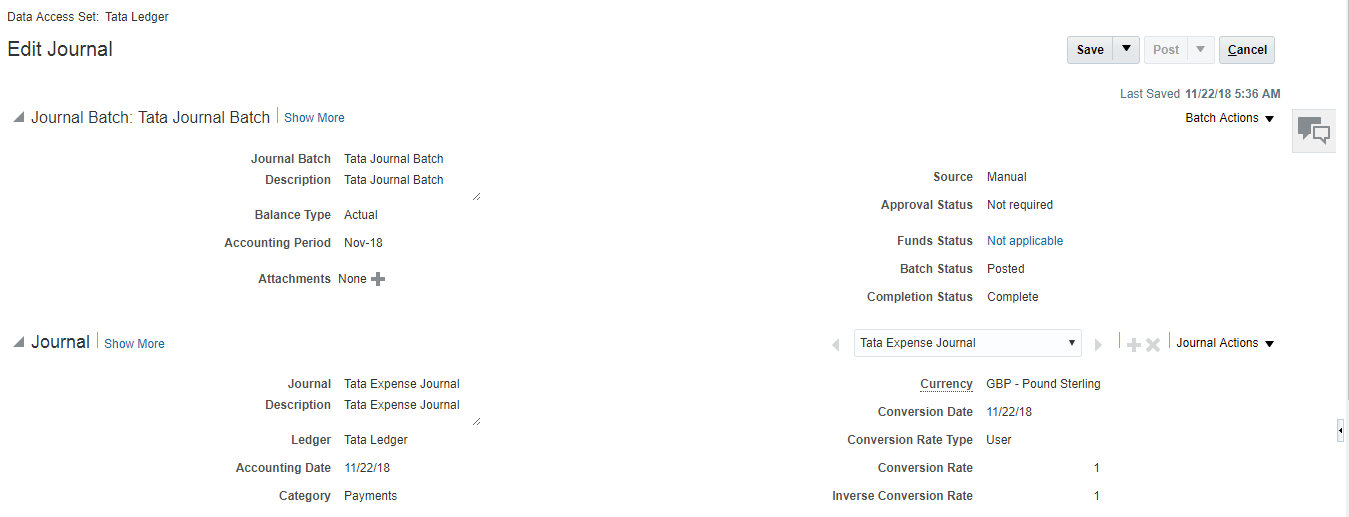 'Post Journals for Single Ledger' job status should be in 'Succeeded'.
To see the Journal status: Navigator >> General Accounting >> Journals >> Tasks panel >> Manage Journals >> Search for your Journal >> Status is Posted.
'Post Journals for Single Ledger' job status should be in 'Succeeded'.
To see the Journal status: Navigator >> General Accounting >> Journals >> Tasks panel >> Manage Journals >> Search for your Journal >> Status is Posted.
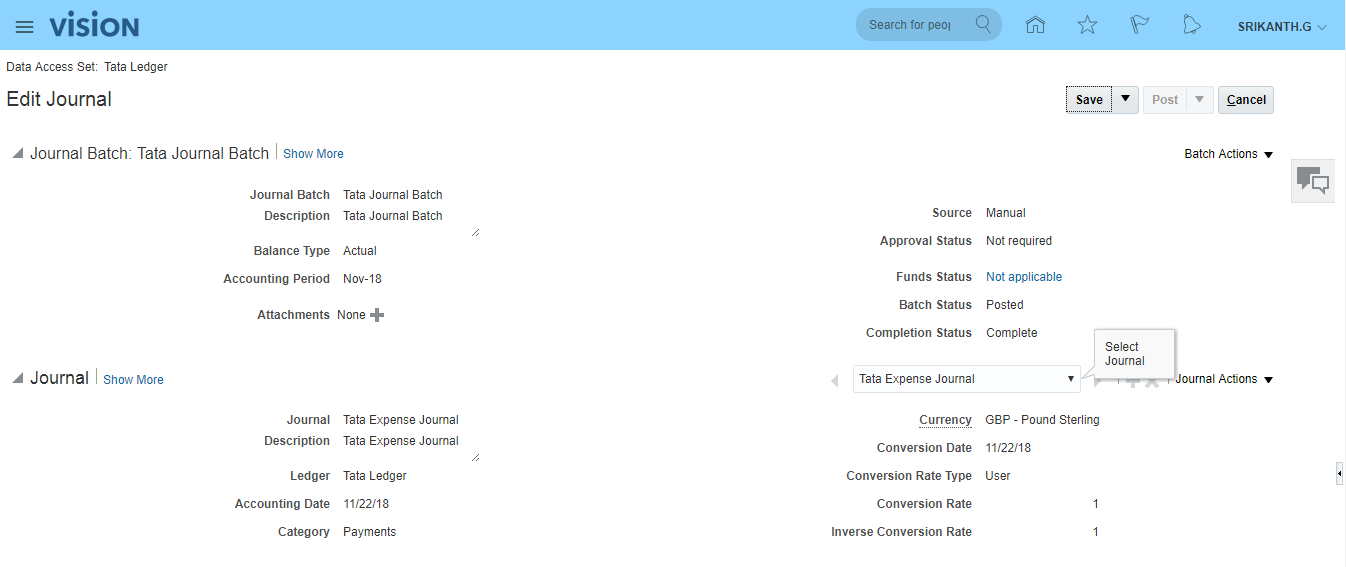 **In case you want to search Journal with other than given 6 fields, we can click on 'Add Fields' button in 'Manage Journals' page.
One more Journal creation
**In case you want to search Journal with other than given 6 fields, we can click on 'Add Fields' button in 'Manage Journals' page.
One more Journal creation
 Save >> Complete >> Post (A request will be submitted)
18.Rapid Implementation i) Download Rapid implementation templates ii) Enter data into sheets iii) Create zip file iv) Upload zip file into application v) Find data definitions in application i) Download Rapid implementation templates In FSM page search for task 'Define Common Financials Configuration for Rapid Implementation' >> Click on 'Create Chart of Accounts, Ledger, Legal Entities, and Business Units in Spreadsheet' >> Save and Open excel ii) Enter data into sheets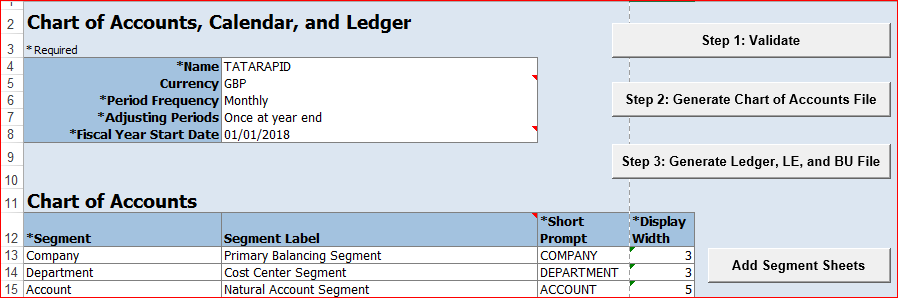 To add Department sheets click on Add Segment Sheets.
Business Units tab:
To add Department sheets click on Add Segment Sheets.
Business Units tab:
Companies and Legal Entities:

 Department:
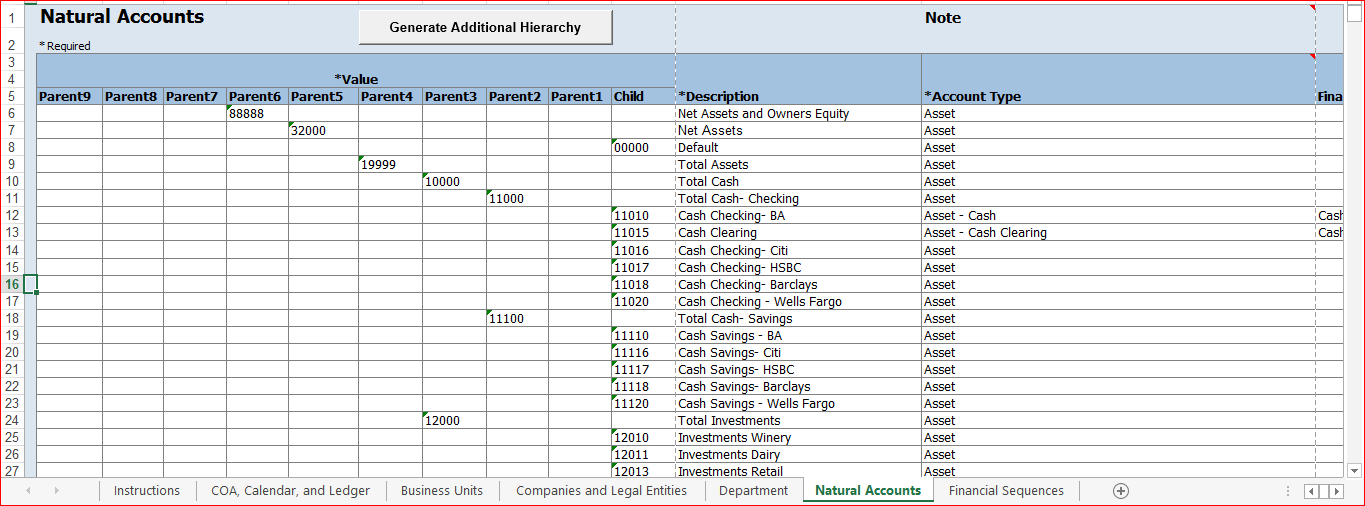
 Natural Accounts:In Instructions tab we have 'Rapid Implementation Template with Sample Data' and I have used same data.
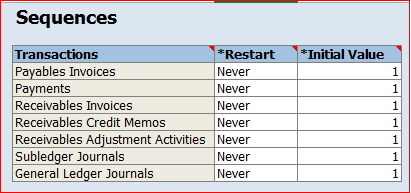
 Financial Sequences: Even we can ignore this option
 iii) Create zip file
Click on Step 1: Validate and look for confirmation message
Click on Step 2: Generate Chart of Accounts File >> Save the zip file
Step 3: Generate Ledger, LE, and BU File >> Save the zip file
iv) Upload zip file into application
In FSM page search for task 'Define Common Financials Configuration for Rapid Implementation' >> Click on 'Upload Chart of Accounts' >> Choose parameters: Upload Enterprise Structure >> Upload the ChartOfAccounts file >> Submit >> 'Upload Enterprise Structures and Hierarchies' should be succeeded.
v) Verifying in application
In FSM search for task 'Manage Chart of Accounts Value Sets' >> Search Value Set Code: Company TATARAPID and Department TATARAPID and Account TATARAPID >> Click on Manage Values and click on search to get all values.
In FSM search for task 'Manage Chart of Accounts Structure Instances' >> Search Key Flexfield Name: Accounting >> Manage Structures >> Structure Code: TATARAPID >> Edit >> Edit and see details
Next upload 'FinancialsCommonEntities' file using step iv navigation in 'Upload Ledger, Legal Entities, and Business Units' task.
In FSM search for task 'Accounting Calendar' >> Manage Accounting Calendars >> Search for TATARAPID (By default the process creates calendar for two years)
In FSM search for task 'Manage Primary Ledgers' >> Search for TATARAPID
In FSM search for task 'Assign Balancing Segment Values to Legal Entities' >> Search for TATARAPID
iii) Create zip file
Click on Step 1: Validate and look for confirmation message
Click on Step 2: Generate Chart of Accounts File >> Save the zip file
Step 3: Generate Ledger, LE, and BU File >> Save the zip file
iv) Upload zip file into application
In FSM page search for task 'Define Common Financials Configuration for Rapid Implementation' >> Click on 'Upload Chart of Accounts' >> Choose parameters: Upload Enterprise Structure >> Upload the ChartOfAccounts file >> Submit >> 'Upload Enterprise Structures and Hierarchies' should be succeeded.
v) Verifying in application
In FSM search for task 'Manage Chart of Accounts Value Sets' >> Search Value Set Code: Company TATARAPID and Department TATARAPID and Account TATARAPID >> Click on Manage Values and click on search to get all values.
In FSM search for task 'Manage Chart of Accounts Structure Instances' >> Search Key Flexfield Name: Accounting >> Manage Structures >> Structure Code: TATARAPID >> Edit >> Edit and see details
Next upload 'FinancialsCommonEntities' file using step iv navigation in 'Upload Ledger, Legal Entities, and Business Units' task.
In FSM search for task 'Accounting Calendar' >> Manage Accounting Calendars >> Search for TATARAPID (By default the process creates calendar for two years)
In FSM search for task 'Manage Primary Ledgers' >> Search for TATARAPID
In FSM search for task 'Assign Balancing Segment Values to Legal Entities' >> Search for TATARAPID
19. Foreign Currency Journals creation FSM >> Tasks >> Search >> Define Currencies and Currency Rates >> Manage Daily Rates >> Daily Rates tab >> Create in Spreadsheet
Save >> Create Daily Rates tab >> Submit
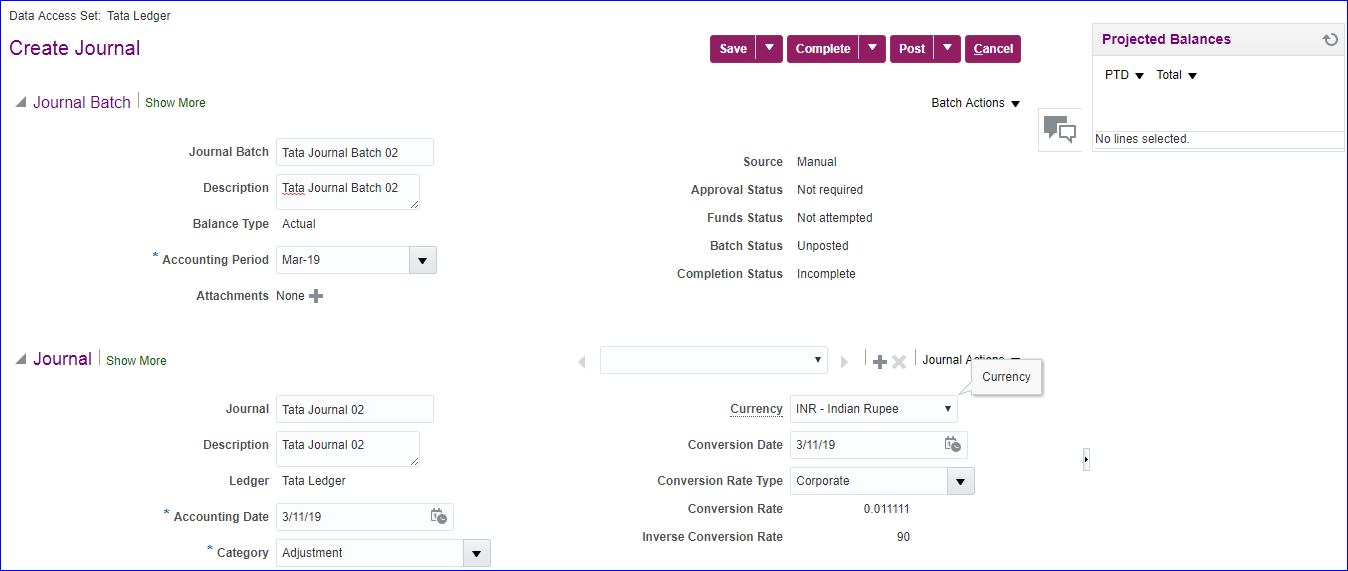
Now create Journal in foreign currency
General Accounting >> Journals >> Tasks >> Create Journal
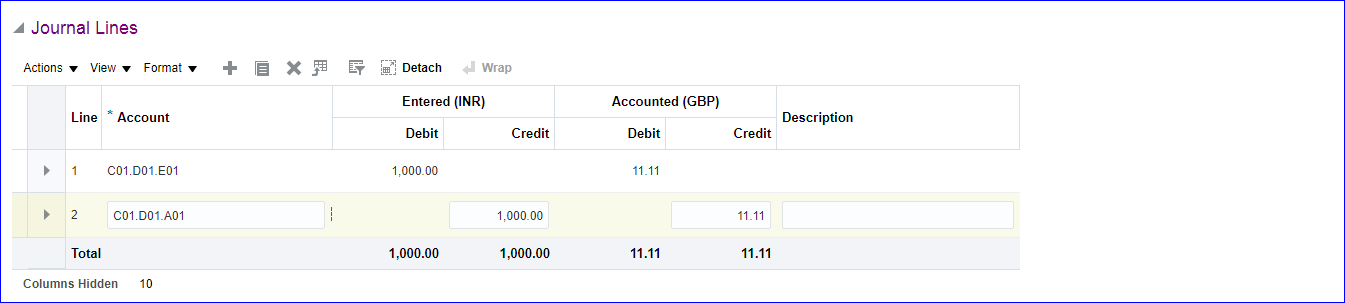 Save >> Complete >> Post
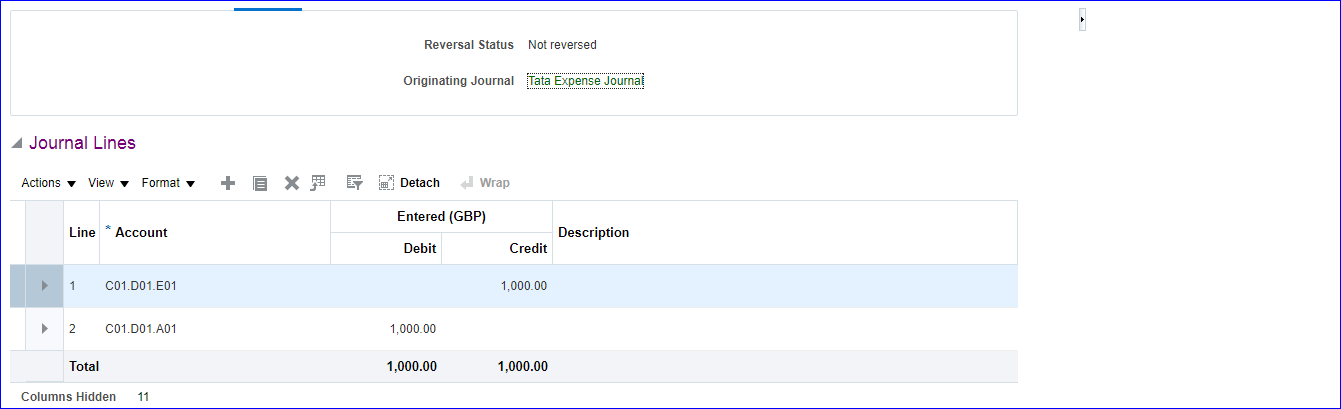
20. Reverse Journals Manage Journals and take any Journal which is already Posted. When we enter incorrect information on Journal then we do Reversal and create new Journal. Journal >> Show More >> Reversal tab >> Reversal Period: (Select your period); Reversal Method: Switch DR or CR >> Save >> Journal Actions >> Reverse >> Save >> The Reversal Status should be Reversed >> Again search your Journal >> Journal >> Show More >> Reversal tab. Here we get new Journal with lines reversed >> Finally Post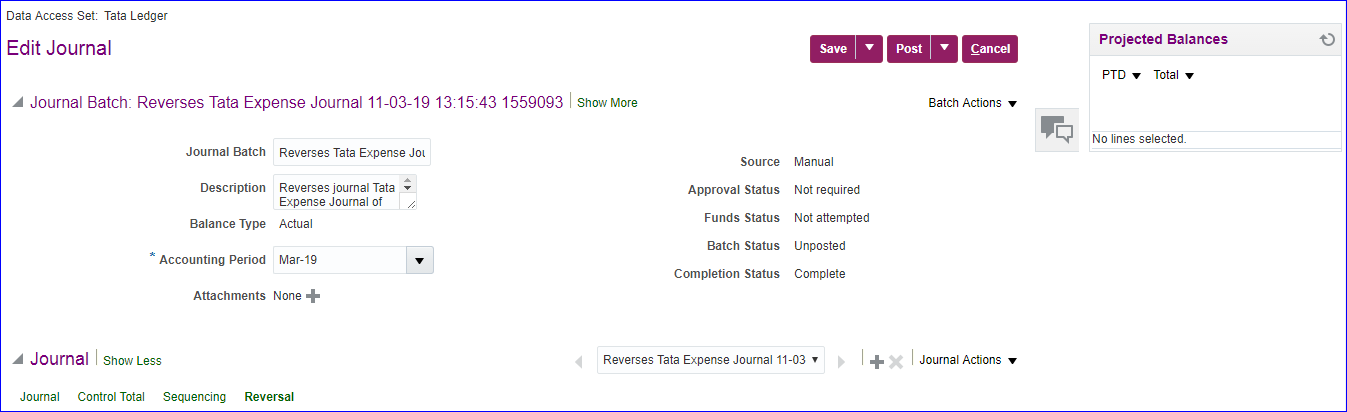
21. Data Access Set Initially when we create primary ledger, the primary ledger name and data access set name will be same. Using custom data access set, we can specify few BSV's in Read Only and few in Read & Write. C01 - Read Only C02 - Read & Write i) Create Data Access Set FSM >> Tasks >> Search >> 'Manage Data Access Sets' >> Create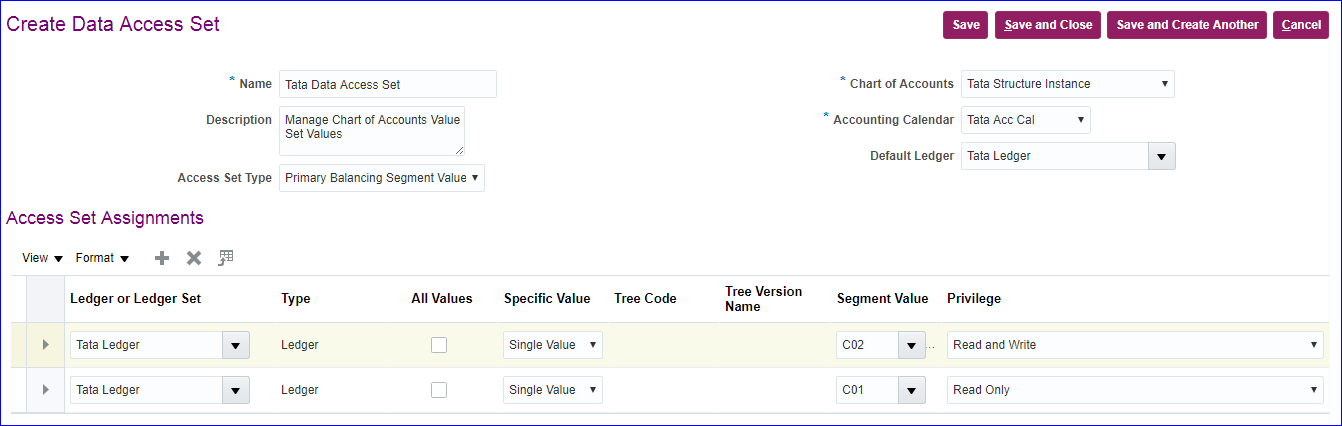 Save and Close
ii) Create new user & Assign GL role to user
SRIKANTH.DAS - General Accountant and General Accounting Manager (Both ORA_ codes)
iii) Provide Data access for user
Save and Close
ii) Create new user & Assign GL role to user
SRIKANTH.DAS - General Accountant and General Accounting Manager (Both ORA_ codes)
iii) Provide Data access for user
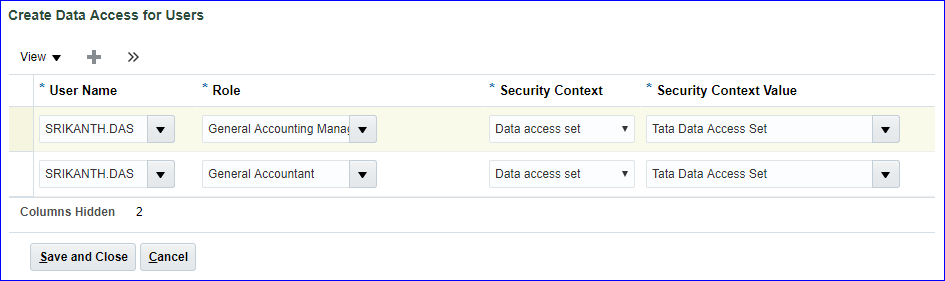 iv) Run LDAP job -- Retrieve Latest LDAP Changes
v) Create Journal
Login as SRIKANTH.DAS and for this user system should allow to create the Journals only with C02 BSV but not with C01.
iv) Run LDAP job -- Retrieve Latest LDAP Changes
v) Create Journal
Login as SRIKANTH.DAS and for this user system should allow to create the Journals only with C02 BSV but not with C01.
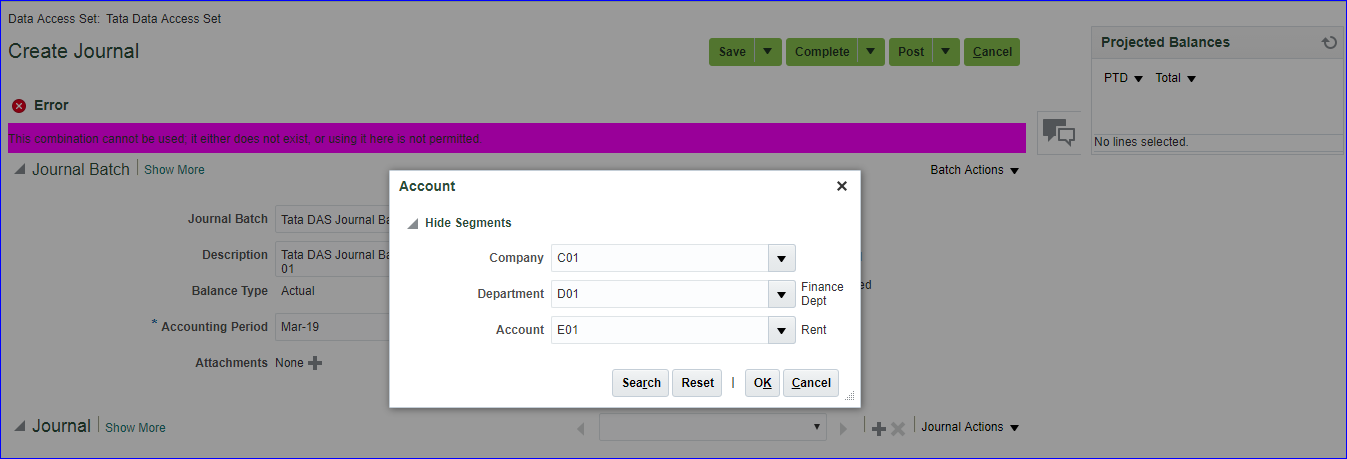
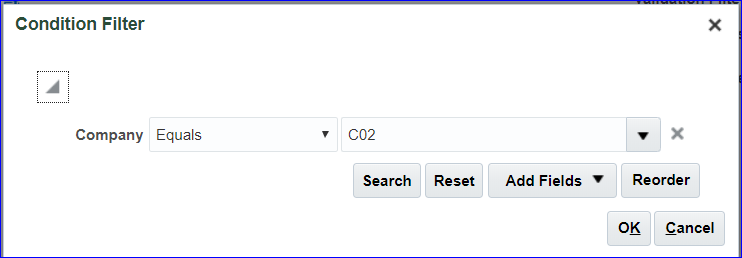
22. Cross Validation Rules Setting up invalid code combinations. Say Company C02 should not possess D01 department. FSM >> 'Manage Cross-Validation Rules' >> Select your COA >> Create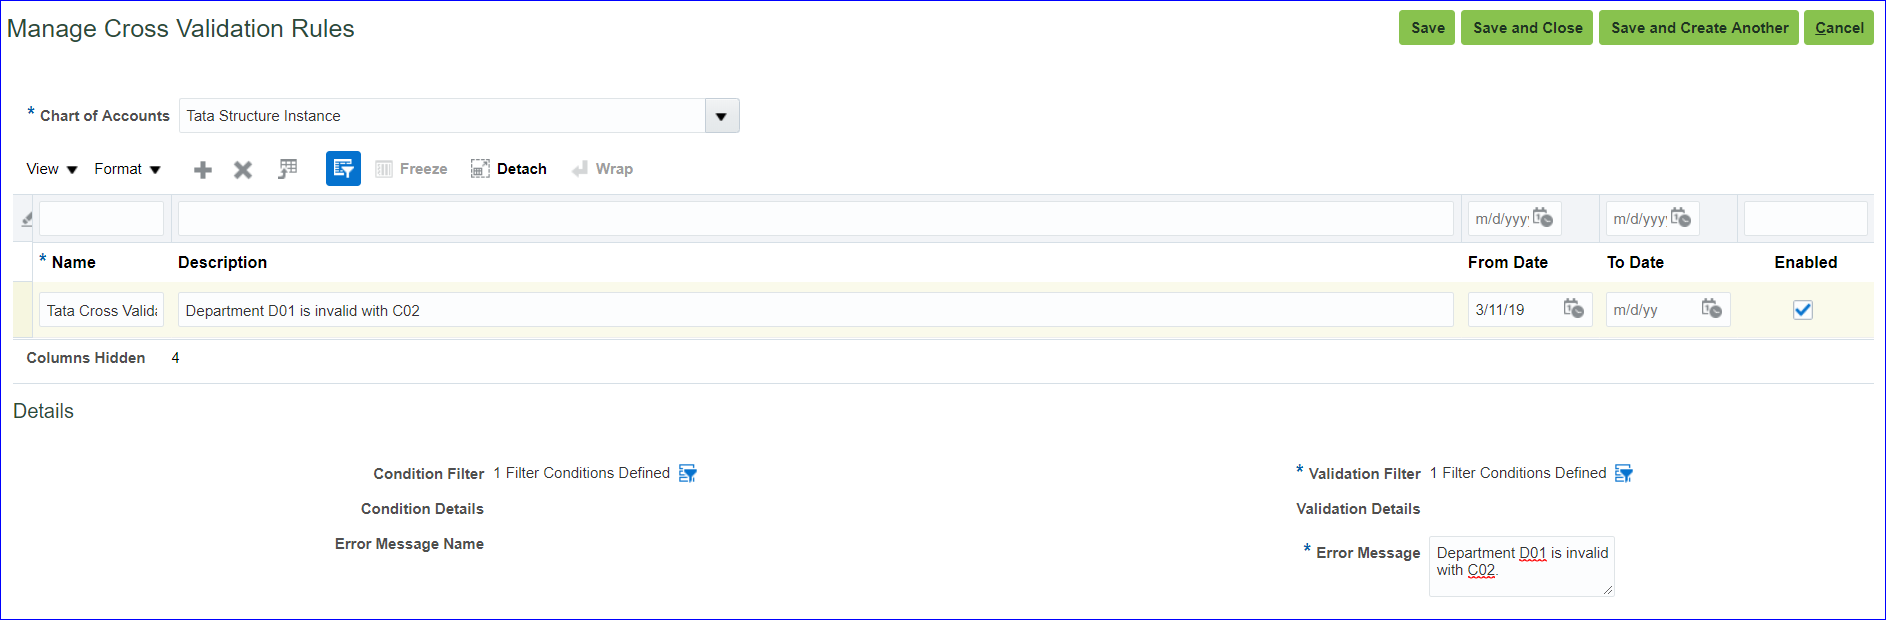
 Save and Close
FSM >> 'Manage Chart of Accounts Structures' >> Key Flexfield Name: Accounting Flexfield >> Deploy Flexfield
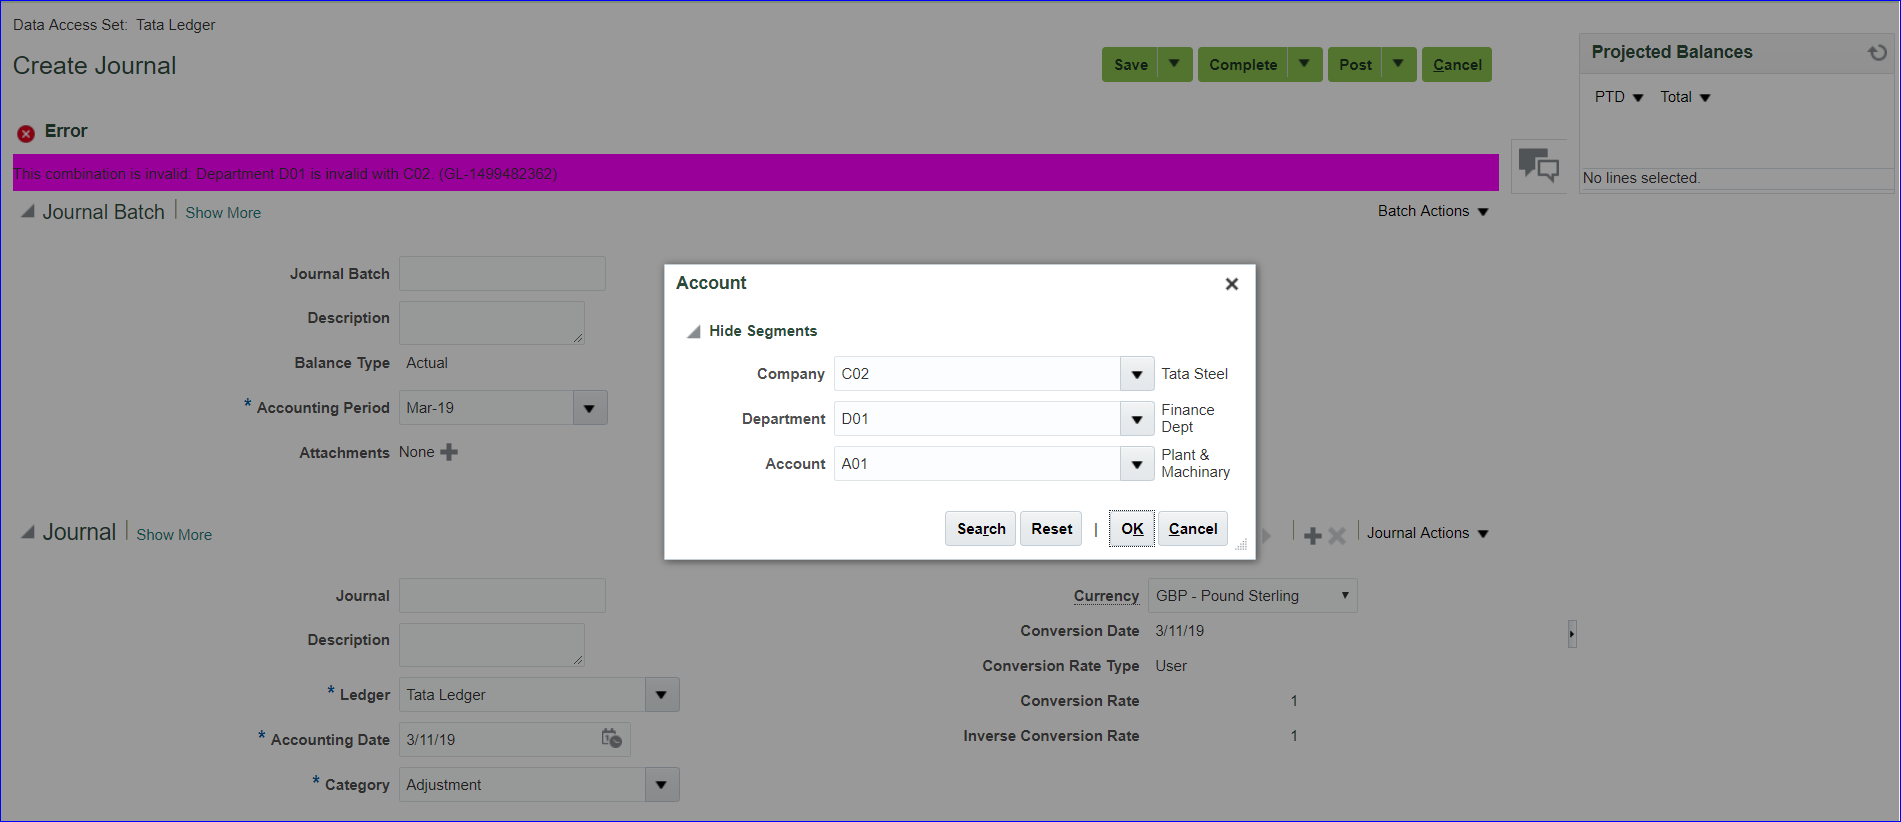
General Accounting >> Journals >> Tasks >> Create Journal >> Now enter C02.D01 code combination to view our error message
Save and Close
FSM >> 'Manage Chart of Accounts Structures' >> Key Flexfield Name: Accounting Flexfield >> Deploy Flexfield
General Accounting >> Journals >> Tasks >> Create Journal >> Now enter C02.D01 code combination to view our error message
 We can disable simply by unchecking the enabled option in 'Manage Cross-Validation Rules' task and also deploy flexfield.
23. Security Rules
i) Create Security rule
C01 - Allow; C02- Dont allow
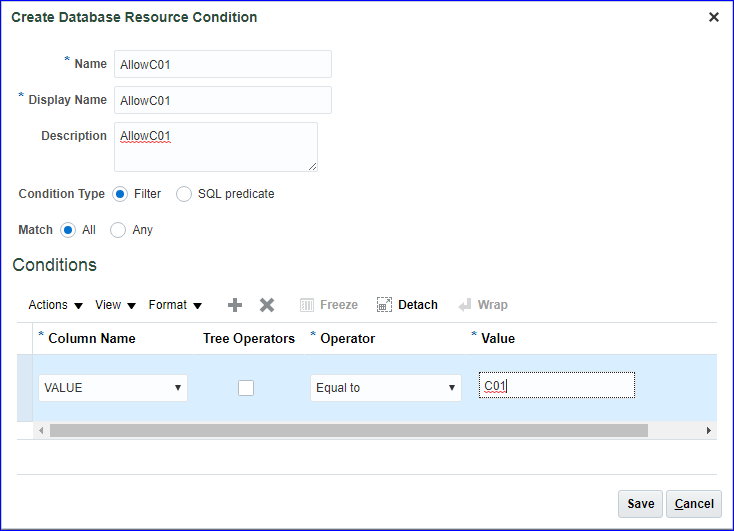
FSM >> 'Manage Chart of Accounts Value Set Values' >> Search value set code: Tata Company Value Set >> Select the line and click on Edit >> Enable 'Security enabled' >> Data Security Resource Name: Tata_Security_Rule >> Save >> Click on Edit Data Security >> Condition tab >> Create
 Save
Policy tab >> Create >> General Information tab - Name: Tata_Security_Rule; Start date: SYSDATE; Module: General Ledger >> Role tab >> Add >> Role name: General; Application: fscm >> Search >> Select General Accounting Manager >> Apply
Rule tab >> Row set: Multiple values; Condition: AllowC01; Description: AllowC01 >> Save and Close
Save and Submit
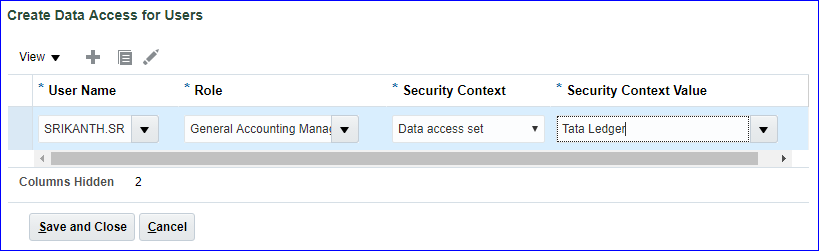
ii) Create new user (SRIKANTH.SR) and assign role (General Accounting Manager - ORA_ code) to user
iii) Provide data access for user
Save
Policy tab >> Create >> General Information tab - Name: Tata_Security_Rule; Start date: SYSDATE; Module: General Ledger >> Role tab >> Add >> Role name: General; Application: fscm >> Search >> Select General Accounting Manager >> Apply
Rule tab >> Row set: Multiple values; Condition: AllowC01; Description: AllowC01 >> Save and Close
Save and Submit
ii) Create new user (SRIKANTH.SR) and assign role (General Accounting Manager - ORA_ code) to user
iii) Provide data access for user
 Save and Close
iv) Run LDAP
→ Retrieve Latest LDAP Changes
→ Import User and Role Application Security Data
v) FSM >> 'Manage Chart of Accounts Structures' >> Search Key Flexfield Name: Accounting Flexfield >> Deploy Flexfield if not deployed.
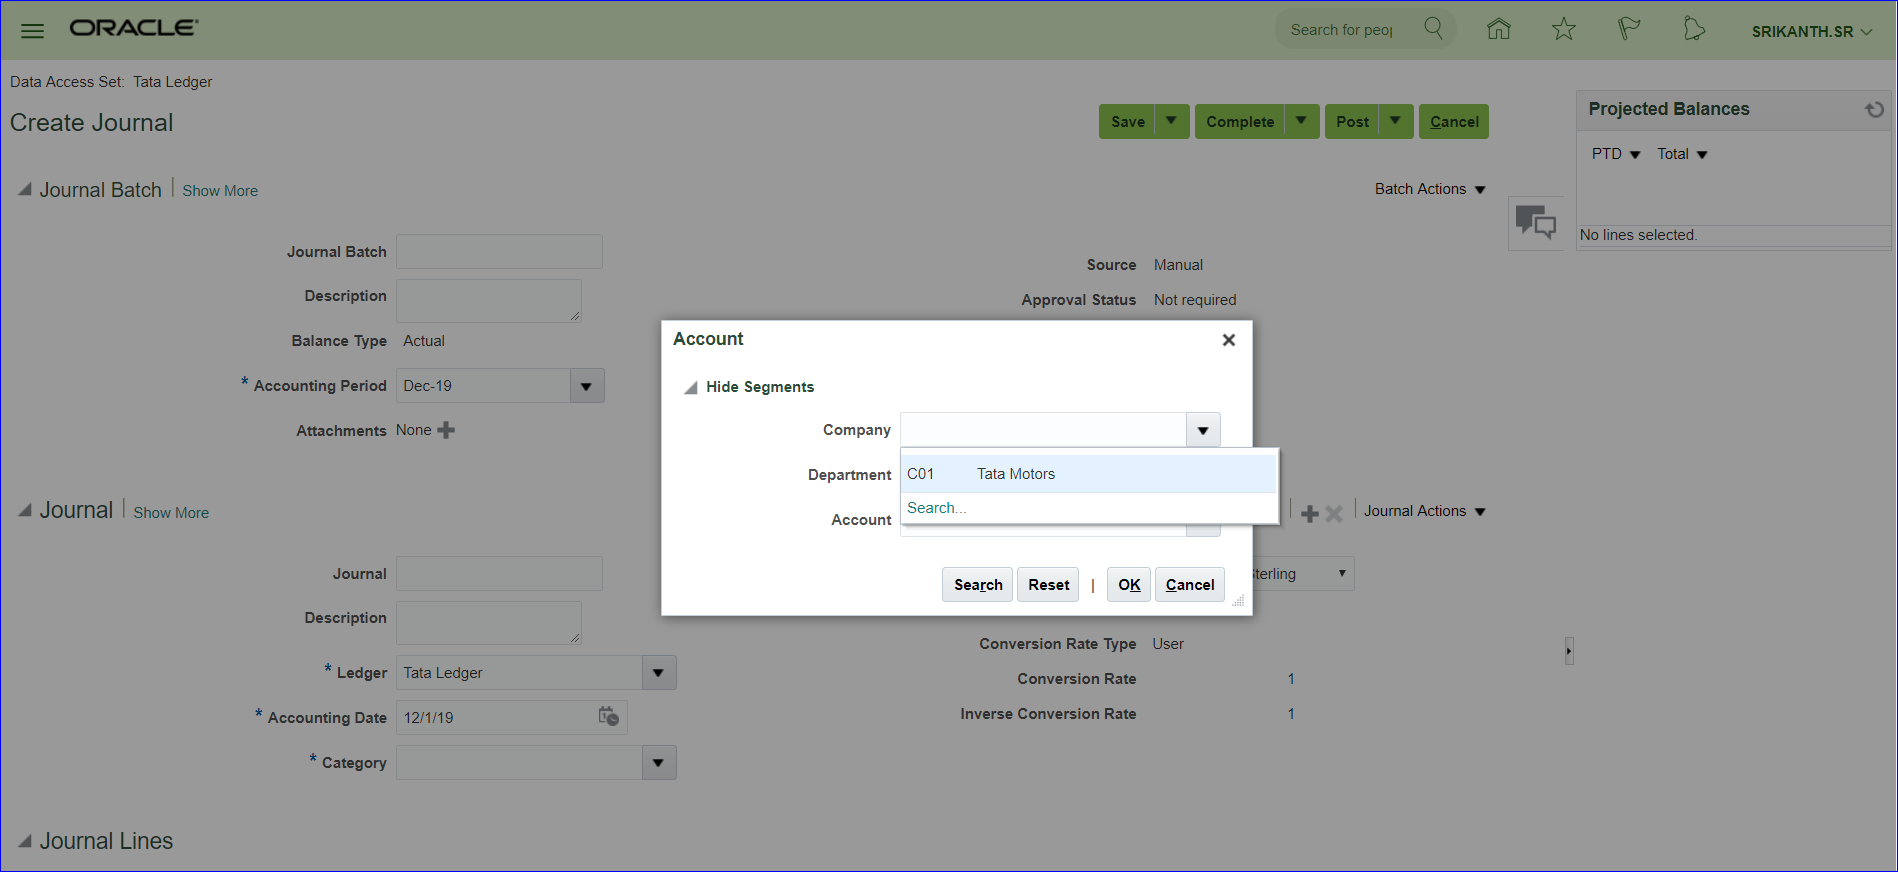
vi) Create Journal
Login as SRIKANTH.SR user and create Journal. In LOV we can see only C01.
Save and Close
iv) Run LDAP
→ Retrieve Latest LDAP Changes
→ Import User and Role Application Security Data
v) FSM >> 'Manage Chart of Accounts Structures' >> Search Key Flexfield Name: Accounting Flexfield >> Deploy Flexfield if not deployed.
vi) Create Journal
Login as SRIKANTH.SR user and create Journal. In LOV we can see only C01.
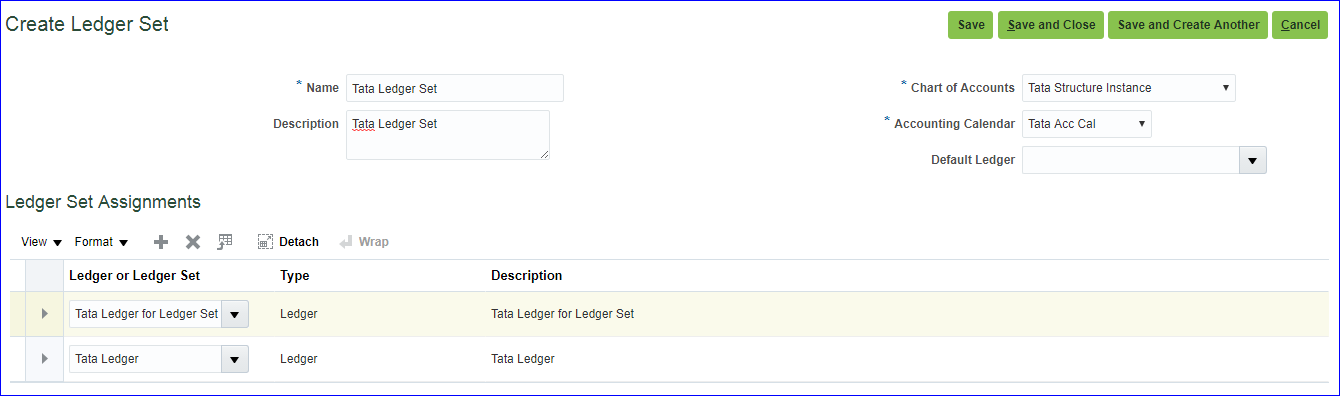
24. Create Ledger Set Grouping of Ledgers which has same COA and Calendar (currency could be different). For this purpose we create one more ledger along with our Tata Ledger. i) Create new Ledger (Tata Ledger for Ledger Set) Implementation project >> 'Manage Primary Ledgers' >> Create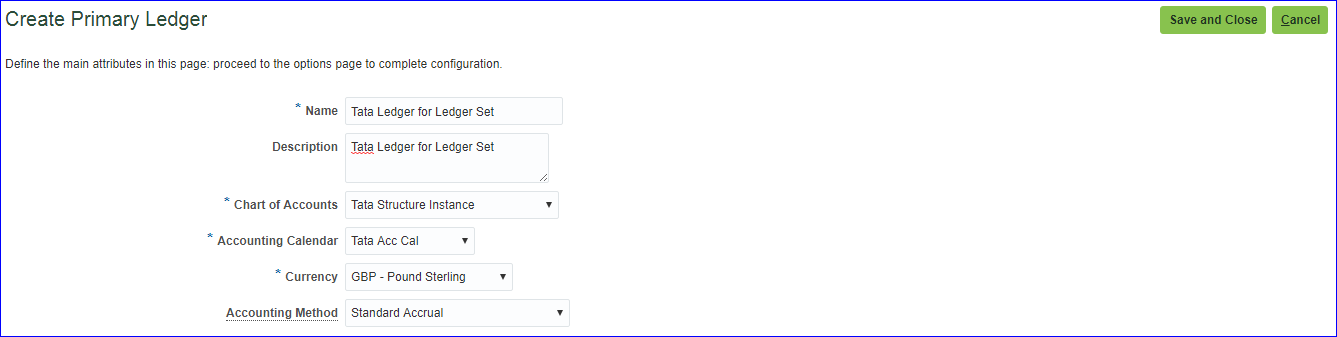 Save and Close
Specify Ledger Options >> Click on Select Scope value >> Primary Ledger: Select and Add >> Apply and Go to Task >> Select your new Ledger >> Save and Close
Save and Close
Specify Ledger Options >> Click on Select Scope value >> Primary Ledger: Select and Add >> Apply and Go to Task >> Select your new Ledger >> Save and Close
 Save and Close
Review and Submit Accounting Configuration >> Submit >> After the successful completion of job, verify the status of Ledger 'Manage Primary Ledgers' and look for newly created Ledger.
ii) Create Ledger set (Tata Ledger Set)
Implementation Project >> 'Manage Ledger Sets' >> Create
Save and Close
Review and Submit Accounting Configuration >> Submit >> After the successful completion of job, verify the status of Ledger 'Manage Primary Ledgers' and look for newly created Ledger.
ii) Create Ledger set (Tata Ledger Set)
Implementation Project >> 'Manage Ledger Sets' >> Create
 Save and Close
iii) Create new user and assign GL role to user
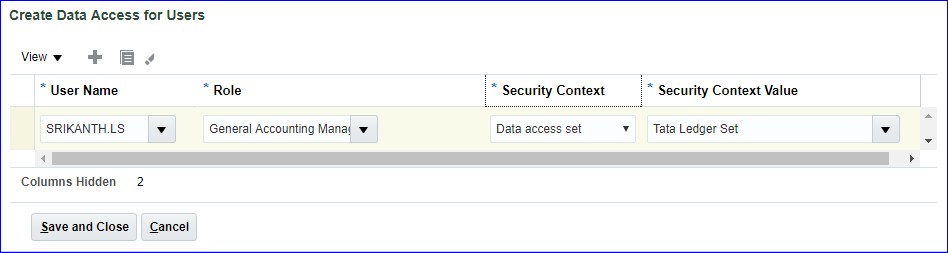
User is SRIKANTH.LS and assigned role is General Accounting Manager (Code: GL_)
v) Assign data access for user
FSM >> 'Manage Data Access for Users' >> Create
Save and Close
iii) Create new user and assign GL role to user
User is SRIKANTH.LS and assigned role is General Accounting Manager (Code: GL_)
v) Assign data access for user
FSM >> 'Manage Data Access for Users' >> Create
 Save and Close
vi) Run LDAP job - Retrieve Latest LDAP Changes
vii) Open periods in new Ledger (Tata Ledger for Ledger Set)
Login as SRIKANTH.LS user >> General Accounting >> Period Close
viii) Create Journal
For one ledger set we get two ledgers
Save and Close
vi) Run LDAP job - Retrieve Latest LDAP Changes
vii) Open periods in new Ledger (Tata Ledger for Ledger Set)
Login as SRIKANTH.LS user >> General Accounting >> Period Close
viii) Create Journal
For one ledger set we get two ledgers
25. Creation of Reporting Ledger i) Create reporting ledger (INR) In implementation project >> 'Manage Reporting Currencies' >> Go to Task >> Create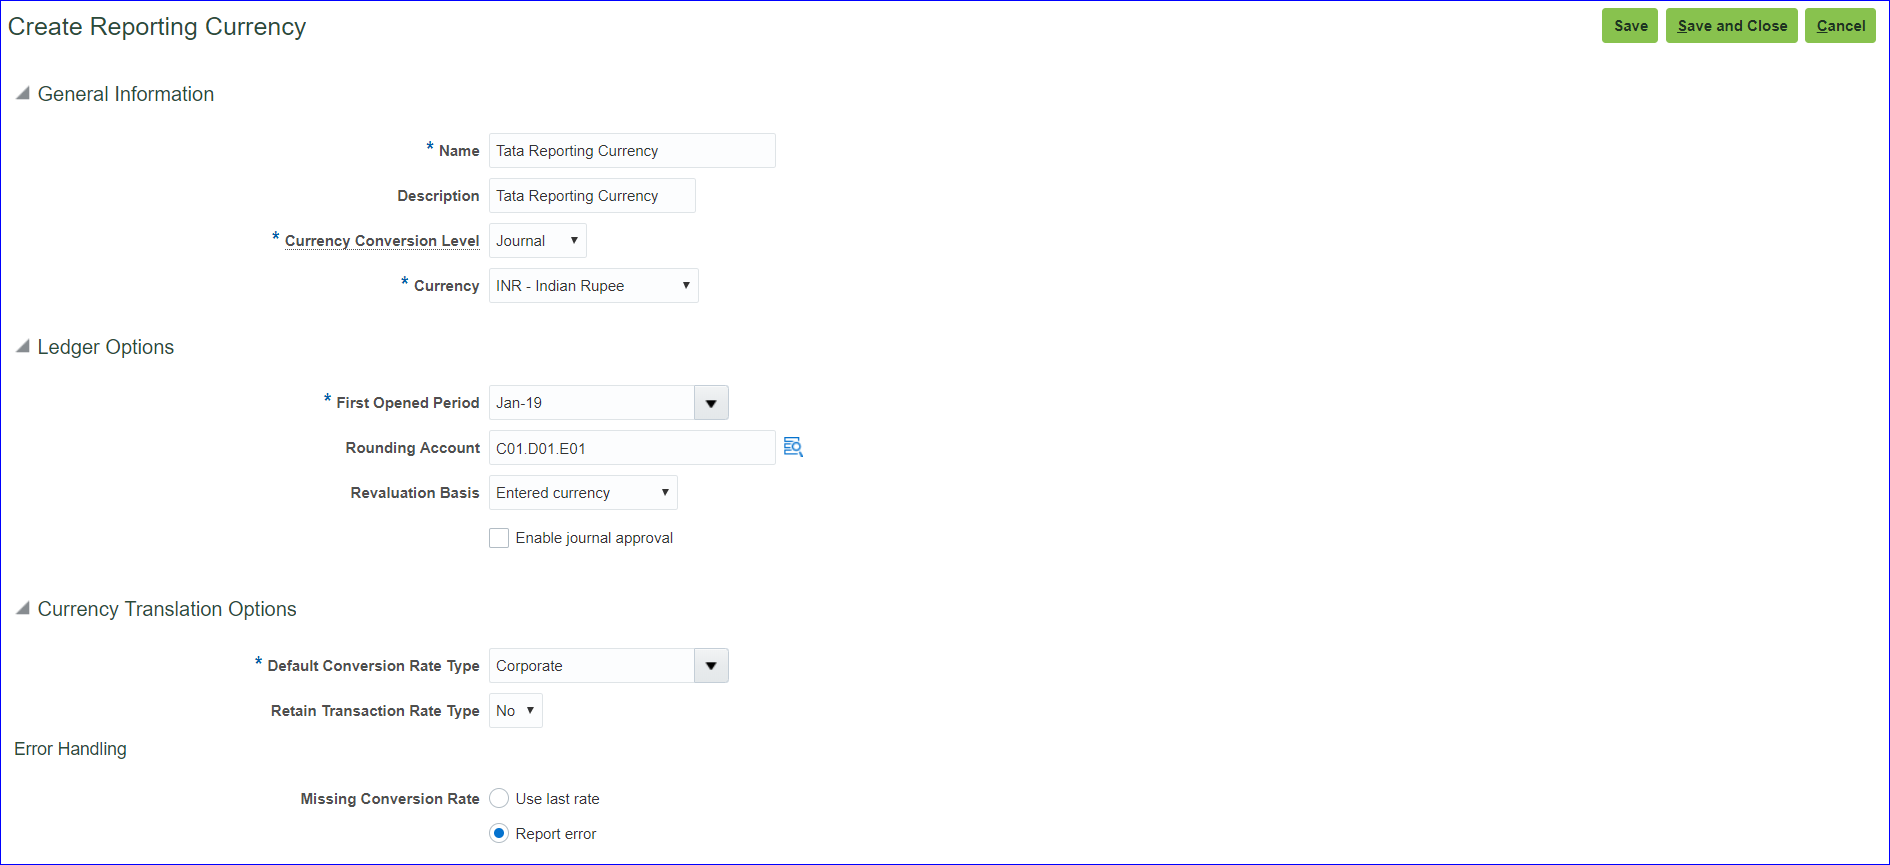 Creation of reporting currency = Creation of reporting ledger
ii) Create new user & assign GL roles to user
SRIKANTH.REPORTING -- General Accounting Manager (ORA_ code)
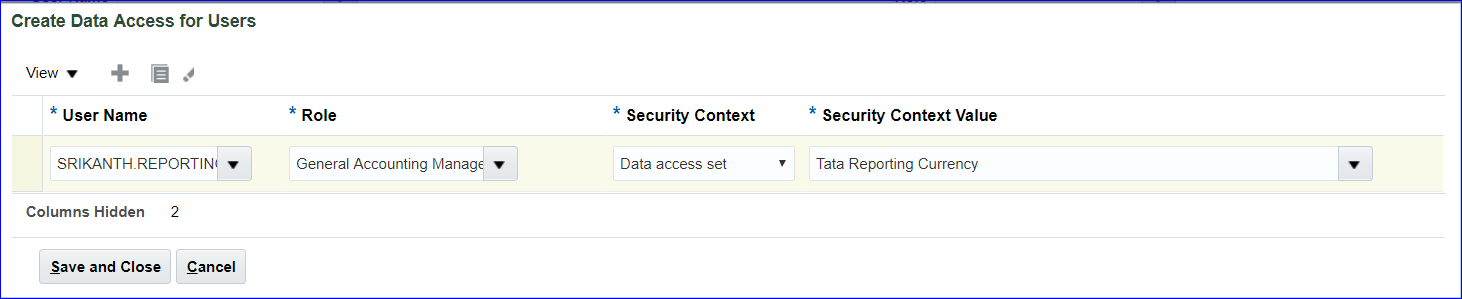
iii) Assign data access set for user
'Manage Data Access for Users' >> Create
Creation of reporting currency = Creation of reporting ledger
ii) Create new user & assign GL roles to user
SRIKANTH.REPORTING -- General Accounting Manager (ORA_ code)
iii) Assign data access set for user
'Manage Data Access for Users' >> Create
 iv) Run standard jobs
a) Retrieve Latest LDAP Changes
b) Import User and Role Application Security Data
v) Define daily rates (GBP & INR)
FSM >> Manage Daily Rates >> Daily Rates tab >> Create in Spreadsheet
iv) Run standard jobs
a) Retrieve Latest LDAP Changes
b) Import User and Role Application Security Data
v) Define daily rates (GBP & INR)
FSM >> Manage Daily Rates >> Daily Rates tab >> Create in Spreadsheet
Create Daily Rates tab >> Submit
vi) Open periods in reporting ledger
Login as SRIKANTH.REPORTING >> General Accounting >> Period Close >> Click on General Ledger (Never Opened) >> Open till current period
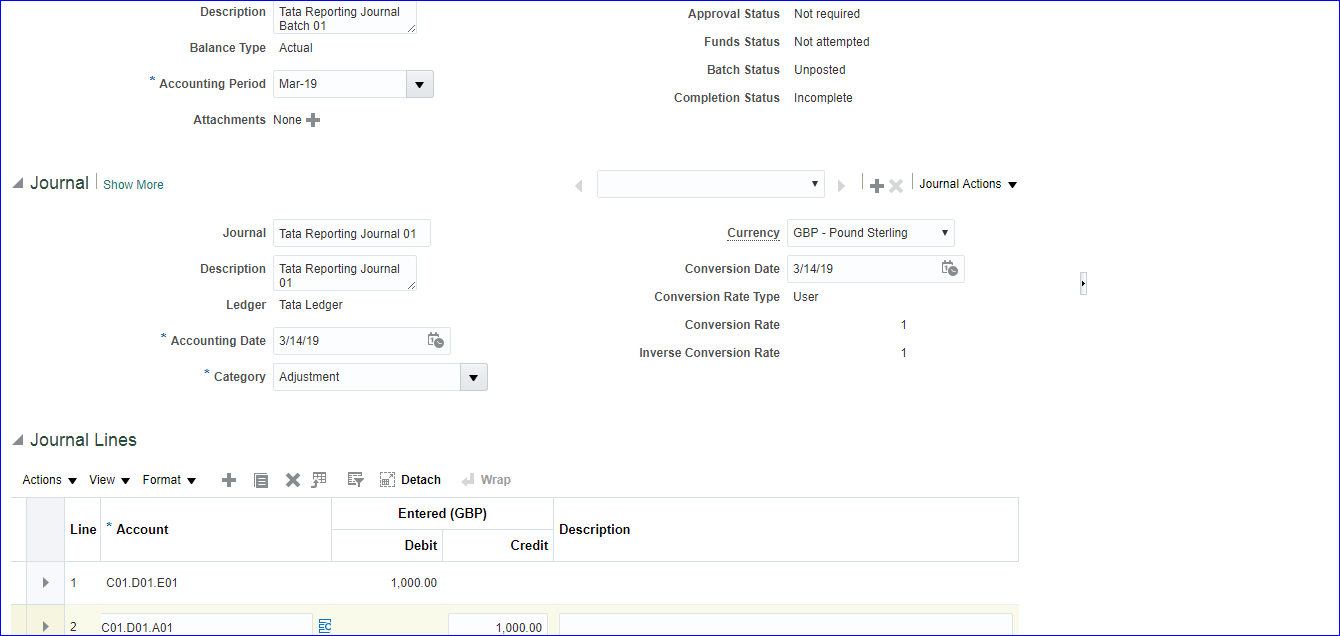
vii) Create Journal in primary ledger (Tata Ledger) & Post
Login as SRIKANTH.G >> Create Journal
 Save >> Complete >> Post
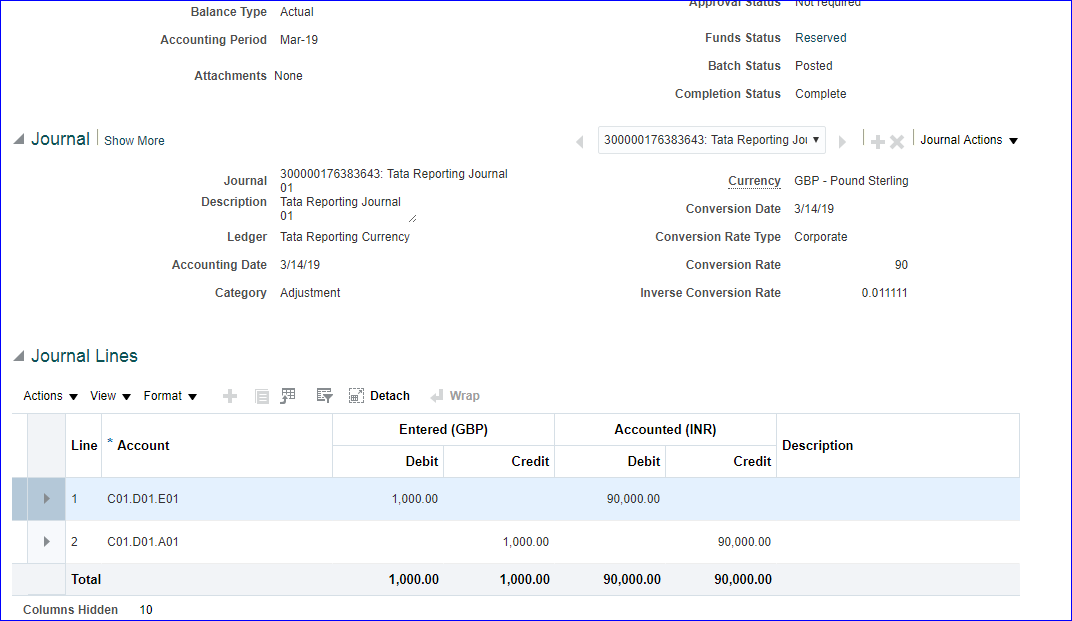
viii) Find Journal in reporting ledger in reporting currency
Login as SRIKANTH.REPORTING >> General Accounting >> Journals >> Tasks >> Manage Journals >> Search your Journal
Save >> Complete >> Post
viii) Find Journal in reporting ledger in reporting currency
Login as SRIKANTH.REPORTING >> General Accounting >> Journals >> Tasks >> Manage Journals >> Search your Journal
26. Creation of Secondary Ledger i) Create COA with two segments Manage Chart of Accounts Structures >> Search for Key Flexfield Name: Accounting Flexfield >> Manage Structures >> Create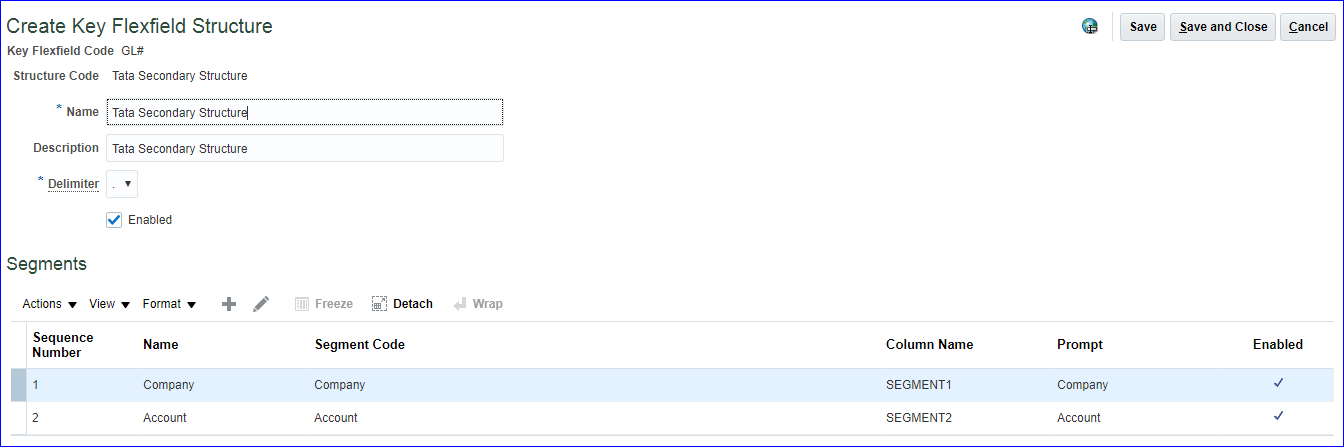

 Click on 'Manage Structure Instances' >> Create
 Save and Close >> Deploy Flexfield
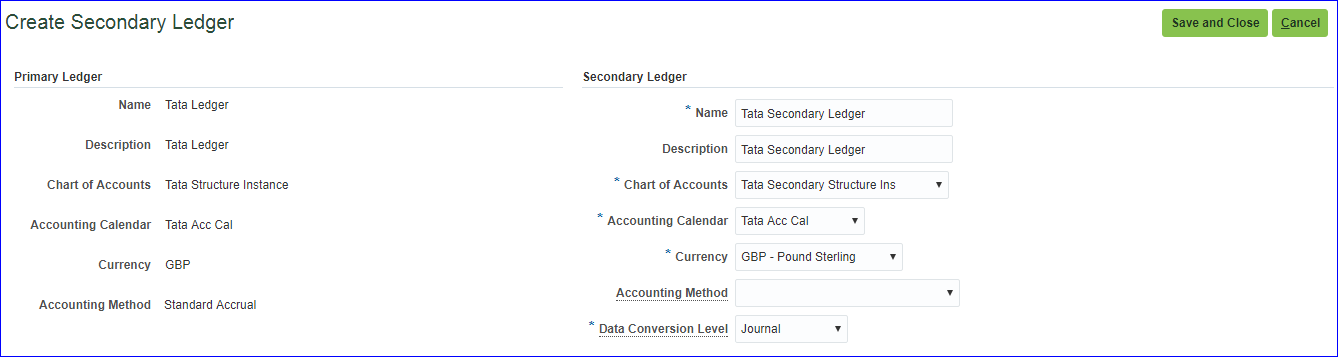
ii) Create secondary ledger
Implementation project >> 'Manage Secondary Ledgers' >> Go to Task >> Create
Save and Close >> Deploy Flexfield
ii) Create secondary ledger
Implementation project >> 'Manage Secondary Ledgers' >> Go to Task >> Create
 iii) Specify ledger options
Implementation project >> 'Specify Ledger Options' >> Go to Task >> Select Specify Ledger Options; Primary Ledger: Tata Ledger; Secondary Ledger: Select and Add >> Apply and Go to Task >> Select the line & Save and Close >> Enter the Retained Earnings Account: C01.O01 >> Save and Close
iv) Map primary and secondary ledger COA
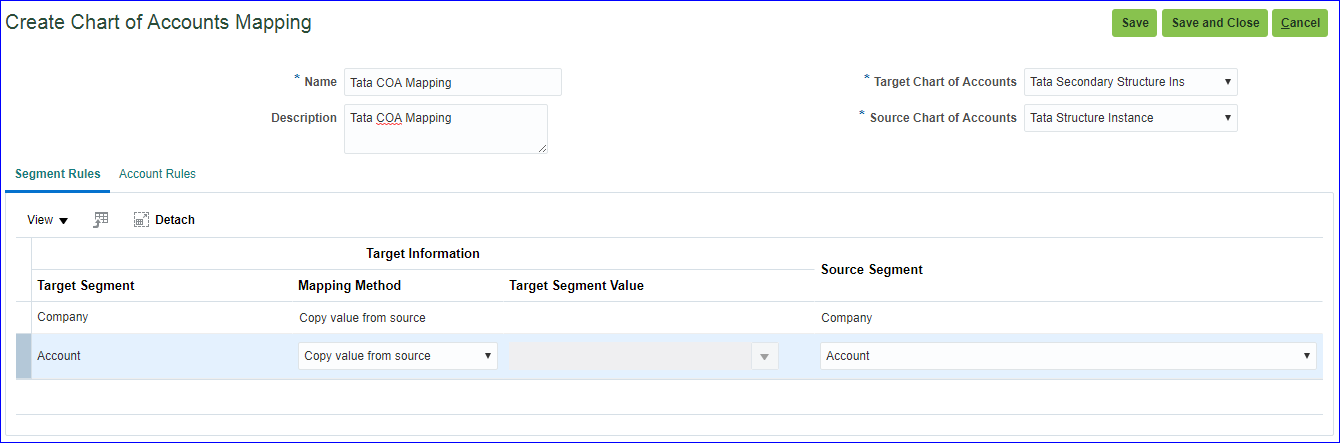
Implementation project >> 'Manage Chart of Accounts Mappings' >> Go to Task >> Create
iii) Specify ledger options
Implementation project >> 'Specify Ledger Options' >> Go to Task >> Select Specify Ledger Options; Primary Ledger: Tata Ledger; Secondary Ledger: Select and Add >> Apply and Go to Task >> Select the line & Save and Close >> Enter the Retained Earnings Account: C01.O01 >> Save and Close
iv) Map primary and secondary ledger COA
Implementation project >> 'Manage Chart of Accounts Mappings' >> Go to Task >> Create
 v) Create mapping between primary and secondary ledger
Implementation project >> 'Complete Primary to Secondary Ledger Mapping' >> Go to Task >> Select Chart of Accounts Mapping: Tata COA Mapping >> Save and Close
vi) Create user & assign GL roles to user
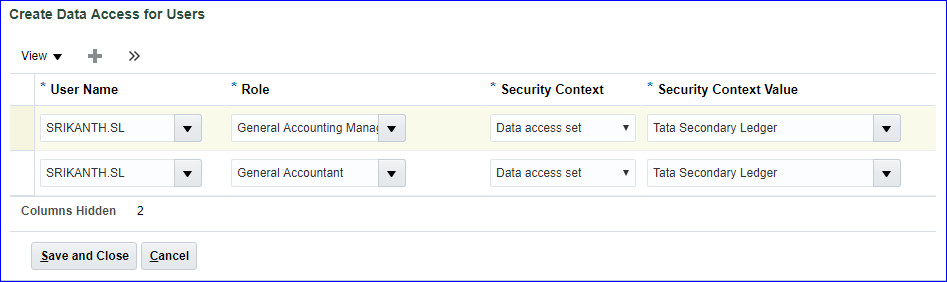
SRIKANTH.SL - General Accounting Manager & General Accountant (ORA_ codes)
vii) Provide data access for user
'Manage Data Access for Users'
v) Create mapping between primary and secondary ledger
Implementation project >> 'Complete Primary to Secondary Ledger Mapping' >> Go to Task >> Select Chart of Accounts Mapping: Tata COA Mapping >> Save and Close
vi) Create user & assign GL roles to user
SRIKANTH.SL - General Accounting Manager & General Accountant (ORA_ codes)
vii) Provide data access for user
'Manage Data Access for Users'
 viii) Run LDAP job
a) Retrieve Latest LDAP Changes
b) Import User and Role Application Security Data
ix) Open periods in secondary ledger
Login as SRIKANTH.SL >> Period Close >> Click on General Ledger (Never Opened) >> Open till current period
x) Create Journal in primary ledger
Login as SRIKANTH.G >> Create Journal
viii) Run LDAP job
a) Retrieve Latest LDAP Changes
b) Import User and Role Application Security Data
ix) Open periods in secondary ledger
Login as SRIKANTH.SL >> Period Close >> Click on General Ledger (Never Opened) >> Open till current period
x) Create Journal in primary ledger
Login as SRIKANTH.G >> Create Journal
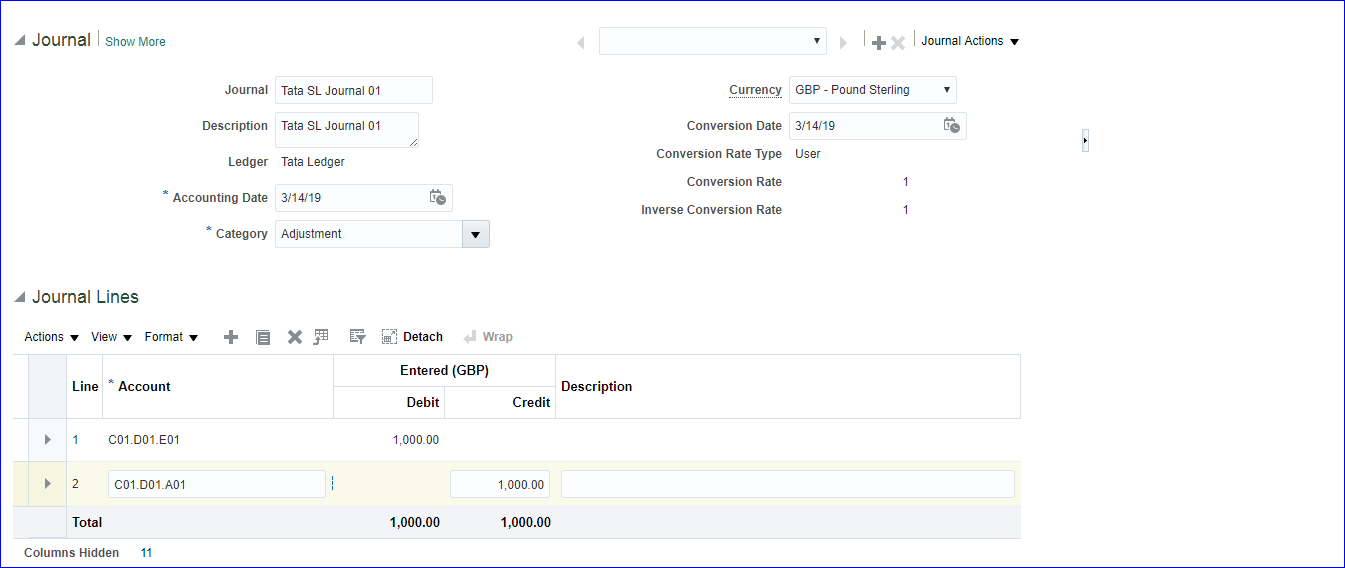 Save >> Complete >> Post
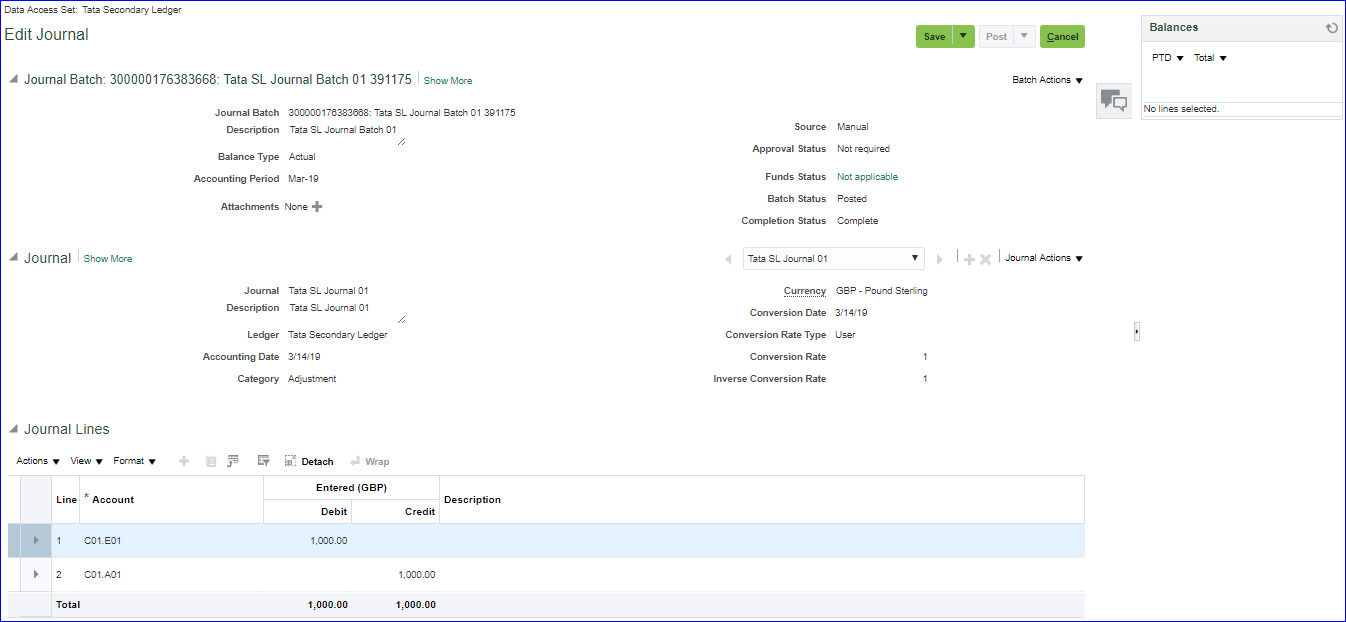
xi) Find Journal in secondary ledger
Login as SRIKANTH.SL >> Manage Journals >> You can post
Save >> Complete >> Post
xi) Find Journal in secondary ledger
Login as SRIKANTH.SL >> Manage Journals >> You can post
27. Auto Posting Implementation Project >> Manage AutoPost Criteria Sets >> Create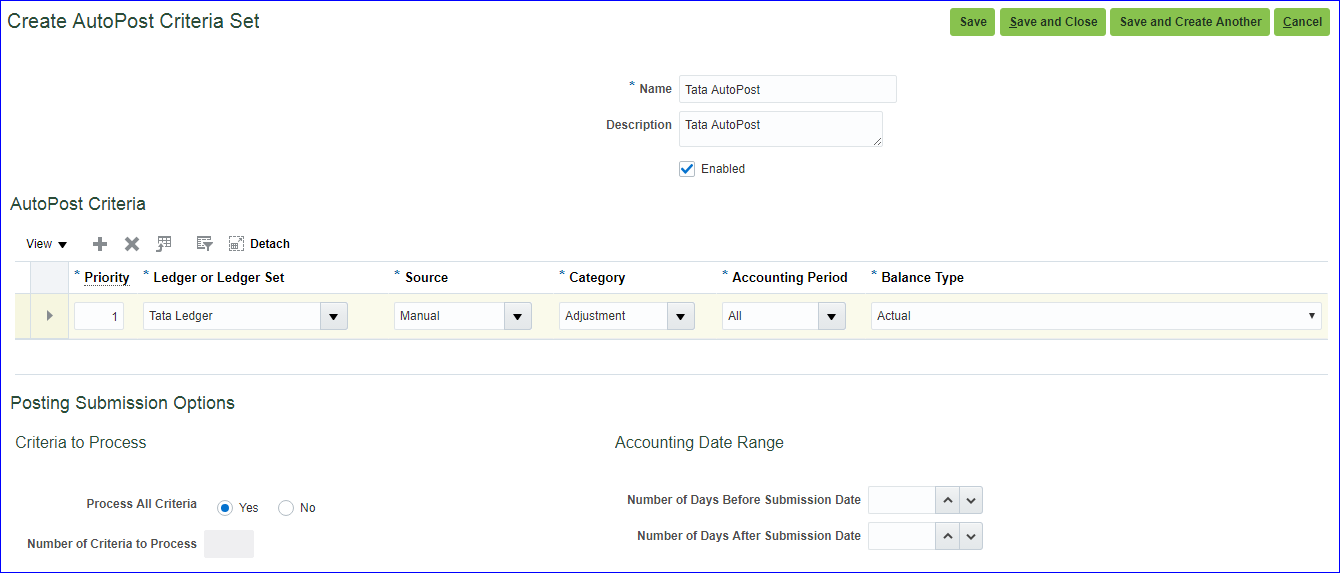 Save and Close
Create Journal with Category as 'Adjustment' >> Save >> Complete >> Cancel (Do not post)
General Accounting >> Journals >> Tasks >> Run AutoPost >> AutoPost Criteria Set: Tata AutoPost
i) If you click on Submit all the eligible Journals will be posted.
ii) If you want to schedule this job then click on Advanced >> Schedule tab >> Run: Using a Schedule; Frequency: Select your frequency.
Finally after Submission verify your Journal batch status which should be Posted.
Save and Close
Create Journal with Category as 'Adjustment' >> Save >> Complete >> Cancel (Do not post)
General Accounting >> Journals >> Tasks >> Run AutoPost >> AutoPost Criteria Set: Tata AutoPost
i) If you click on Submit all the eligible Journals will be posted.
ii) If you want to schedule this job then click on Advanced >> Schedule tab >> Run: Using a Schedule; Frequency: Select your frequency.
Finally after Submission verify your Journal batch status which should be Posted.
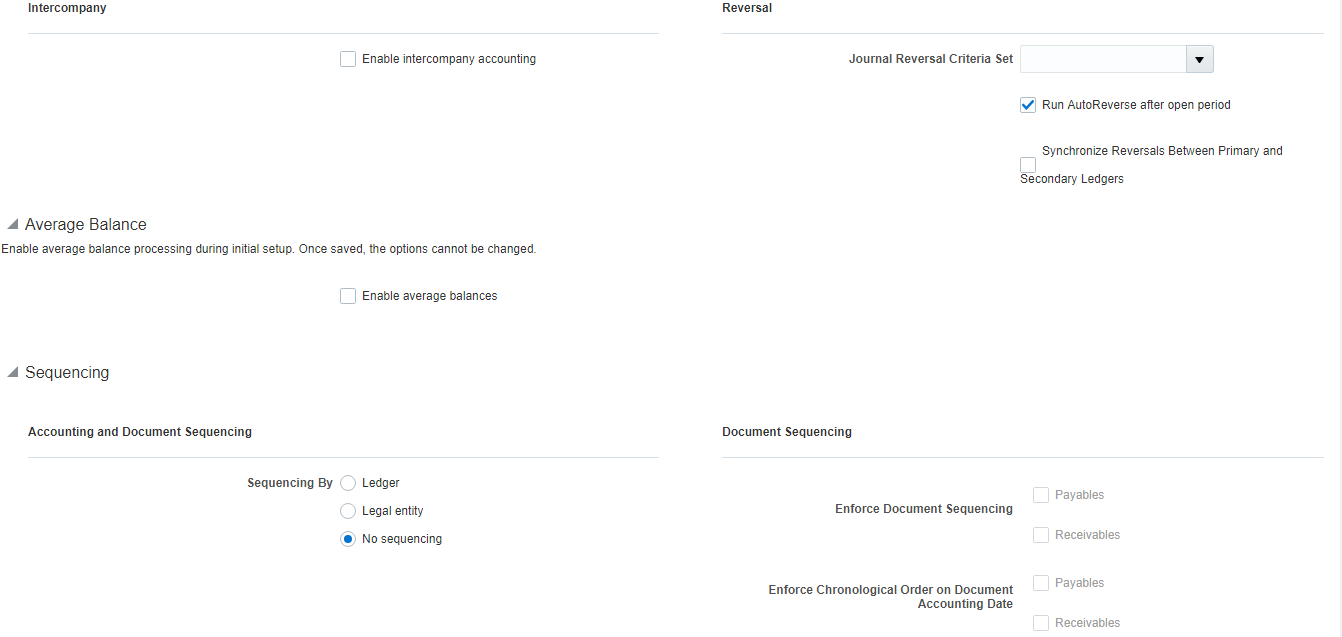
28. Auto Reversal Implementation project >> 'Manage Journal Reversal Criteria Sets' >> Create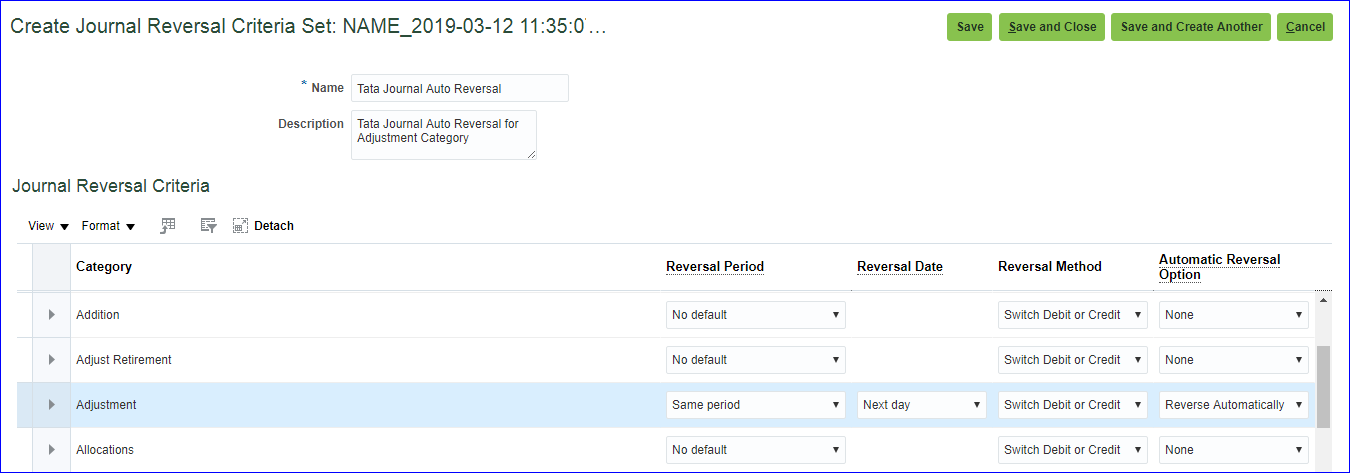 Save and Close
Implementation project >> 'Specify Ledger Options' >> Select Journal Reversal Criteria Set: Tata Journal Auto Reversal >> Save and Close
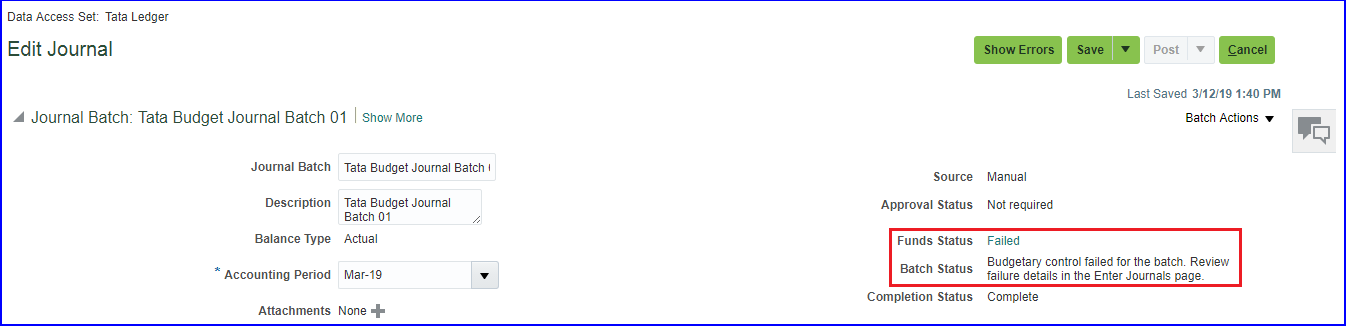
Create Journal with Category as 'Adjustment' >> Journal Batch: Tata Auto Reversal Journal Batch 01; Journal: Tata Auto Reversal Journal 01 >> Save >> Complete >> Post
General Accounting >> Journals >> Tasks >> Run AutoReverse >> Enter parameters >> Submit.
For scheduling go with Advanced
Save and Close
Implementation project >> 'Specify Ledger Options' >> Select Journal Reversal Criteria Set: Tata Journal Auto Reversal >> Save and Close
Create Journal with Category as 'Adjustment' >> Journal Batch: Tata Auto Reversal Journal Batch 01; Journal: Tata Auto Reversal Journal 01 >> Save >> Complete >> Post
General Accounting >> Journals >> Tasks >> Run AutoReverse >> Enter parameters >> Submit.
For scheduling go with Advanced
29. Create Budget i) Define Budgetary Controls Implementation project >> 'Define Budgetary Controls' >> Manage Budgetary Control >> Click on our Ledger name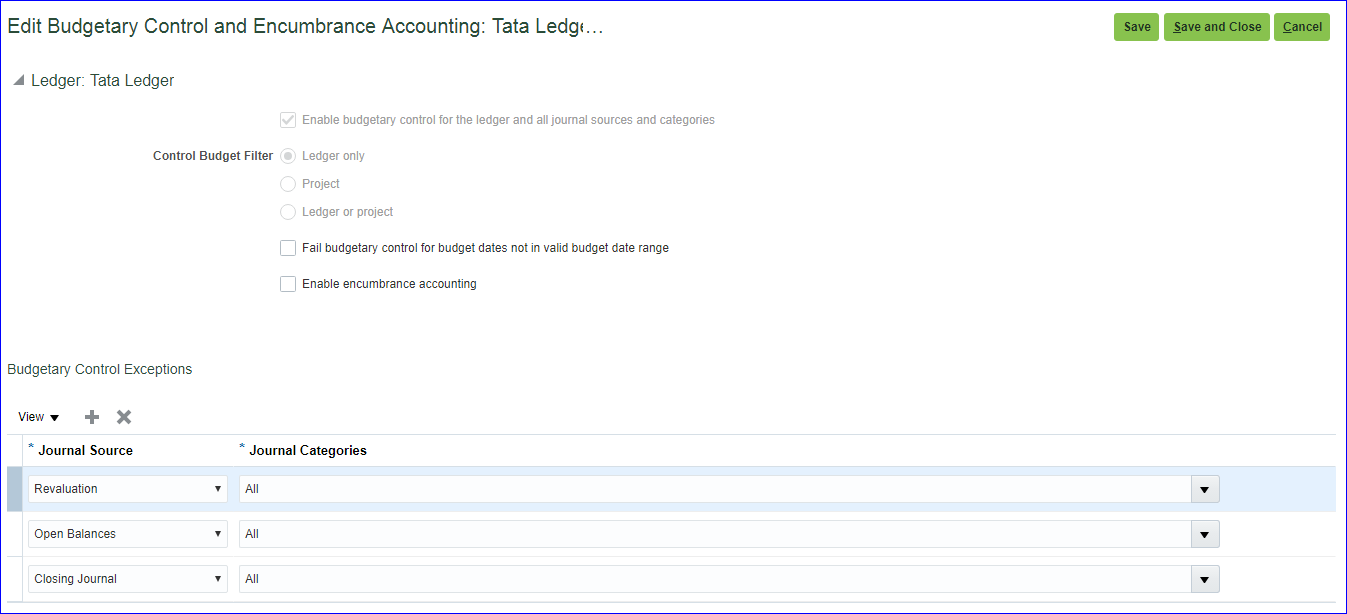
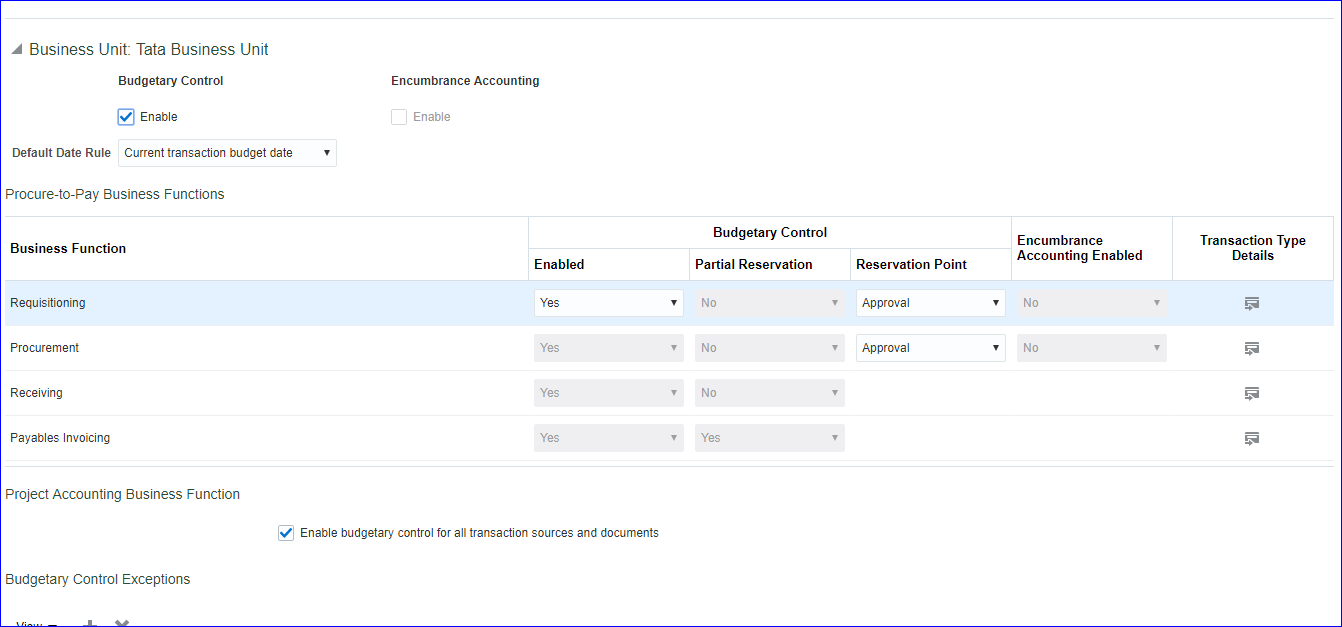 Save and Close
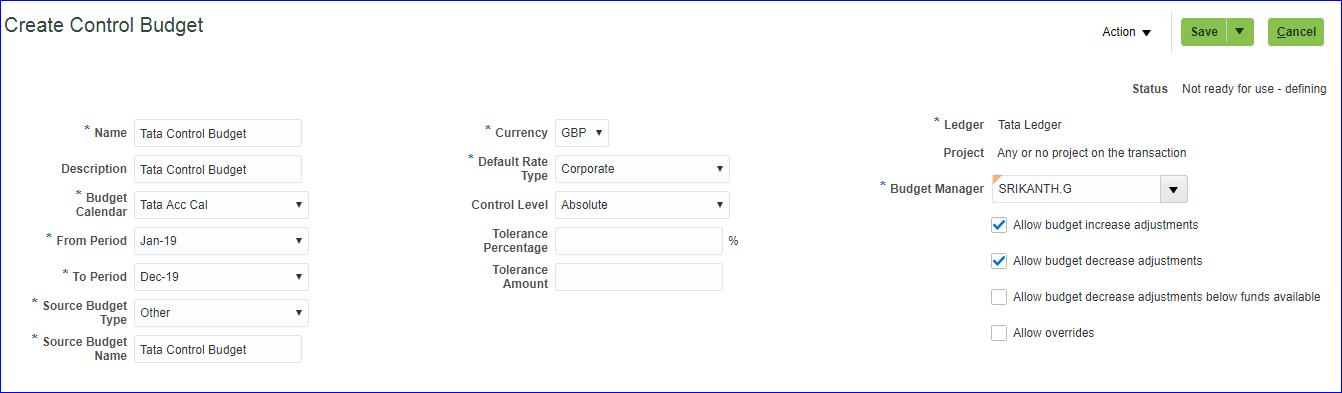
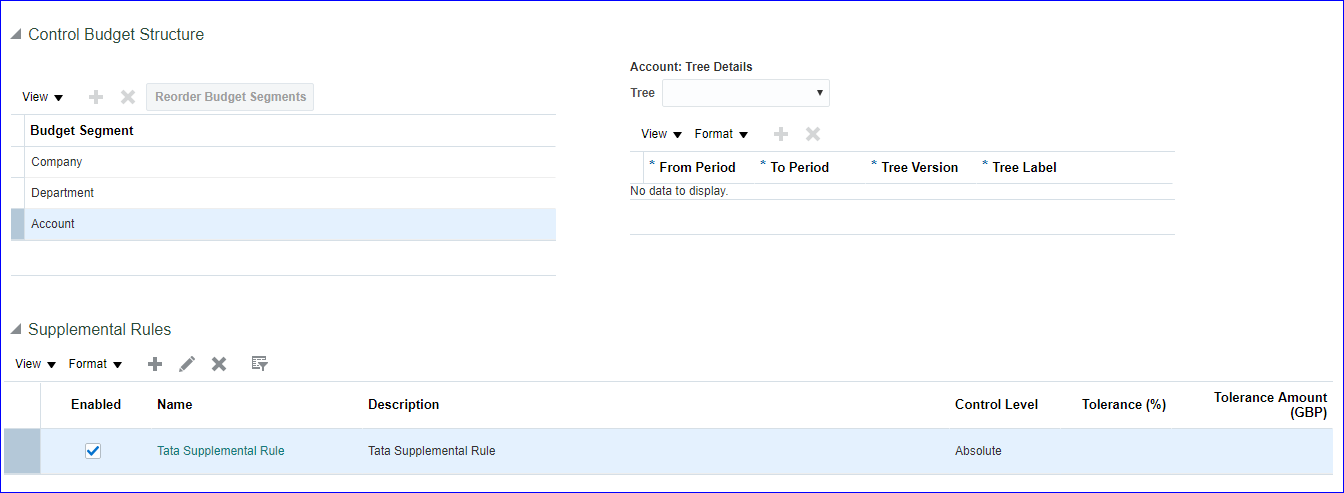
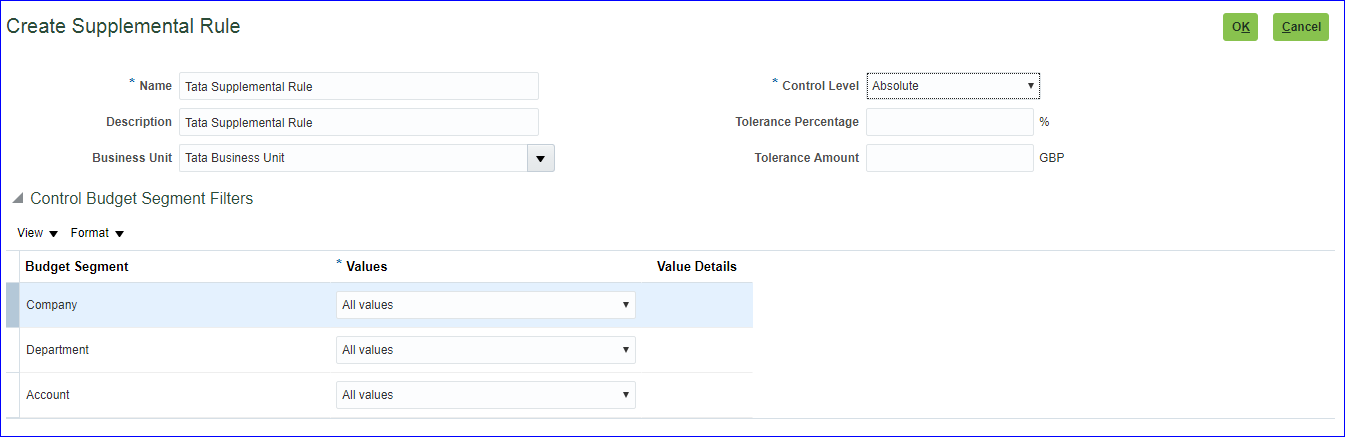
ii) Create Control Budget
'Manage Control Budgets' >> Create
Save and Close
ii) Create Control Budget
'Manage Control Budgets' >> Create
 Ok
Action >> Prepare for use
iii) Assign Budget role to User
Security Console and assign role 'Budget Analyst' and 'Budget Manager' to your user
iv) Assign data access for user
FSM >> 'Manage Data Access for Users' >> Create and above two roles to your user
Ok
Action >> Prepare for use
iii) Assign Budget role to User
Security Console and assign role 'Budget Analyst' and 'Budget Manager' to your user
iv) Assign data access for user
FSM >> 'Manage Data Access for Users' >> Create and above two roles to your user
 v) Run LDAP job -- Retrieve Latest LDAP Changes
vi) Open Budget periods
Budgetary Control >> Tasks >> Budget Period Statuses >> Click on Control budget name >> Change the status to Open for all periods >> Save and Close
vii) Prepare Budget data
Budgetary Control >> Tasks >> Enter Budgets in Spreadsheet >> Control Budget: Tata Control Budget; Start Period: Jan-19; End Period: Dec-19; Budget Entry Name: 2019 12-03-19 12:53:46 PM >> Create Spreadsheet
v) Run LDAP job -- Retrieve Latest LDAP Changes
vi) Open Budget periods
Budgetary Control >> Tasks >> Budget Period Statuses >> Click on Control budget name >> Change the status to Open for all periods >> Save and Close
vii) Prepare Budget data
Budgetary Control >> Tasks >> Enter Budgets in Spreadsheet >> Control Budget: Tata Control Budget; Start Period: Jan-19; End Period: Dec-19; Budget Entry Name: 2019 12-03-19 12:53:46 PM >> Create Spreadsheet
Enter Budget Amounts >> Import Amounts as Entered
Budgetary Control >> Tasks >> Review Budget Entries >> Control Budget: Tata Control Budget; From Budget Period: Jan-19; To Budget Period: Dec-19 >> Search >> Here we can see the imported amount
viii) Create Journal
Create Journal with Category as 'Adjustment' >> Journal Batch: Tata Budget Journal Batch 01; Journal: Tata Budget Journal 01
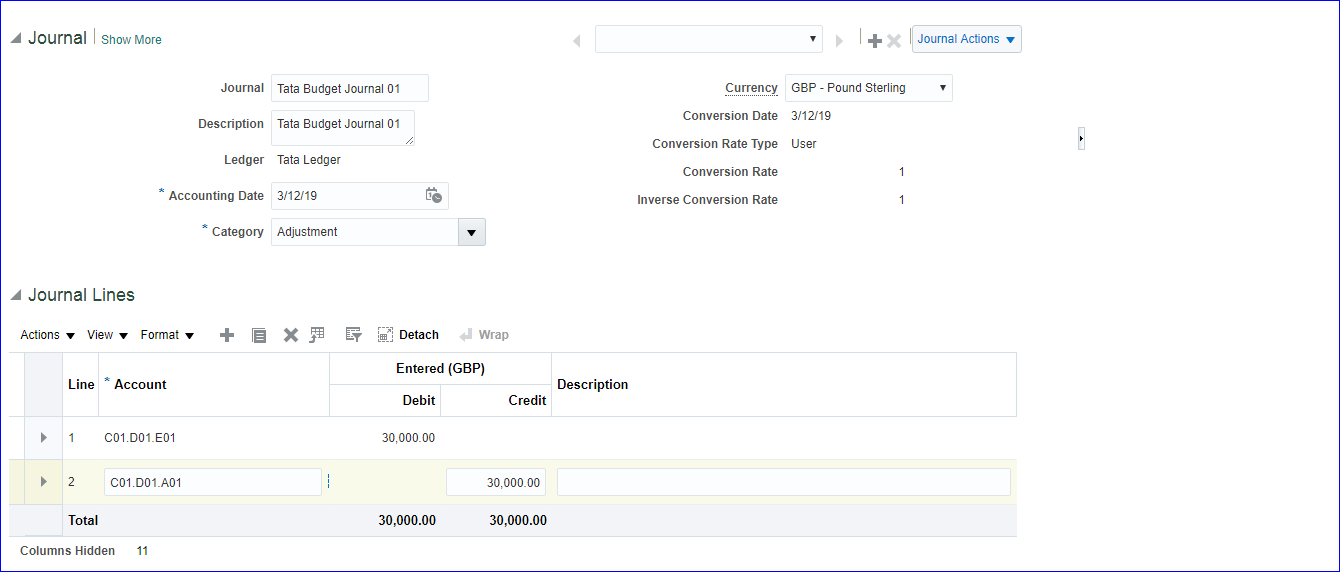 Save >> Complete >> Post
30. Journal Approval + Revaluation + Translation + Consolidation Pending i) Create Approval group FSM >> 'Manage Approval Groups' >> Create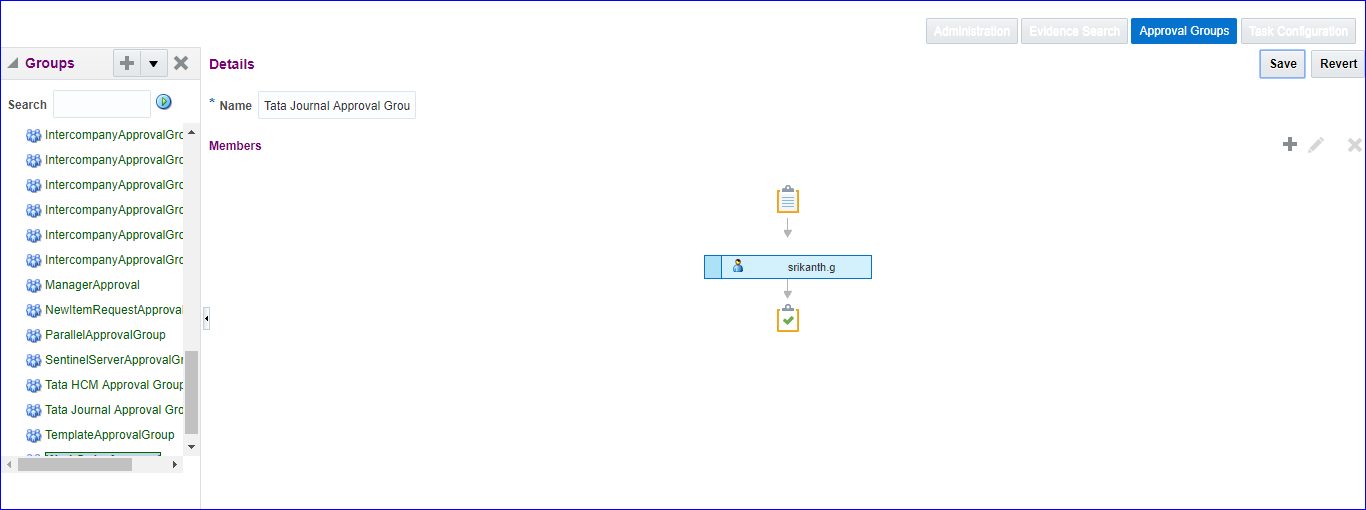 Save
ii) Create Approval rule
Rule is <= 10k.
On above click on Task Configuration >> Below search, select 'FinGlJournalApproval' and click on Edit >> Assigness tab
iii) Enable Journal approval for Ledger
iv) Enable Journal approval for Sources
v) Create Journal
Save
ii) Create Approval rule
Rule is <= 10k.
On above click on Task Configuration >> Below search, select 'FinGlJournalApproval' and click on Edit >> Assigness tab
iii) Enable Journal approval for Ledger
iv) Enable Journal approval for Sources
v) Create Journal
31. 1z0-960 dumps Below are correct: NO.1 You need to integrate Fusion Accounting Hub with external source systems used for Billing. Identity the step that is not correct when implementing this integration.
1. Create Implementation Project by selecting Offerings/ Options
2. Enable Geographies
3. Create Accounting Calendar
4. Currencies
5. Chart of Accounts (COA)
i) Create value sets
ii) Create COA structure
a) Create COA segments and assign value sets to segments
b) Create COA segment labels (segment labels in Fusion = flexfield qualifiers in EBS)
iii) Create COA structure instance and Deploy Accounting Flexfield
iv) Create value set values
a) Assign value attributes to segment (Natural Account) values (value attributes in Fusion = segment qualifier in EBS)
6. Create 'Primary Ledger'
7. Specify 'Ledger Options'
8. Create 'Legal Address'
9. Create 'Legal Entity'
10. Assign 'Legal Entity' to 'Primary Ledger'
11. Assign 'Balancing Segment Values' to 'Legal Entity'
12. Review and submit 'Accounting Configuration'
13. Assign GL Roles to User
14. Assign 'Data Access Set' to GL roles
15. Run LDAP Job
16. Open GL Periods
17. Create Journal and Post
18. Rapid Implementation
19. Foreign Currency Journals creation
20. Reverse Journals
21. Data Access Set
22. Cross Validation Rules
23. Security Rules
24. Create Ledger Set
25. Creation of Reporting Ledger
26. Creation of Secondary Ledger
27. Auto Posting
28. Auto Reversal
29. Create Budget
30. Journal Approval
31. 1z0-960 dumps
1. 'Implementation Project' creation Navigation: User Name >> Setup and Maintenance >> Tasks >> Manage Implementation Projects >> Click on create (+) icon
**One project will be assigned to only one user. The offerings and options within the project can be assigned to multiple users.
Next >> Check 'Financials' offerings and select all options >> Also check 'Procurement' offerings and select all options >> Save and Open Project
System automatically creates 'Task Lists and Tasks' (List of setups).
We can change status from 'Not Started' to 'In Progress' click on 'Edit' and change status accordingly.
Different statuses at 'Task Lists and Tasks' level: Not Started, In Progress, Completed, Execution Frozen, Completed with Errors.
2. Geographies Search for task 'Manage Geographies' in implementation project (Tata Finance Implementation Project).
Click on 'Go to Task' >> Search for Country Code >> Here for GB all the validations are completed.
Here 'Structure Defined', 'Hierarchy Defined' and 'Validation Defined' are important tasks. The 'Geography Type' which is defined in 'Structure Defined' reflects in 'Hierarchy Defined'.
In case 'Geocoding Defined' is disabled then enable 'Geocoding Defined' and 'Address Cleansing Defined. Later go to Actions and click on 'Import Nokia Data' (R13 old name) or 'Import Geography Data' (R13 new name). System will automatically upload the required Geography data. Few countries do not have this option then we have to complete these steps manually.
3. Accounting Calendar Navigation: UserName >> Setup and Maintenance >> Tasks >> Manage Implementation Projects >> Search for your implementation project - Tata Finance Implementation Project >>Search for task 'Manage Accounting Calendars' (Select Financials offerings path)>> Go to Task >> Click on create icon >> Enter details as below >> Next >> Save and Close
**In EBS, we used to have same accounting calendar for 'Budgetary Control' whereas in Fusion we can have another calendar for 'Budgetary Control' (enable check box).
Next >> Just go through Period Details >> Save and Close.
To open next year period simply click on 'Add Year'.
4. Currencies In Fusion all the currencies are enabled by default. Navigation: UserName >> Setup and Maintenance >> Tasks >> Manage Implementation Projects >> Search for your implementation project - Tata Finance Implementation Project >>Search for task 'Manage Currencies'. Most of the standard currencies will be enabled by default.
5. Chart of Accounts (COA) i) Create value sets Navigation: UserName >> Setup and Maintenance >> Tasks >> Manage Implementation Projects >> Search for your implementation project - Tata Finance Implementation Project >>Search for task 'Manage Chart of Accounts Value Sets' >> Go to Task >> Click on create (+) icon. **The pre-defined value sets provided by Oracle as 'Corporate Company', 'Corporate Account' and so on.... Lets create Company, Department and Account value set
ii) Create COA structure a) Create COA segments and assign value sets to segments b) Create COA segment labels (segment labels in Fusion = flexfield qualifiers in EBS). Flexfield Qualifier = Defines behavior of each segment. Search for task 'Manage Chart of Accounts Structures' >> Go to Task >> Search Key Flexfield Name with 'Accounting Flexfield' >> Click on 'Manage Structures' >> Click on Create icon (+).
After entering above details click on save to enter segment details.
Save and Close
iii) Create COA structure instance and Deploy Accounting Flexfield Search for task 'Manage Chart of Accounts Structure Instances' >> Search Key Flexfield Name with 'Accounting Flexfield' >> Go to 'Manage Structures Instances' >> Click on Create icon (+) >> Enter details as below and Save and Close. Select the Segment Code, click on edit and select Required to make it as required.
Click on 'Deploy Flexfield' tab for completion of process.
We need to create 'Structure Instance' since we will be using at Primary Ledger creation rather than direct Structure.
With one COA Structure, we can create multiple 'Structure Instances'.
iv) Create value set values Search for task 'Manage Chart of Accounts Value Set Values' >> Click on 'Go to Task' >> Search for Value Set Code 'Tata Company Value Set' >> Click on 'Manage Values' >> Click on Create icon (+).
Tata Account Value Set
Assign value attributes to segment values (value attributes in Fusion = segment qualifier in EBS) (Segment Qualifier = Defines property of segment values). Here we have additional 4 columns (Account Type, Third Party Control Account, Reconcile, Financial Category) due to 'Natural Account Segment' Flexfield qualifier assigned to Account segment.
**Mandatory is 'Retained Earnings' account.
Save and Close
6. Create 'Primary Ledger' Navigation: Go to your implementation project (Tata Finance Implementation Project) >> Search for task 'Manage Primary Ledgers' >> Click Go to Task >> Click on Create icon (+) >> Enter details as below >> Save and Close
**Here Tata Structure Instance has been identified under COA. Hence instance is required.
**In case we want to record transactions only in GL then Accounting Method is not required but required when transactions happens in sub ledgers.
7. Specify 'Ledger Options' Search for task 'Specify Ledger Options' >> Choose path -- 'Financials>Define Common Applications Configuration for Financials>Define Ledgers>Define Accounting Configurations' >> Click 'Go to Task' >> Choose 'Specify Ledger Options' scope and Primary Ledger as 'Select and Add'>> Apply and Go to Task >>Search our Ledger (Tata Ledger) >> Save and Close >> Enter accounting values >> Save and Close
8. Create 'Legal Address' Search for task 'Manage Legal Addresses' >> Go to Task >> Click on Create(+) icon >> Enter details as below >> Save and Close
9. Create 'Legal Entity' Search for task 'Manage Legal Entity' >> Go to Task >> Select Scope: Manage Legal Entity and Legal Entity: Create New >> Apply and Go to Task >> Click on Create(+) icon
10. Assign 'Legal Entity' to 'Primary Ledger' Search for task 'Assign Legal Entities' >> Go to Task >> Click on 'Select and Add' >> Search for Legal Entity (Tata Legal Entity) >> Select >> Apply >> Done >> Save and Close
11. Assign 'Balancing Segment Values' to 'Legal Entity' Search for task 'Assign Balancing Segment Values to Legal Entities' >> Go to Task >> Click on Create(+) icon >> Select first Company Value and click on 'Save and Assign Another' >> Repeat this step for other companies as well. >> Save and Close
12. Review and submit 'Accounting Configuration' The primary Ledger data is stored in Oracle DB. Now this needs to be copied to Essbase Database. The whole GL set up data need to be synced with Essbase DB. For that purpose, search for task 'Review and Submit Accounting Configuration' >> Click 'Go to Task' >> Submit. After submission you can see Confirmation message as
| The Create Accounting Configuration process 1234567 has been submitted. |
Since we have assigned Employee Job Role to User (ORA_PER_EMPLOYEE_ABSTRACT), we should be able to see requests. Navigator >> Tools >> Scheduled Processes (This is ESS job page)>> See the Succeeded status.
Verify status of Primary Ledger:
Go to task 'Manage Primary Ledgers' >> Search for your Ledger (Tata Ledger) >> The status is 'Confirmed'
13. Assign GL Roles to User We have 5 Job roles which need to be assigned to User to record the GL transactions. Navigation: Navigator >> Tools >> 'Security Console' task >> Select Users tab >> Search for your User >> Click on hyperlink (User Login) >> Click on Edit >> Add Roles >> Search for i) 'General Accountant' (Code: ORA_GL_GENERAL_ACCOUNTANT_JOB) ii) 'General Accounting Manager' (Code: GL_GENERAL_ACCOUNTING_MANAGER_JOB) iii) 'Chief Financial Officer' (Code: GL_CHIEF_FINANCIAL_OFFICER_JOB) iv) 'Controller' (Code: GL_CONTROLLER_JOB) v) 'Financial Analyst' (Code: ORA_GL_FINANCIAL_ANALYST_JOB) >> Add Role Membership >> Save and Close
14. Assign 'Data Access Set' to GL roles In EBS, we used to assign 'Primary Ledger' value to profile option 'GL Ledger Name' at responsibility level. Additionally once the ledger creation is completed, we will assign the ledger to profile option 'GL: Data Access Set'. Now go to your implementation project and search for task 'Manage Data Access Sets' >> Go to Task >> Search for your ledger (Tata Ledger) >> Here Name reflects Data Access Set (Tata Ledger) >> Click on edit for more details.
Search for task 'Manage Data Access for Users' >> Go to Task >> Create >> Select your User Name, select each 5 GL roles, Security Context: Data access set, Security Context Value: select your 'Primary Ledger' name. >> Just verify (Users without Data Access and Users with Data Access) by searching with User Name after completion of above steps.
15. Run LDAP Job Navigation: Navigator >> Tools >> Scheduled Processes >> This is ESS Job page >> Schedule New Process >> Type: Job; Name: Retrieve Latest LDAP Changes >> Submit >> Look for Succeeded status.
16. Open GL Periods Post above changes sign-out and sign-in again to see 'General Accounting' task in Navigator. In case you see error when you open Period Close 'GL_PLL_INVALID_DATA_ACCESS_SET.oracle.javatools.resourcebundle.ResourceBundleRT' then run the job 'Import User and Role Application Security Data'. Navigation: Navigator >> General Accounting >> Period Close >> Select your Data Access Set >> Click on General Ledger(Never Opened) icon >> Open first period and a request will be submitted>> Actions >> Open Target Period or we can open one-by-one period.
Set default 'Category' value in Journal at User level This is an optional step. We need to set profile options to achieve this activity. We can set profile option using the task - 'Manage Administrator Profile Values' Navigation: Setup and Maintenance >> Tasks Panel >> Search (The tasks which are not mandatory to create from implementation project can be created here) >> 'Manage Administrator Profile Values' >> Search for Profile Display Name: Default Journal Category >> Click on Create >> Profile Level: User, User Name: SRIKANTH.G, Profile Value: Adjustment >> Save and Close
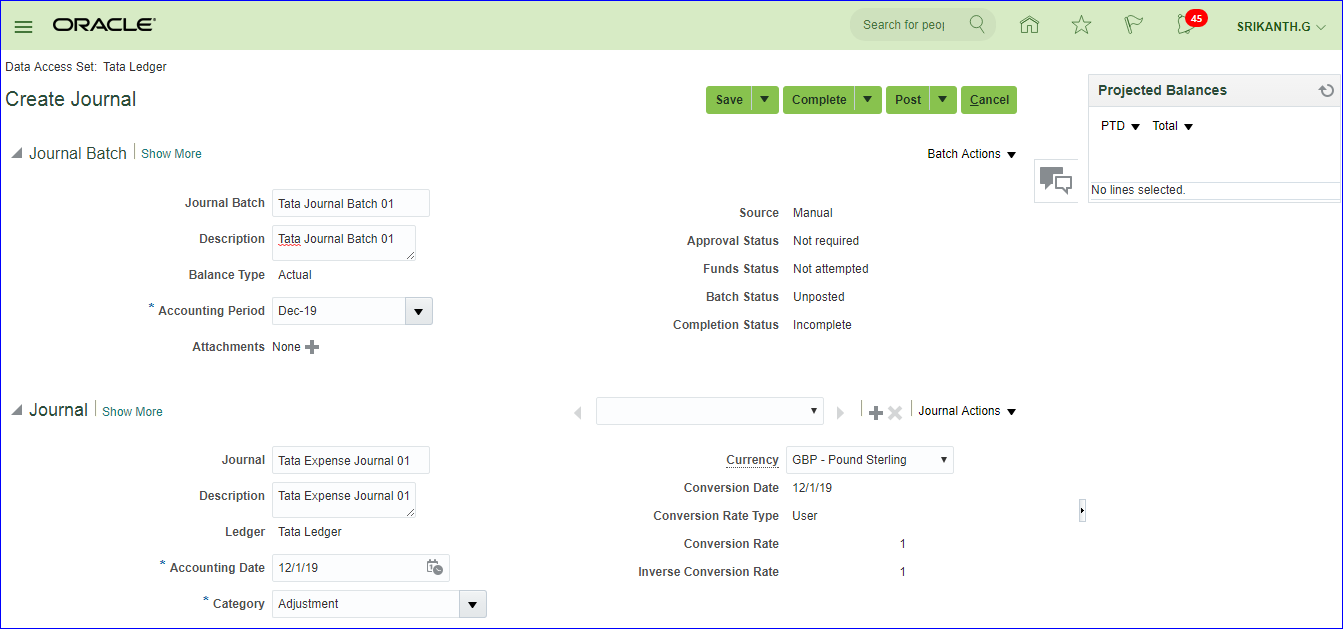
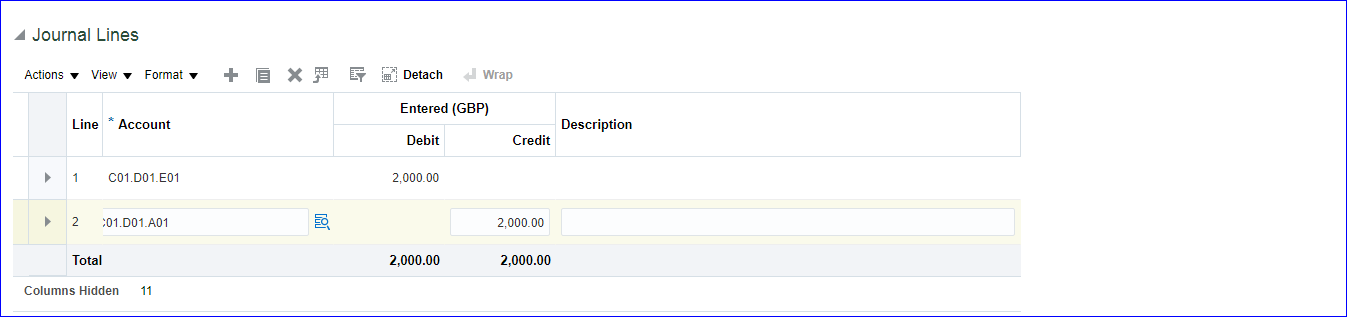
17. Create Journal and Post Batch --> Journal --> Lines Batch is not mandatory. Even Journal name will be auto-created if not given. Navigation: Navigator >> General Accounting >> Journals >> Tasks Panel >> Create Journal Notice the Category: Payments have been defaulted due to above set up.
Save >> Complete >> Post (A request will be submitted)
'Post Journals for Single Ledger' job status should be in 'Succeeded'.
To see the Journal status: Navigator >> General Accounting >> Journals >> Tasks panel >> Manage Journals >> Search for your Journal >> Status is Posted.
**In case you want to search Journal with other than given 6 fields, we can click on 'Add Fields' button in 'Manage Journals' page.
One more Journal creation
Save >> Complete >> Post (A request will be submitted)
18.Rapid Implementation i) Download Rapid implementation templates ii) Enter data into sheets iii) Create zip file iv) Upload zip file into application v) Find data definitions in application i) Download Rapid implementation templates In FSM page search for task 'Define Common Financials Configuration for Rapid Implementation' >> Click on 'Create Chart of Accounts, Ledger, Legal Entities, and Business Units in Spreadsheet' >> Save and Open excel ii) Enter data into sheets
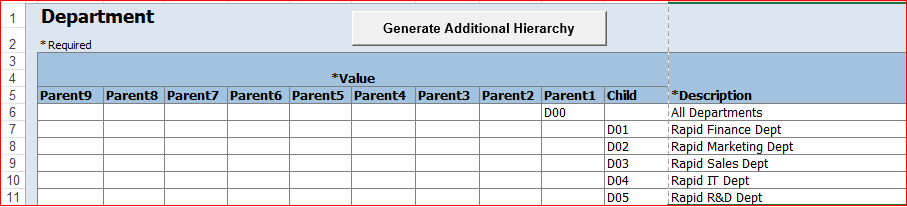
To add Department sheets click on Add Segment Sheets.
Business Units tab:
| Name | Default Legal Entity Name |
| TATARAPID Business Unit | TATARAPID Legal Entity |
Department:
Natural Accounts:In Instructions tab we have 'Rapid Implementation Template with Sample Data' and I have used same data.
Financial Sequences: Even we can ignore this option
iii) Create zip file
Click on Step 1: Validate and look for confirmation message
Click on Step 2: Generate Chart of Accounts File >> Save the zip file
Step 3: Generate Ledger, LE, and BU File >> Save the zip file
iv) Upload zip file into application
In FSM page search for task 'Define Common Financials Configuration for Rapid Implementation' >> Click on 'Upload Chart of Accounts' >> Choose parameters: Upload Enterprise Structure >> Upload the ChartOfAccounts file >> Submit >> 'Upload Enterprise Structures and Hierarchies' should be succeeded.
v) Verifying in application
In FSM search for task 'Manage Chart of Accounts Value Sets' >> Search Value Set Code: Company TATARAPID and Department TATARAPID and Account TATARAPID >> Click on Manage Values and click on search to get all values.
In FSM search for task 'Manage Chart of Accounts Structure Instances' >> Search Key Flexfield Name: Accounting >> Manage Structures >> Structure Code: TATARAPID >> Edit >> Edit and see details
Next upload 'FinancialsCommonEntities' file using step iv navigation in 'Upload Ledger, Legal Entities, and Business Units' task.
In FSM search for task 'Accounting Calendar' >> Manage Accounting Calendars >> Search for TATARAPID (By default the process creates calendar for two years)
In FSM search for task 'Manage Primary Ledgers' >> Search for TATARAPID
In FSM search for task 'Assign Balancing Segment Values to Legal Entities' >> Search for TATARAPID
19. Foreign Currency Journals creation FSM >> Tasks >> Search >> Define Currencies and Currency Rates >> Manage Daily Rates >> Daily Rates tab >> Create in Spreadsheet
| *From Currency | GBP |
| *To Currency | INR |
| *Conversion Rate Type | Corporate |
| *From Conversion Date | SYSDATE |
| *To Conversion Date | SYSDATE |
| Conversion Rate | 90.00 |
Save >> Complete >> Post
20. Reverse Journals Manage Journals and take any Journal which is already Posted. When we enter incorrect information on Journal then we do Reversal and create new Journal. Journal >> Show More >> Reversal tab >> Reversal Period: (Select your period); Reversal Method: Switch DR or CR >> Save >> Journal Actions >> Reverse >> Save >> The Reversal Status should be Reversed >> Again search your Journal >> Journal >> Show More >> Reversal tab. Here we get new Journal with lines reversed >> Finally Post
21. Data Access Set Initially when we create primary ledger, the primary ledger name and data access set name will be same. Using custom data access set, we can specify few BSV's in Read Only and few in Read & Write. C01 - Read Only C02 - Read & Write i) Create Data Access Set FSM >> Tasks >> Search >> 'Manage Data Access Sets' >> Create
Save and Close
ii) Create new user & Assign GL role to user
SRIKANTH.DAS - General Accountant and General Accounting Manager (Both ORA_ codes)
iii) Provide Data access for user
iv) Run LDAP job -- Retrieve Latest LDAP Changes
v) Create Journal
Login as SRIKANTH.DAS and for this user system should allow to create the Journals only with C02 BSV but not with C01.
22. Cross Validation Rules Setting up invalid code combinations. Say Company C02 should not possess D01 department. FSM >> 'Manage Cross-Validation Rules' >> Select your COA >> Create
Save and Close
FSM >> 'Manage Chart of Accounts Structures' >> Key Flexfield Name: Accounting Flexfield >> Deploy Flexfield
General Accounting >> Journals >> Tasks >> Create Journal >> Now enter C02.D01 code combination to view our error message
We can disable simply by unchecking the enabled option in 'Manage Cross-Validation Rules' task and also deploy flexfield.
23. Security Rules
| EBS | Fusion |
| We enable at segment level | We enable at value set level |
Save
Policy tab >> Create >> General Information tab - Name: Tata_Security_Rule; Start date: SYSDATE; Module: General Ledger >> Role tab >> Add >> Role name: General; Application: fscm >> Search >> Select General Accounting Manager >> Apply
Rule tab >> Row set: Multiple values; Condition: AllowC01; Description: AllowC01 >> Save and Close
Save and Submit
ii) Create new user (SRIKANTH.SR) and assign role (General Accounting Manager - ORA_ code) to user
iii) Provide data access for user
Save and Close
iv) Run LDAP
→ Retrieve Latest LDAP Changes
→ Import User and Role Application Security Data
v) FSM >> 'Manage Chart of Accounts Structures' >> Search Key Flexfield Name: Accounting Flexfield >> Deploy Flexfield if not deployed.
vi) Create Journal
Login as SRIKANTH.SR user and create Journal. In LOV we can see only C01.
24. Create Ledger Set Grouping of Ledgers which has same COA and Calendar (currency could be different). For this purpose we create one more ledger along with our Tata Ledger. i) Create new Ledger (Tata Ledger for Ledger Set) Implementation project >> 'Manage Primary Ledgers' >> Create
Save and Close
Specify Ledger Options >> Click on Select Scope value >> Primary Ledger: Select and Add >> Apply and Go to Task >> Select your new Ledger >> Save and Close
Save and Close
Review and Submit Accounting Configuration >> Submit >> After the successful completion of job, verify the status of Ledger 'Manage Primary Ledgers' and look for newly created Ledger.
ii) Create Ledger set (Tata Ledger Set)
Implementation Project >> 'Manage Ledger Sets' >> Create
Save and Close
iii) Create new user and assign GL role to user
User is SRIKANTH.LS and assigned role is General Accounting Manager (Code: GL_)
v) Assign data access for user
FSM >> 'Manage Data Access for Users' >> Create
Save and Close
vi) Run LDAP job - Retrieve Latest LDAP Changes
vii) Open periods in new Ledger (Tata Ledger for Ledger Set)
Login as SRIKANTH.LS user >> General Accounting >> Period Close
viii) Create Journal
For one ledger set we get two ledgers
25. Creation of Reporting Ledger i) Create reporting ledger (INR) In implementation project >> 'Manage Reporting Currencies' >> Go to Task >> Create
Creation of reporting currency = Creation of reporting ledger
ii) Create new user & assign GL roles to user
SRIKANTH.REPORTING -- General Accounting Manager (ORA_ code)
iii) Assign data access set for user
'Manage Data Access for Users' >> Create
iv) Run standard jobs
a) Retrieve Latest LDAP Changes
b) Import User and Role Application Security Data
v) Define daily rates (GBP & INR)
FSM >> Manage Daily Rates >> Daily Rates tab >> Create in Spreadsheet
| *From Currency | GBP |
| *To Currency | INR |
| *Conversion Rate | Corporate |
| *From Conversion | SYSDATE |
| *To Conversion Rate | SYSDATE |
| Conversion Rate | 90 |
Save >> Complete >> Post
viii) Find Journal in reporting ledger in reporting currency
Login as SRIKANTH.REPORTING >> General Accounting >> Journals >> Tasks >> Manage Journals >> Search your Journal
26. Creation of Secondary Ledger i) Create COA with two segments Manage Chart of Accounts Structures >> Search for Key Flexfield Name: Accounting Flexfield >> Manage Structures >> Create
Click on 'Manage Structure Instances' >> Create
Save and Close >> Deploy Flexfield
ii) Create secondary ledger
Implementation project >> 'Manage Secondary Ledgers' >> Go to Task >> Create
iii) Specify ledger options
Implementation project >> 'Specify Ledger Options' >> Go to Task >> Select Specify Ledger Options; Primary Ledger: Tata Ledger; Secondary Ledger: Select and Add >> Apply and Go to Task >> Select the line & Save and Close >> Enter the Retained Earnings Account: C01.O01 >> Save and Close
iv) Map primary and secondary ledger COA
Implementation project >> 'Manage Chart of Accounts Mappings' >> Go to Task >> Create
v) Create mapping between primary and secondary ledger
Implementation project >> 'Complete Primary to Secondary Ledger Mapping' >> Go to Task >> Select Chart of Accounts Mapping: Tata COA Mapping >> Save and Close
vi) Create user & assign GL roles to user
SRIKANTH.SL - General Accounting Manager & General Accountant (ORA_ codes)
vii) Provide data access for user
'Manage Data Access for Users'
viii) Run LDAP job
a) Retrieve Latest LDAP Changes
b) Import User and Role Application Security Data
ix) Open periods in secondary ledger
Login as SRIKANTH.SL >> Period Close >> Click on General Ledger (Never Opened) >> Open till current period
x) Create Journal in primary ledger
Login as SRIKANTH.G >> Create Journal
Save >> Complete >> Post
xi) Find Journal in secondary ledger
Login as SRIKANTH.SL >> Manage Journals >> You can post
27. Auto Posting Implementation Project >> Manage AutoPost Criteria Sets >> Create
Save and Close
Create Journal with Category as 'Adjustment' >> Save >> Complete >> Cancel (Do not post)
General Accounting >> Journals >> Tasks >> Run AutoPost >> AutoPost Criteria Set: Tata AutoPost
i) If you click on Submit all the eligible Journals will be posted.
ii) If you want to schedule this job then click on Advanced >> Schedule tab >> Run: Using a Schedule; Frequency: Select your frequency.
Finally after Submission verify your Journal batch status which should be Posted.
28. Auto Reversal Implementation project >> 'Manage Journal Reversal Criteria Sets' >> Create
Save and Close
Implementation project >> 'Specify Ledger Options' >> Select Journal Reversal Criteria Set: Tata Journal Auto Reversal >> Save and Close
Create Journal with Category as 'Adjustment' >> Journal Batch: Tata Auto Reversal Journal Batch 01; Journal: Tata Auto Reversal Journal 01 >> Save >> Complete >> Post
General Accounting >> Journals >> Tasks >> Run AutoReverse >> Enter parameters >> Submit.
For scheduling go with Advanced
29. Create Budget i) Define Budgetary Controls Implementation project >> 'Define Budgetary Controls' >> Manage Budgetary Control >> Click on our Ledger name
Save and Close
ii) Create Control Budget
'Manage Control Budgets' >> Create
Ok
Action >> Prepare for use
iii) Assign Budget role to User
Security Console and assign role 'Budget Analyst' and 'Budget Manager' to your user
iv) Assign data access for user
FSM >> 'Manage Data Access for Users' >> Create and above two roles to your user
v) Run LDAP job -- Retrieve Latest LDAP Changes
vi) Open Budget periods
Budgetary Control >> Tasks >> Budget Period Statuses >> Click on Control budget name >> Change the status to Open for all periods >> Save and Close
vii) Prepare Budget data
Budgetary Control >> Tasks >> Enter Budgets in Spreadsheet >> Control Budget: Tata Control Budget; Start Period: Jan-19; End Period: Dec-19; Budget Entry Name: 2019 12-03-19 12:53:46 PM >> Create Spreadsheet
| *Company[..] | C01 |
| *Department[..] | D01 |
| *Account[..] | E01 |
| Jan-19 till Dec-19 enter same value | 25,000 |
Save >> Complete >> Post
30. Journal Approval + Revaluation + Translation + Consolidation Pending i) Create Approval group FSM >> 'Manage Approval Groups' >> Create
Save
ii) Create Approval rule
Rule is <= 10k.
On above click on Task Configuration >> Below search, select 'FinGlJournalApproval' and click on Edit >> Assigness tab
iii) Enable Journal approval for Ledger
iv) Enable Journal approval for Sources
v) Create Journal
31. 1z0-960 dumps Below are correct: NO.1 You need to integrate Fusion Accounting Hub with external source systems used for Billing. Identity the step that is not correct when implementing this integration.
- Analyse external system transactions.
- Capture accounting events.
- Determine the accounting impact of transactions.
- Create the accounting in the source system and then import the journal entries into subledger accounting.
- Value Set
- Constant
- Existing Account Rule
- Account Combination
- Mapping Set
- Source
- Data Access Sets using an Access Set Type of Primary Balancing Segment
- Cross-Validation Rules
- Segment Value Security
- Balancing Segment Value Assignment to Legal Entities
- Select the Data/Missing check box in the Data Options tab.
- Use Excel functions to hide rows with #Missing assigned
- Choose the Suppress Zeros option under Data options.
- This indicates a database connection issue. Try to reconnect to Fusion Applications.
- View the Projected Balance region in the Create Journals page.
- Run a Trial Balance before and after posting.
- Use Oracle Transactional Business Intelligence (OTBI) to query General Ledger balances
- Query the account balance online.
- An Online Transactional Business Intelligence (OTBI) report to create ad hoc queries on
- Account Analysis Reports
- Journals Reports
- Aging Reports
- General ledger balances are multidimensional, allowing you to perform robust reporting and analysis.
- You can access real-time results for reporting and analysis because every time a transaction is posted in General Ledger, multidimensional balances are also updated simultaneously.
- You no longer need to create and maintain hierarchies because the Essbase cubes are created when you create your chart of accounts.
- Posting performance is much faster.
- Integrating with third-party systems is easier because the Essbase cube provides chart of accounts mapping rules.
- by using the Close Status monitor to drill down on the close status across ledgers
- by using the Journals region to view journals Requiring Attention, Requiring Approval, and Pending Approval from Others
- by running the Journals report using Business Intelligence Publisher
- by creating an ad hoc query on journals using Oracle Transactional Business
- Provide a central place to access and perform all of the setup steps across Fusion application product
- Automatically generate lists of setup tasks in the correct sequence with dependencies highlighted.
- Automatically mark the status of tasks as Completed after they have been completed.
- Assign setup tasks to individuals with due dates where users must manually update their
- Centrally manage the close processes across subledgers and ledgers.
- Smart View
- Financial Reports with Embedded charts
- Account Monitor
- Account Inspector and its charts
- Data Access Sets
- Cross-Validation Rules
- Segment Value Security
- Role-Based Access
- End Users that perform transaction processing
- Implementation Project Managers and Consultants
- System Administrators
- Application Developers
- C-Level Executives
- chart of accounts hierarchy maintenance
- integration with transactions from external feeder systems
- chart of accounts master data maintenance
- data access and security
- cross-validation rules
- A. Effectively manage an organization's financial business.
- Consider implementing a single, global chart of accounts
- Anticipate growth and maintenance needs as organizational changes occur.
- Limit the number of segments to those you need today to reduce data entry.
- Try to use all 30 segments and 25 characters per segment because you cannot change It later.
- Use the spreadsheet loader from the Currency Rates Manager.
- Import daily rates through the Daily Rates open interface table.
- Update rates manually using the Currency Rates Manager, which can be accessed only from the Functional Setup Manager
- Update rates manually using the Currency Rates Manager, which can be accessed from the Functional Setup Manager or the General Ledger's Period Close work area.
- Edit existing transactions and update the rates manually.
- Access each subledgers' calendar and General Ledger's Manage Accounting Periods page to view the status of each period.
- Use the Manage Accounting Periods page to view the status of all subledgers and ledgers.
- Use Close Monitor in General Accounting Dashboard.
- Run Closing Status reports.
- Download OTBI reports and charts to a spreadsheet and then copy and paste the spreadsheet to PowerPoint
- Use SmartView to create reports and charts using general ledger and subledger subject areas embed the charts/reports into PowerPoint
- Use Smart View and Oracle BI EE View Designer to create reports in PowerPoint, Word, and Excel.
- Use Account Inspector and then export to Excel and copy and paste into PowerPoint.
- Chart of accounts was not deployed.
- Accounting Configuration was not submitted-
- An Audit process needs to be successfully performed before a tree version can be set to Active.
- Two tree versions were not defined
- The Implementation Project is preconfigured and cannot be deleted or changed.
- Plan your implementation project carefully because you cannot delete it or make changes later.
- You must select the Offering "Financials," and each individual product or option to perform the setup for each product in Financials Cloud.
- Selecting the Offering "Financials," automatically allows you to perform the setup for all
- You only need to make the project name unique, then you can perform the setup for any product family, such as Financials, Procurement, Human Capital Management and Supply
- Reference Data Sets
- Business Units functions
- None. Setup data is partitioned by Business Unit and must be defined separately per Business Unit.
- Data Access Sets
- Use the All option for category and accounting period to reduce maintenance and ensure that all imported journals are included in the posting process.
- Include all of your sub ledger sources in the AutoPost Criteria. Divide up criteria sets by subledger source only if you need to schedule different posting times.
- Create your AutoPost criteria using minimal source and categories.
- Schedule your AutoPost Criteria set to run during off-peak hours only
- Payables Trial Balance, Receivables Trial Balance, and General Ledger Trial Balance reports
- Payables and Receivables Aging Reports with the General Ledger Trial Balance report
- C. Payables to Ledger Reconciliation Report and the Receivables to Ledger Reconciliation Report
- General Ledger Financial Statements and the Accounts Payable and Accounts Receivables Invoice Registers
- There is no difference.
- The "Real Time" subject areas are based on real-time transactions and all others are based on Historical data.
- The "Real Time" subject areas are based on real-time transactions in Fusion Applications, and all others are based on data stored in the Oracle Business Intelligence Applications data warehouse.
- The "Real time" subject areas are based on sub ledger transactions and all others are based on general ledger balances.
- Use SQL to populate the HR interface tables and load employees in bulk.
- Use the spreadsheet templates available in Oracle Enterprise Repository (OER) and then import users into Fusion Applications.
- Use the "Hire an Employee" user interfaceto inter each user manually.
- Use the spreadsheet available in Oracle Identity Manager (OIM) to import users.
- Use the "Enter a Supplier" user interface to enter each user manually.
- Supervisory level based on HR Supervisors
- Job level
- Position
- Approval Group
- Use the Manage Users page to update the user's information and change the password.
- Use Oracle Identity Management (OIM) to reset the user's password.
- Log in to the user's machine as an Administrator and change the password from the login pa
- Use Access Policy Manager (APM) to reset the user's password.
- Create a new user ID and password for the user.
- None. The Fusion Applications Superuser, FAADMIN, has full access to create an
- A full-time employee that has the FSM Superuser role assigned
- None. The OIM system administrator user ID, XELSYSADM, which is assigned by the person provisioning the system, has full access.
- Implementation Users
- All roles that will be used throughout the implementation
- Add the periods manually
- Use the Add Year button
- Import the periods from a spreadsheet
- The application automatically populates the next year when you open the first period a new fiscal year.
- Delete the journal and create a new journal.
- Update the journal through workflow
- Click the Withdraw Approval button in the Edit Journals page and edit the journal.
- Reverse the journaland create a new one.
- A robust reporting and analysis tool
- A relational database
- A data ware house
- A multidimensional Online Analytical Processing (OLAP) server that is embedded in
- Using Workspace, assemble multiple reports into a book.
- Use a Report Batch to run reports at a specific time to create set of snapshot reports based on accounting information at that specific point in time.
- Users can drill down on snapshot reports for future analysis.
- The report contained in the book can be printed or viewed individually or as an entire book that includes a table of contents.
- Snapshot reports can only be viewed online.
- A. Application Implementation Manager
- Functional Setup Manager Superuser
- Application Implementation Consultant
- Any functional user
- IT Security Manager
- Transaction Objects
- Event Entities
- Mapping Sets
- Accounting attributes
- Event Classes
- Define Balance-Level Reporting Currencies in the more stable currency and run
- Use Journal-Level or Subledger-Level Reporting Currencies denominated in the more stable currency.
- Run Revaluation as often as you need to the more stable currency and report on the more stable currency's balances.
- Create a secondary ledger that uses a different chart of accounts that is denominated in the more stable currency.
- Allocation journals
- Revaluation journals
- Manual journals
- Sub ledger journals
- Journals imported from third-party systems
- Budget Group
- Application Development framework Desktop Integral ion (ADFdi)
- Account Group
- Budget Controller
- Budget Account Group
- Create a segment that acts as the primary balancing segment and create values that represent a concatenation of all three business dimensions.
- Use account hierarchies to create different hierarchies for different purposes and use those hierarchies for reporting.
- Create three segments and qualify them as the primary balancing segment, second, and third balancing segments, respectively.
- Create two segments where the first segment represents the concatenation of Company and Line of Business, and then enable secondary tracking for the Product Segment.
- The data is not transferred.
- Data is summarized across segments that are not mapped to Hyperion Financial Management
- Errors occur for unmapped segments. You must map multiple segments from source general ledgers to the target segment in Hyperion Financial Management.
- The unmapped segments default to future use segments in Hyperion Financial Management
- Perform an account analysis online.
- Open a Smart View file saved on your desktop.
- Create an Account Group using Account Monitor.
- Use Account Inspector.
- Journals Work Area
- Period Close Work Area
- Financial Reporting Center
- General Accounting Dashboard
- All sub ledger transactions have been entered but do not have complete accounting.
- Subledger transactions have been accounted and transferred to General Ledger but have not been posted.
- There were manually entered journals against the Payables and Receivables accounts that were posted in General Ledger.
- Intercompany transactions have not been fully processed.
- Period Close processes, such as Revaluation, Translation, and Consolidation have not
- Journal Category
- Journal Source
- Journal Batch
- Journal Description
- Use Oracle Hyperion Financial Management for this type of complex consolidation.
- Translate balances to the corporate currency, create a chart of accounts mapping to the corporate Chart of accounts, then transfer balances to the corporate consolidation ledger using the balance transfer program.
- Translate balances to the corporate currency for ledgers not in the corporate currency, use General Ledger's Financial Reporting functionality to produce consolidated reports by balancing segment where each report represents a different subsidiary.
- Create separate ledgers for each subsidiary that shares the same chart of accounts, calendar, currency and accounting method. Create a separate elimination ledger to enter intercompany eliminations, then create a ledger set across all ledgers and report on the ledger set.
- Point of View (POV)
- Run Time Prompts (RTP)
- Formulas
- RuleSets
- Oracle Identity Manager Roles Assignment
- Access Policy Manager's Role Generation
- Role Mappings
- Data Roles
- You cannot reassign contingent workers.
- Use the Open Account Balances Listing report that has balances by customer.
- Use the Third Party Control Account feature.
- Use Supporting References to capture customer classification information.
- Capture customer information as the source and develop a custom report using Online
- Detach the table to resize it to the maximum size of the monitor
- Export the table to Excel.
- Run a Business Intelligence Publisher report with Excel as the output format.
- Use the Freeze feature on the tables to scroll through large amounts of data.
- The subledger accounting option Is set to system date.
- The actual accounting date was set up under the encumbrance accounting Default Date
- The system date was set up under the encumbrance accounting Default Date Rule.
- The current transaction accounting date was set up under the encumbrance accounting
- The prior related transaction accounting date was set up under the encumbrance accounting Default Date Rule.
- OBIA is based on the universal data warehouse design with different prebuilt adapters that canconnect to various source application
- Both OBIA and OTBI provide a set of predefined reports and dashboards and a library of metrics that help to measure business performance
- OBIA works for multiple sources including E-Business Suite, PeopleSoft, JD Edwards, SAP,
- OTBI allows you to create custom reports from real-time transactional data against thedatabase directly
- Cloud customers can use both OTBI and OBIA.
- Define an intercompany segment in the chart of accounts. The Intercompany module and the intercompany balancing feature in general ledger and sub ledger accounting will automatically populate the intercompany segment with the balancing segment value of the legal entity with which you are trading.
- There is no need to define an intercompany segment. You can track the Intercompany trading partner using distinct intercompany receivable/payable natural accounts to identify the trading partner.
- Define an intercompany segment and qualify it as the second balancing segment to make sure all entries are balanced for the primary balancing segment and intercompany segment.
- There is no need to define an intercompany segment, the Intercompany module keeps track of the trading partners for you based on the Intercompany rules you define.
- Event Type
- Journal Line Rule
- Event Class
- Journal Entry Rule Set
- Journal Entry
- They can format each table by hiding and showing columns, moving columns, and resizing columns.
- They can use Personalization to move and remove regions from those pages.
- Users have very little control customizing their Dashboards and Work Areas; they can only resize columns.
- They can have the System Administration customize pages for them using Page Composer.
- Use the spreadsheet template that is accessed from the "Create Journal in Spreadsheet" task and import the spreadsheet with the eliminating entries every period.
- Use the General Ledger's Calculation Manager to define an allocation definition to eliminate entries that you can generate every period.
- There is no way to automate this process if the customer is not using Oracle Hyperion Financial Close Management.
- Create a manual journal that includes the eliminating entries, and then create a copy of the Journal batch every period.
- Each product has its own Intercompany Accounting feature that needs to be set up separately.
- Intercompany Balancing Rules are defined centrally and applied across Financials,
- Within Financials Cloud, Intercompany Balancing Rules are used to balance both cross- ledger intercompany transactions and single ledger intercompany journals.
- They need to license a separate stand-alone Intercompany product that acts as the
- Close Fusion Payables and Receivables periods, close the related intercompany period, and then close the Fusion General Ledger's period.
- Close Fusion Payables and Receivables periods, close Fusion General Ledger, and then close the related intercompany period
- Close the related intercompany period, close Fusion Payables and Receivables periods, and then Fusion General Ledger.
- You only need to close Fusion Payables and Receivables periods followed by the
- Funds check
- Requisition approved
- Requisition rejected by the buyer
- Submit the requisition for approval
- Checkout and Save the requisition
- Create change request on the requisition after submitting requisition for approval
- You must assign the corresponding Receivables and Payables Business Units.
- You only need to assign the Legal Entity and Organization Contact.
- You must perform additional setup steps for Fusion Payables and Fusion Receivables.
- You can only associate one Intercompany Organization per Legal Entity.
- You can use hierarchies to define rules.
- The Segment Value Security rules do not take effect until you assign the rules to users and products.
- When you enable Segment Value Security on a segment, users will not be able to access any values until you grant access to users and products.
- When you enable or disable Segment Value Security, you do not need to redeploy your chart of accounts.
- Specify Run Time Prompts (RTP).
- Always use the Outer Point of View (POV).
- Never use the Outer Point of View (POV).
- Only specify segment values in formulas.
- The purchase order is Partially Liquidated and the invoice is Partially Reserved.
- The purchase order is Partially Liquidated and the invoice will be reserved.
- Both are reserved.
- The purchase order is liquidated and the invoice is Partially Reserved.
- Both are Partially Reserved.
- The purchase order is Open and the invoice is validated.
- Purchase order encumbrance will be released for $2100 USD.
- As there are cancellations for $400 USD, the system will partially reserve the funds in
- As you are matching to a purchase order, the system will allow the user to create an invoice with the reservation status of Reserved.
- Encumbrance entries are created only for nonmatched Invoices, so the system will not create any encumbrance accounting entries.
- The system always consumes budget of future periods if the limit for the current period is expired, so December 2015 budget will be considered for reservation.
- You need to flatten the rows to be able to use drilldown in Smart View and you must publish tree to view the hierarchy in Essbase cubes.
- You must flatten the columns and publish the tree to view the hierarchy in Essbase cubes.
- The tree should have at least two tree versions to reduce report and allocation maintenance.
- You only need to flatten the columns if you plan to use the hierarchy in Oracle
- It is fine to have the same child value roll up to two or more different parent values.
- The prepayment application was already released at the time of payment and the invoice
- The prepayment application releases funds of 200 USD ^nd the invoice consumes funds of lOO USD, with a net decrease to available funds of 200 USD.
- Available funds will not change till invoice is approved.
- The prepayment application releases funds of lOO USD and the invoice consumes funds of 300 USD, with a net decrease to available funds of 200 USD.
- The prepayment application releases funds of 300 USD and the invoice consumes funds of 300 USD, with a net decrease to available funds of 100 USD.
- The budget will be released only foi the USD 30O invoice amount.
- The intercompany transaction is not approved.
- The corresponding Payables and Receivables invoice have not been generated.
- If they are different, then the exchange rate is missing between the intercompany and ledger currency.
- The intercompany period is closed.
- Both the intercompany and general ledger periods are open.
- You must define rules for every combination of specific categories and sources. Otherwise, theintercompany balancing will not work.
- You can create a rule for all sources and categories by selecting the source "Other" and the category "Other."
- If you choose to have rules at various levels, then intercompany balancing evaluates the rules in this order: Ledger, Legal Entity, chart of accounts, and primary balancing segment value.
- Set up a chart of accounts rule for every chart of accounts structure you have in order to
- Set the Department segment as a User Point of View (POV) and submit a report batch and schedule it: to run for every department. Send the different batch outputs as PDF attachments via email to different users.
- Create a single report for all departments. When department managers log in to
- Set up Bursting Options for your batch to prepare multiple versions of a report from a single process.
- When defining the report, make the Department Segment a prompt and when users view the report, they can change the prompt to their department.
- Purge all translated balances, change the CTA account in the Ledger page, and rerun
- Open the Ledgers page and update the CTA account and then rerun Translation for all periods required. The system will automatically update the translated balances.
- Query the Translation journals and delete all of them, then change the CTA account in the Ledger page, and rerun Translation for all periods required.
- Define a new ledger and accounting configuration. The CTA account cannot be updated after the ledger has been in use.
- RuleSets
- Point of View (POV)
- Formulas
- General Ledger Journal entries
- Reverse them in the same period as the revaluation run.
- Both balance sheet and income statement revaluation journals should be reversed in the next period.
- Never, because each period's revaluation adjustment is just for that period.
- The reversals must be done at the end of each quarter.
- When viewing the report, download to Excel and use Excel's Charting features to create your bar graph.
- When designing your financial statement using Financial Report (FR), embed a chart into your report
- Use Account Inspector that automatically creates graphs on financial balances.
- D. Use Smart View, which is and Excel Add-on
- When entering journals manually, the customer will need to make sure that the debits and credits are equal across all balancing segments because the system will not automatically balance the journal.
- Every journal where debits do not equal credits across the three balancing segments will result in the System generating extra journal lines to balance the entry.
- Additional intercompany rules will need to be defined for the two additional balancing segments.
- Ledger balancing rules will need to be defined to instruct the system on how to generate
- Create two journal line rules with a condition of supplier type.
- Create an Account Rule with 31 rule elements using one condition for each expense type and another for supplier type.
- Create an Account Rule with two rule elements using one for expense type mapping and the other for the condition of supplier type.
- Create an Account Rule with three rule elements using one for expense type mapping, one for condition of supplier type, and the other without any conditions.
- complete Accounting Configuration
- Suppliers and Customers
- Banks, Bank Accounts, and Branches
- chart of account values, accounting calendar, and ledger
- setup data for Receivables and Payables product.
- All ledgers engaged in an intercompany transaction must share the same chart: of accounts in order to define balancing rules
- You can only define balancing rules for different journals' sources. You cannot define balancing rules for different journal categories.
- You can define different balancing rules for different combinations of journal sources, journal categories, and transaction types
- You can define different rules for different charts of accounts, ledgers, legal entities, and primary balancing segment value.
- Control budgets are always absolute to generate encumbrance accounting.
- A control budget can allow override rules only if the control level is absolute.
- The control budget structure has all the chart of account segments as budget segments.
- A control budget is associated to a ledger and creates three control budgets for Australia, New Zealand, and Singapore.
- A control budget can be associated with a different calendar than accounting calendar.
- You must define a Data Access Set to obtain full read/write access to the ledgers in the Accounting Configuration.
- A Data Access Set with full read/write access to the ledger is automatically created.
- Open the ledger's period to begin entering transactions.
- Verify the data roles created and assign them to the General Ledger users.
- Whether to enforce an enterprise-wide currency or allow in intercompany transactions in local currencies
- Whether to allow receivers to reject intercompany transactions
- Automatic or manual batch numbering and the minimum transaction amount
- Automatic or manual batch numbering and the maximum transaction amount
- The approvers who will approve intercompany transactions
- A set of reports are provided for both exported and imported setup data to validate the
- Reports on setup data can be used to compare and analyze how the data might have changed over time.
- To view errors encountered during the export or import Process, you must use SQL queries to obtain that data because no reports exist.
- A set of reports lists user names, suppliers, and customers that have been exported/imported
- The export/import reports are available only for Fusion Customer Relationship
- Clearing companies are not supported.
- If you map legal entities to balancing segment values, then a clearing company can only be applied within a legal entity.
- You must map legal entities to balancing segment values in order to use a clearing company.
- If you do not map legal entities to balancing segment values, then a clearing company can be applied to any journal within the ledger.
- If you choose to use a clearing company, you can define a default clearing company value or select the clearing company value directly in the general ledger journal.
- Share the same value set for the company and intercompany segments to reduce chart of accounts maintenance.
- Use two different value sets for the company and intercompany segment because segment value security rules are at the value set level.
- Define the company segment only and qualify it as both the primary balancing segment
- Define two different charts of accounts.
- Run the BI Publisher reports called Intercompany Transaction Summary and Account
- Create a query using Oracle Transactional Business Intelligence (OTBI) that will match the
- Run the Intercompany Reconciliation report, which shows pairs of intercompany receivables and payables accounts that are out of balance.
- In Fusion Financials, you must manually reconcile your intercompany account balances.
- Use Oracle Hyperion Close Manager to automatically reconcile intercompany account balances.
- Define three segments for the company, department, and natural account. The qualifiers shouldbe primary balancing segment, cost center segment, and natural account segment, respectively
- Define four segments for the company, department, natur.il account, and intercompany segment. The qualifiers should be primary balancing segment, cost center segment, natural account segment, and intercompany segment, respectively.
- Define five segments for the company, department, natural account, intercompany, and future use segment. The qualifiers should be primary balancing segment, cost center segment, natural account segment, intercompany segment, and no qualifier, respectively.
- Define three segments tor the company, department, and natural account. The qualifiers for the first segment should be primary balancing segment and intercompany segment, cost center segment, and natural account segment, respectively.
- Account Inspector
- Smart View
- Account Monitor
- Online Transactional Business Intelligence
- Financial Reports published to Excel
- ADB provides organizations with the ability to track average and end-of-day balances,
- Average balances are stored for both subledger balances and general ledger balances.
- Average balances are stored in the Essbase cube.
- Average balances are maintained for both actual and budget balances.
- When using ADB, you must define a daily calendar and assign it to your ADB ledger.
- Close all subledger periods.
- Close Intercompany periods in Fusion Intercompany.
- Freeze the Intercompany Journal source in General Ledger.
- Close the General Ledger period in the Manage Accounting Periods page.
- Receivables Aging by General Ledger Account report
- General Ledger Trial Balance report
- Receivables to General Ledger Reconciliation report
- AR Aging report
- Make sure the tree version was published successfully.
- Make sure to flatten the rows of the tree version.
- Make sure the tree is active.
- Redeploy the chart of accounts.
- Define separate revaluation definitions for each class of accounts, currency, and different rate types.
- Use hierarchies and parent values in your revaluation definition.
- Share revaluation definitions across ledgers that share the same chart of accounts.
- Define one revaluation definition for all accounts (assuming all ledgers share the same chart of accounts) and simply change the parameters at run time.
- Drill Through in Grid Properties
- Report Functions
- Nothing. All report balances are drillable in all FR Studio reports.
- Allow Expansion
- Invoice type will have less funds available by $400 USD.
- Manual encumbrance journal needs to be entered In General Ledger to release the budget amount of $400 USD.
- Only obligation type will have $400 USD funds available.
- $400 USD will be added back to available funds
- $400USD will be expired and not available for use.
- The Account Rule is defined with a different chart of accounts from the Journal Entry Rule Set.
- The Account Rule's chart of accounts have no account values assigned
- The Account Rule's conditions are not defined.
- The Account Rule is using sources assigned to different event classes from that of the associated Journal Entry Rule Set.
- Create an annual budget with absolute control and so encumbrance accounting will work.
- Create a summary budget annually with advisory control and control budget monthly with absolute control.
- Create a Summary budget annually with absolute* control and monthly control budget with advisory or track control.
- Create two detail control budgets: annually with absolute control and monthly with advisory or track control.
- Create two detail control budgets: annually with advisory/track control and monthly with absolute control.
- Translate only the adjusting journal entry.
- Rerun Revaluation and then rerun Translation
- Rerun Translation and then reconsolidate your result
- Enter another adjusting journal entry in the currency to true up the balances.
- Every time the tree version is published
- Every time journals are posted to the general ledger
- Every time you run the batch program called "Update Essbase Balances"
- At report run-time
- Every time you open a new period
- Line Manager role to your user
- Application Implementation Manager role to your user
- C. IT Security Manager role to your user
- Superuser role to your user
- Smart View
- Application Development Framework Desktop Integration (ADFdi)
- File-based Data Import
- Entering budget Journals
- Financial Reporting Center
- Oracle Transactional Business Intelligence (OTBI)
- Intelligence Publisher (BI Publish.
- Smart View
- Oracle Business Intelligence Applications (OBIA)
- Open the Oracle Identity Management (OIM) and make sure the data roles were created.
- Open the Manage Users page and make sure the employees at
- Open Access Policy Manager (APM) and assign the roles manually
- Make sure you run the Retrieve Latest LDAP Changes program to regenerate the data roles.
- Oracle Business Intelligence Applications (OBIA
- Smart View
- Business Intelligence Publisher (BI Publisher)
- Oracle transactional Business Intelligence (OTBI)
- Oracle Financial Reporting (FR)
- While defining control for business unit two, enable control at Requisitioning and define the exceptions to only include invoicing.
- Define control for business unit two to disable control for Requisitioning, Purchasing, and
- Define budgetary control at ledger level with Budgetary Control Exceptions for each business unit.
- While defining control for business unit one, disable control lor Purchasing, Payable Invoicing, and Receiving.
- While defining control for business unit one, enable control at purchasing and define the
- Define budgetary control at ledger level and only encumbrance controls at the business units.
- Define the hierarchy, then deploy the chart of accounts. The chart of accounts hierarchies will be generated automatically.
- Define the hierarchy, make sure the tree version is active, and then run the publish account Hierarchies program or the Publish Chart of Accounts Dimension Members and Hierarchies
- Define the hierarchy and make sure the tree is active. The hierarchy will be system generated for
- Define the hierarchy, make sure the tree is active, and the Publish check box is selected for the hierarchy.
- Application Development Framework Desktop Integration (ADFdi)
- Account Inspector
- Account Monitor
- Smart View
- Use Oracle Hyperion Financial Management for this type of complex consolidation.
- Use General Ledger's Balance Transfer programs to transfer subsidiary ledger balances to
- Use General Ledger's Financial Reporting functionality to produce consolidated reports
- Create separate ledgers for each subsidiary that shares the same chart of accounts,
- Manage Users
- Hire a New Employee
- Oracle Identity Management (OIM)
- Policy Manager (APM)
- Financials not a stand-alone product
- Completing accounting transformation definition and activating Subledger Journal Entry Rule Set assignments for the Accounting Method
- Populating supporting reference information in reference objects
- Selecting source values from transaction objects
- Creating subledger accounting events
- Completing pre-accounting validation