EBS General Ledger (GL)
1. Flexfield
2. Structure
3. Ledger
4. Chart of Accounts (COA)
5. Currencies
6. Calendar
7. Mandatory Accounts in GL
8. Actuals vs. Budgets
9. Creation of Ledger
10. Open a Period
11. Entering a Journal
12. Effective date in Journals
13. Category in Journals
14. Suspense Journals
15. Document Sequence
16. Auto Posting
17. Recurring Journals
18. Security Rules
19. Cross Validation Rules
20. Calculation of Total Expenditure for a particular month
21. Summary Accounts
22. Multi Reporting Currency (MRC)
23. Intra Company Journals
24. Ledger Set and Data Access Set
25. FSG (Financial Statement Generator)
1. Flexfield
1. Descriptive Flexfield – Capture additional information. Stored in attributes. Display in form as [ ]. DFF’s are of two types:
a) Global : Always appear on form
b) Context-Sensitive : May/ may not appear. Depends on form field2.
2. Key Flexfield – Predefined by Oracle. Made up of segments where each segment has value and meaning. Set of segments is called Code Combination.
Tables: fnd_flex_value_sets and fns_flex_values
2. Structure
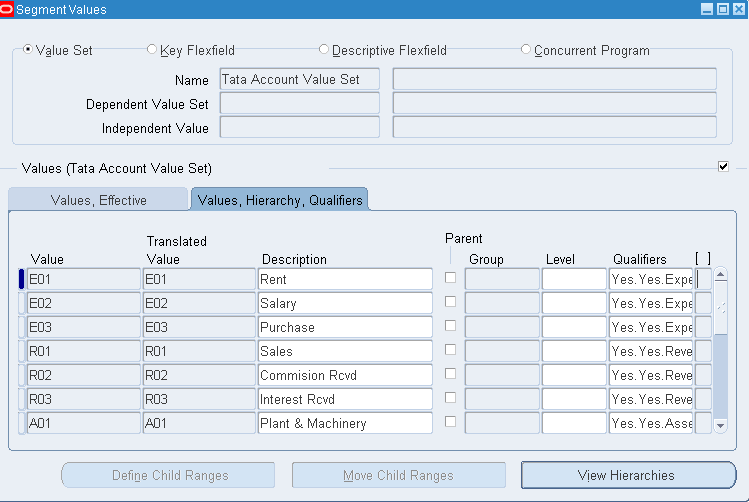
General ledger application >> Accounting Flexfield >> Structure >> Segments >> Segment Values.
We create the structure using Accounting Flexfield (KFF) in General Ledger. Each structure can have max 30 segments and min 2 segments (Company and Accounts). Say we have Tata as structure and this consists of three segments:
i) Company
ii) Department
iii) Account
Each segment will have values like
i) Company values like C01, C02, C03
ii) Department values like Education & Research, Sales, Marketing, Finance, HR iii) Account values like Expense, Revenue, Assets, Liability and Ownership.
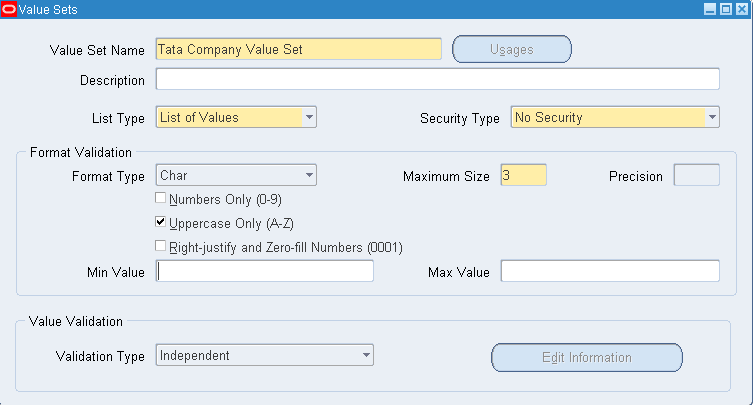
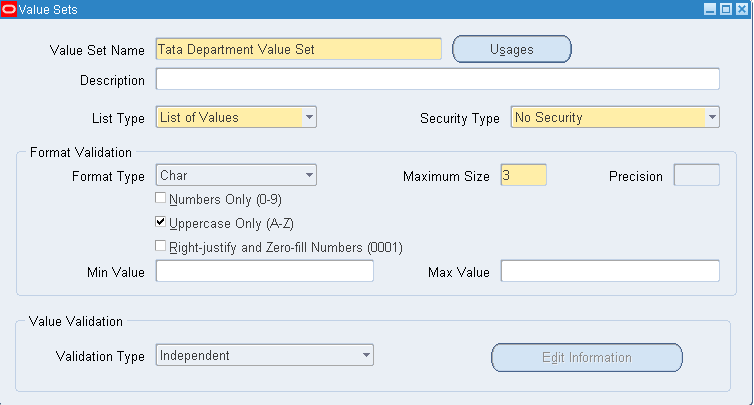
We define these values under value set. In case min & max value are not specified and the max size is defined as 3 having NUMBER format type, then system automatically defaults the min value to 001 and max value to 999. Similarly if the format type is CHAR with max size as 3 then we n number of combinations for min & max value, like 001-999, AAA-ZZZ, A01-A99, B01-B99, AB1-AB9, 1DA-9DA & so on}.
Value Set Navigation: Setup >> Financials >> Flexfield >> Validation >> Sets
(or)
Application Developer >> Application >> Validation >> Sets
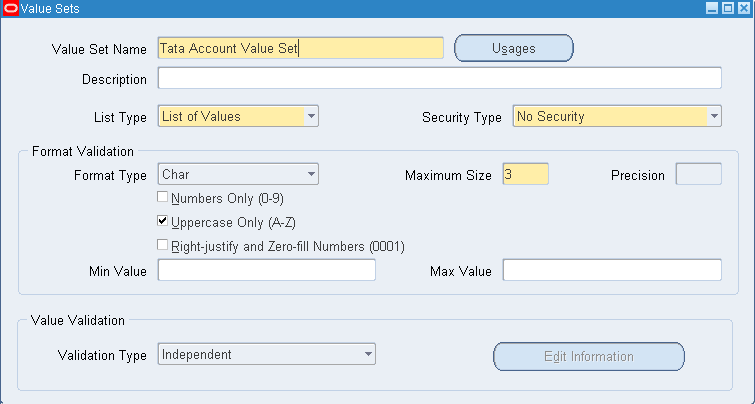
Creation of Company, Department and Account value set
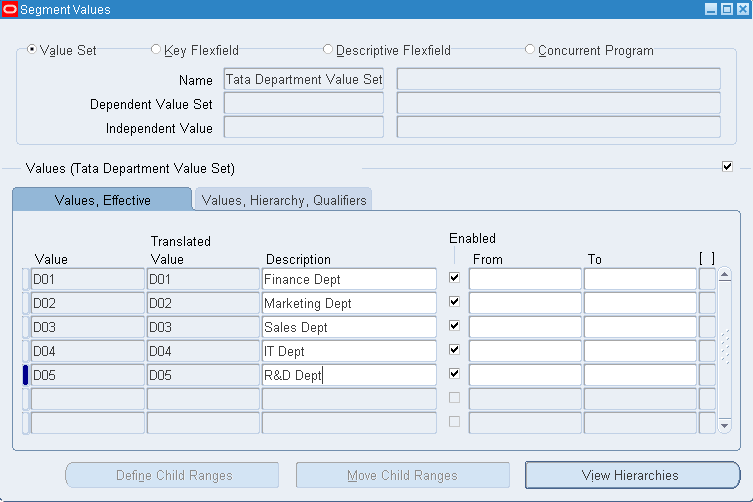
Assigning values to each value set: Setup >> Financials >> Flexfields >> Key >> Values >> Select Value set >> Query for value set name >> Click on Find >> Enter values for Company

Similarly enter values for Department
Similarly enter values for Account and assign segment qualifiers as this is mandatory for Account segment. We have following account types under segment qualifiers:
i) Asset
ii) Liability
iii) Expense
iv) Revenue
v) Ownership/ Stockholder’s Equity
vi) Budgetary (CR)
vii) Budgetary (DR)
3. Ledger
Ledger is an entity where we record the business information like selling and purchasing details. We define 4C’s in Ledger.
1. Chart of Accounts: Here we define structure, segments and segment values (attaching value set)
2. Currency: INR, AUD, USD, GBP
3. Calendar: We have two types
a. 01-Jan-2015 to 31-Dec-2015 — Standard Calendar
b. 01-Apr-2015 to 31-Mar-2015 — Fiscal (Any calendar other than standard calendar is Fiscal calendar)
4. Convention: Also called Accounting method. We have two types
a. Cash Basis of Accounting – As on when transaction takes place. Immediate settlement.
b. Accrual Basis of Accounting – Not immediate settlement. Pay later.
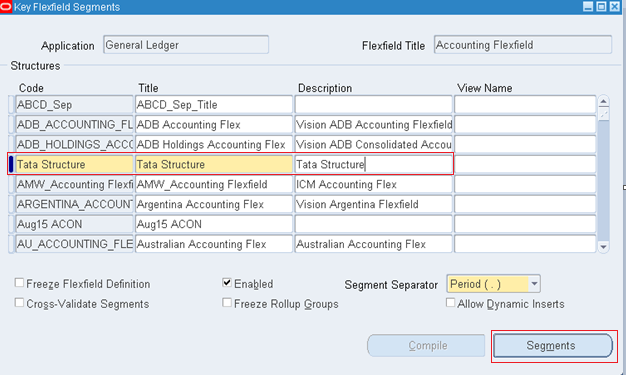
4. Chart of Accounts (COA)
Defining structure and segments:
General Ledger Super User responsibility >> Setup >> Financials >> Flexfields >> Key >> Segments >> Query for Application ‘General Ledger’ and Flexfield Title ‘Accounting Flexfield’
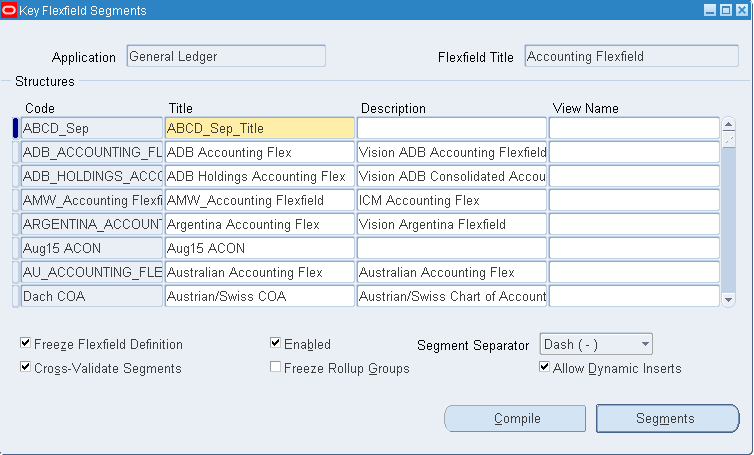
Create your Structure as highlighted below and click on Segments
Creation of Segments and assigning value set to each segment
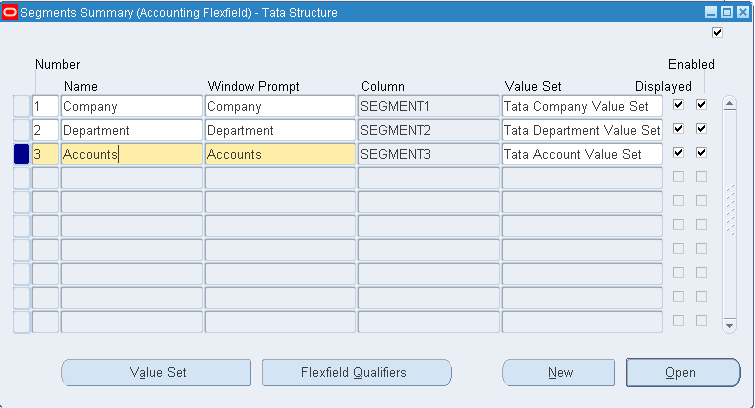
Click on Flexfield Qualifiers (Flexfield Qualifier – Defines behavior of each segment)
>> For Company select Balancing Segment
>> For Department select Cost Center Segment
>> For Accounts select Natural Account Segment
After including the flexfield qualifiers come to main page. Check Allow Dynamic Inserts and Freeze Flexfield Definition and click on Compile. With this COA gets completed.
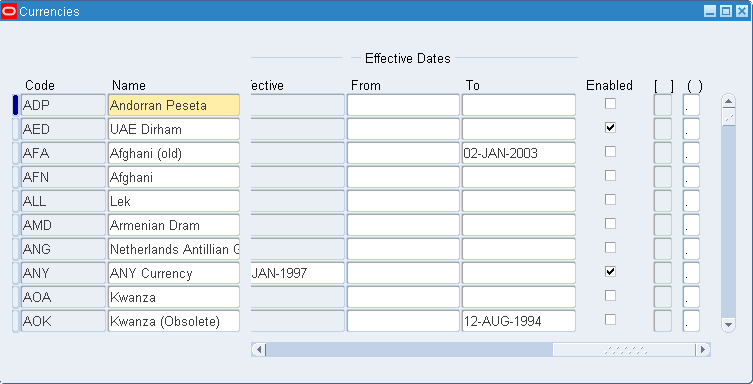
5. Currencies
General Ledger Super User >> Setup >> Currencies >> Define >> Check the Enabled field for the currencies which you want to use. Also we can create our own currency if required.
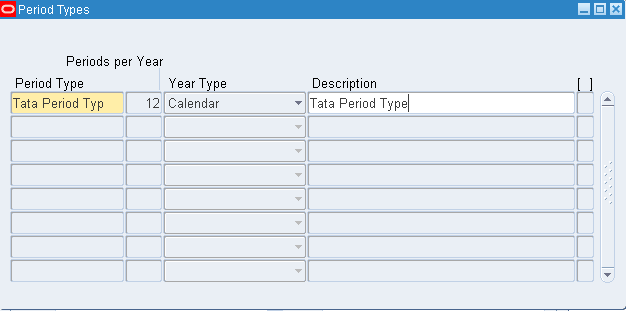
6. Calendar
We have two types:
1. Accounting Calendar (Mandatory) 2. Transaction Calendar (Optional)
Accounting Calendar are of two types
1. Calendar – 01-Jan-2015 to 31-Dec-2015
2. Fiscal Calendar – 01-Apr-2015 to 31-Mar-2016
General Ledger Super User >> Setup >> Financials >> Calendars >> Types >> Create your custom period type
General Ledger Super User >> Setup >> Financials >> Calendars >> Accounting >> Create custom calendar
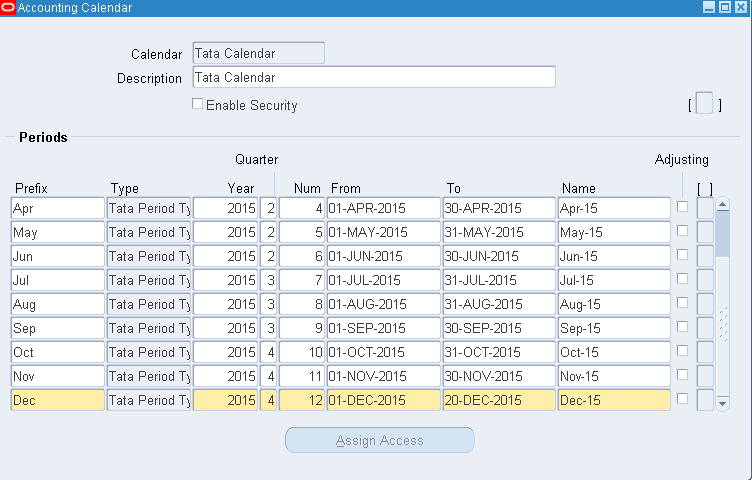
In case you would like to have adjustment period then create period having periods per year as 13 so that you can have the adjustment period in calendar.
When trying to close the form you have validation message. Go ahead and select Current. Ensure the program successfully gets completed.
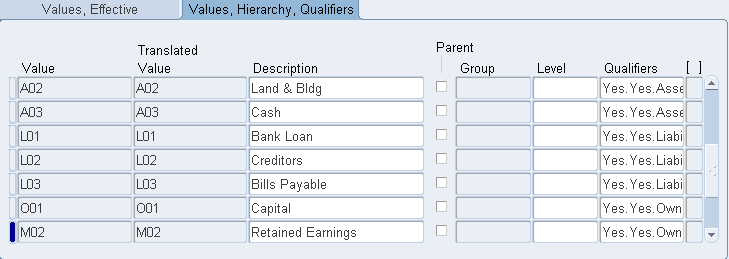
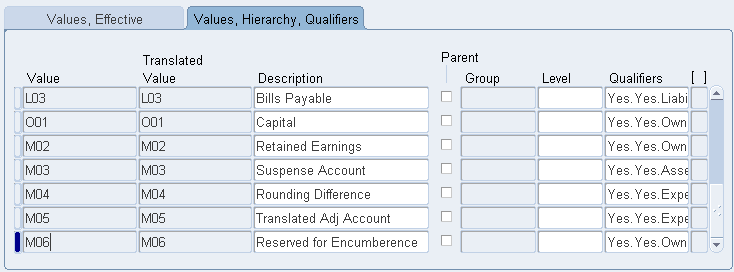
7. Mandatory Accounts in GL
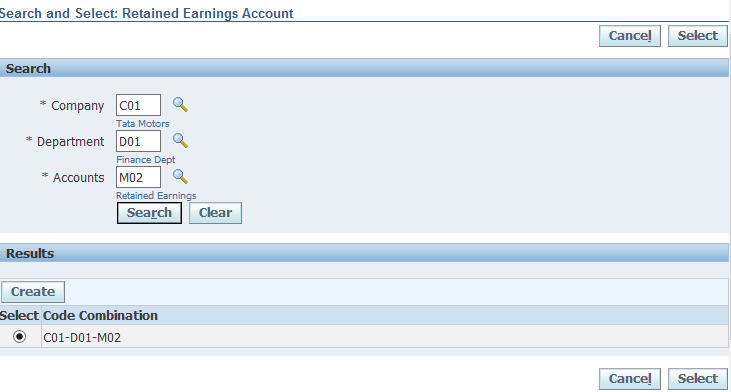
1. Retained Earnings Account (Account Type: Ownership) – Used to accumulate organisations profits
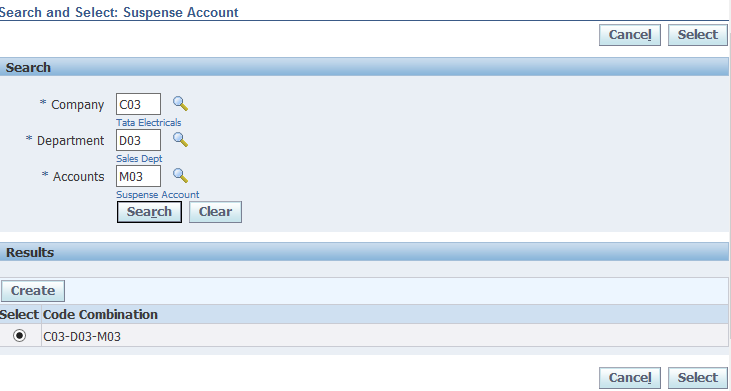
2. Suspense Account (Account Type: Asset/ Liability) – Placeholder for unbalanced journal entries. If a user enters debit without a corresponding credit (or vice versa), the system posts the difference to the suspense account.
3. Rounding Difference Account (Account Type: Expense/ Revenue) – Used to manage rounding discrepancies during currency conversions or calculations.
4. Translation Adjustment Account (Account Type: Ownership/ Revenue) – Used when dealing with multiple currencies. It records adjustments when financial statements are translated from one currency to another.
5. Net Income/ Net Earnings Account (Account Type: Expense/ Revenue) – Used to track current years profit or loss.
6. Reserve for Encumbrance (Account Type: Ownership) – Used for budget journals. When a budget entry is missing a debit or credit, the system posts the difference to this account.
8. Actuals vs. Budgets
Actuals: These represent day-to-day financial transactions, such as recording salaries, rent, or purchases. In cases where a transaction is incomplete (missing a debit or credit), the suspense account is used to temporarily balance the entry.
Budgets: These are used for future or forecasted transactions. When entering budget data for upcoming periods (e.g., for 2016 or 2017), if an entry is missing a debit or credit, the reserve for encumbrance account is used to maintain the integrity of the budget journal.
9. Creation of Ledger
Creation of Ledger = Accounting Setup + Accounting Options (or) Ledger Options
Accounting Setup = Ledger Name + 3 C’s (COA, Currency, and Calendar)
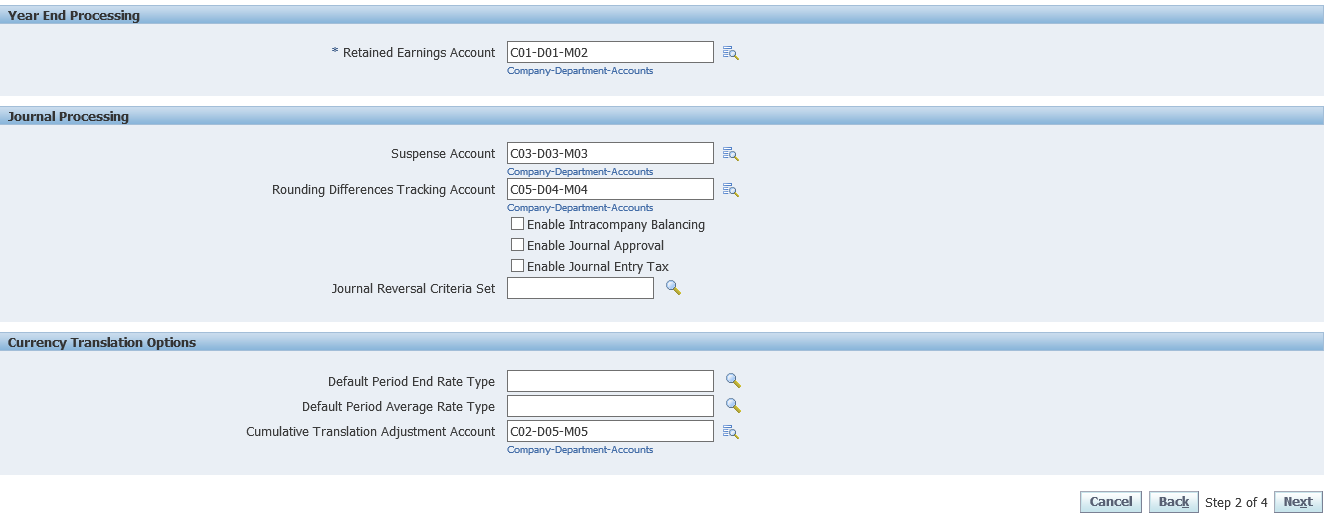
Ledger options = Six mandatory accounts like Retained earnings, Suspense account, Rounding difference, Translation adjustment, Net income, Reserve for encumbrance
General Ledger Super User >> Setup >> Financials >> Accounting Setup Manager >> Accounting Setups >> Click on Create Accounting Setup >> Legal Entity creation can be taken later so click Next >> Enter details as below
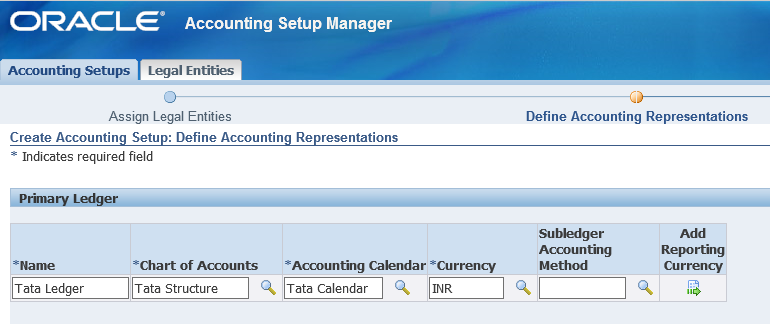
Click Next >> Click Finish >> In case you are willing to define accounting options then click Define Accounting Options else choose ‘Return to Accounting Setups’. Here I opted to create accounting options.
Click on update against Ledger Options >> Just review the values
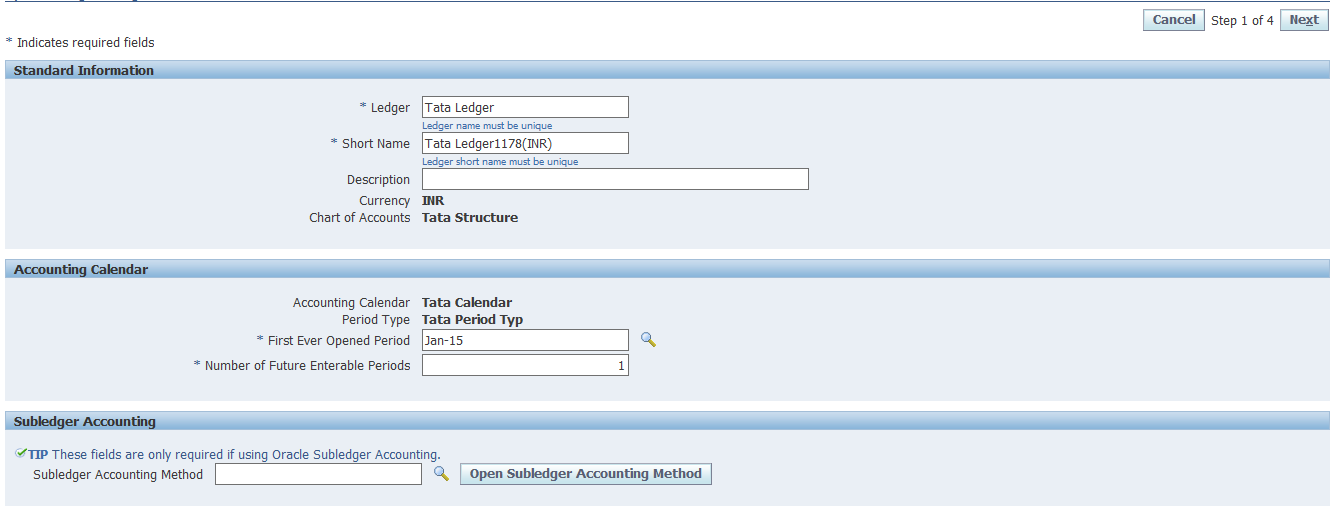
Click on Next >> Under Retained Earnings Account >> Select the values from LOV and ensure you selected retained earnings account value under Accounts segment. We can choose any company/ department >> Click on create to generate code combination
Similarly for Suspense account select the values
Similarly for rounding differences select the values

Similarly for Translated adjustment account
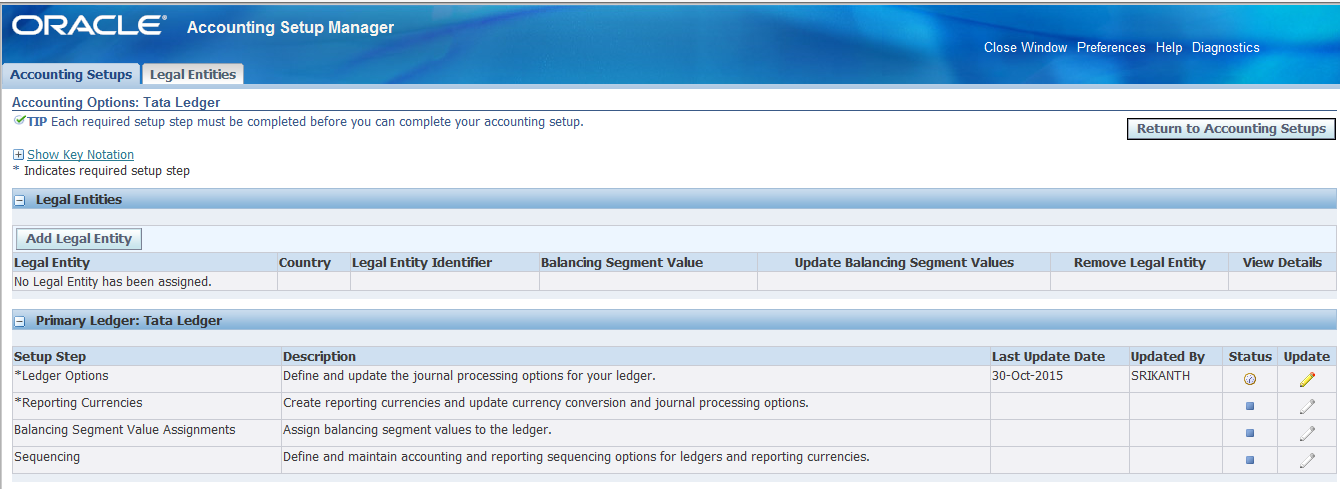
 Click on Next >> Include Reserve for Encumbrance account if required >> Click on Next >> Review the details and click on Finish >> The status against Tata Ledger has to be Tick marked. And observe the difference which is highlighted with previous page. Earlier we have Ledger option which is now modified to Tata Ledger
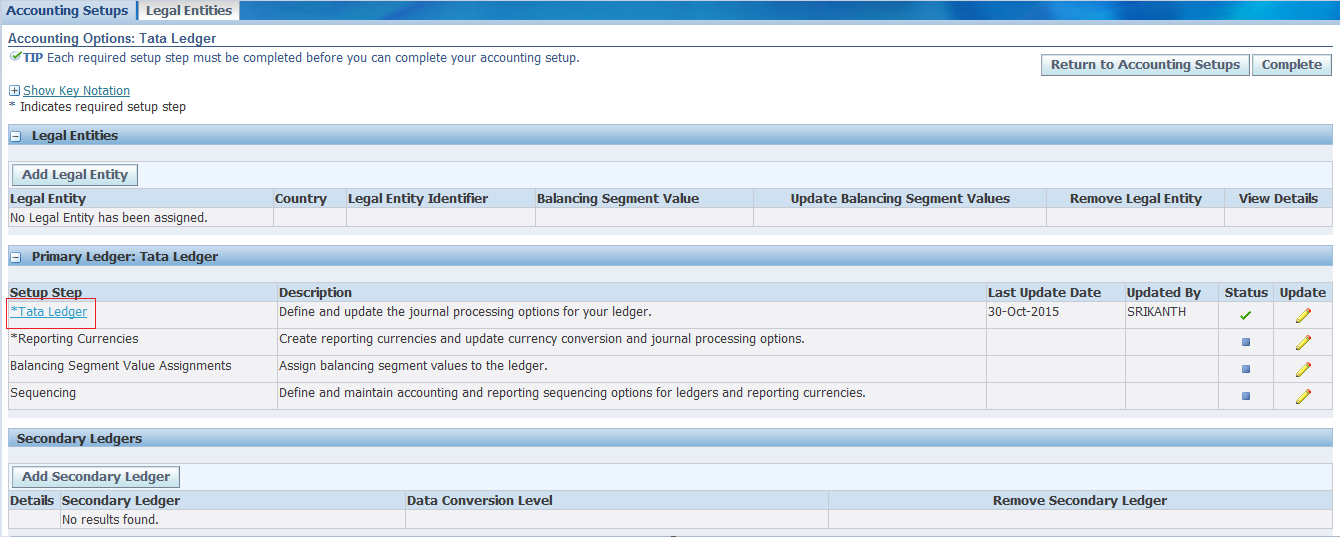
Click on update against Reporting Currencies >> In case you use other reporting currencies then click on Add Reporting Currency, else click on Complete >> Ensure the status of Reporting Currencies to be Completed.
Click on update against Balancing Segment Values >> Click add balancing segment value >> In case we don’t select all values then we wont be able to use within this Ledger >> Select all balancing segment values and click on Complete >> Ensure the Balancing segment value to be in completed status — Balancing segment value is a specific value assigned to a designated segment (Company Segment)
Click on update against Sequencing >> Change the status from In Progress to Complete and click on Apply >> Ensure the status to be Completed.
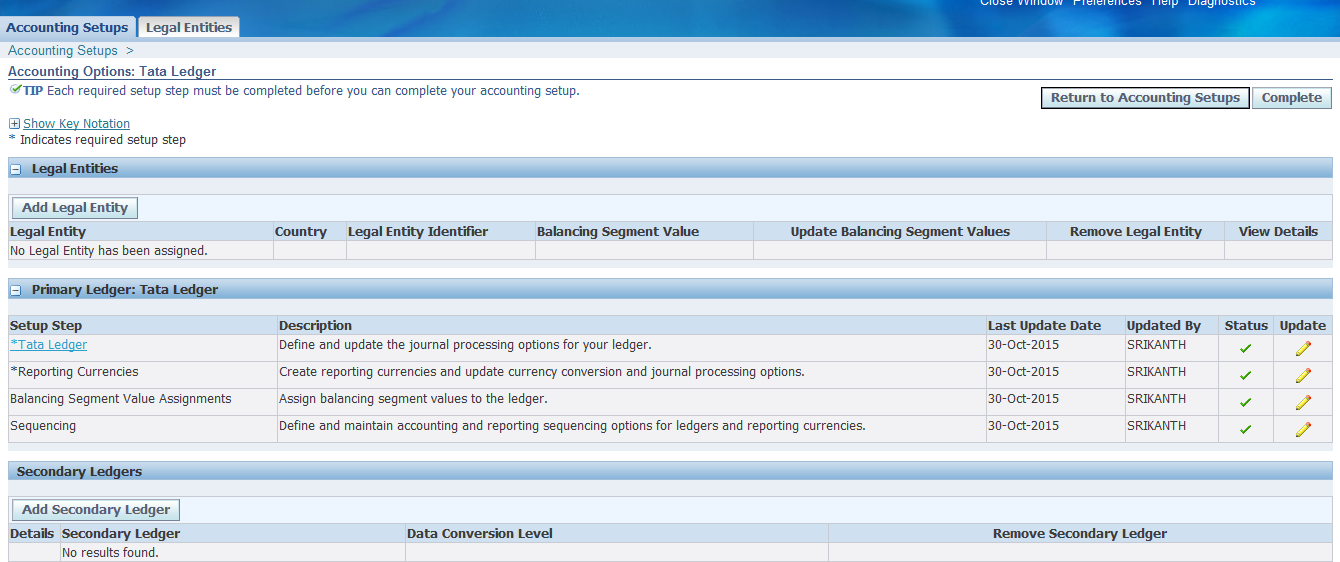
Click on Complete for Ledger creation.
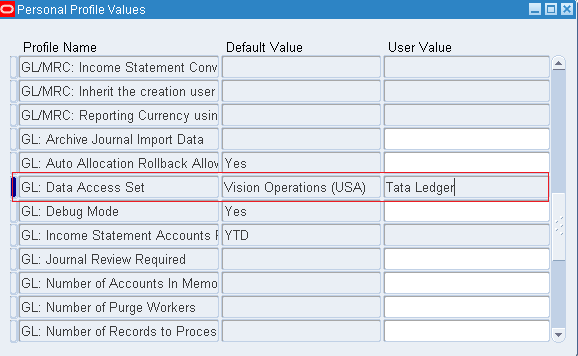
Now assign the created ledger to profile option: GL: Data Access Set — This profile option is used to control which ledgers or ledger sets a user or responsibility can access.
General Ledger Super User >> Other >> Profile >> Enter the ledger name under user value for GL: Data Access Set
The priority will be given to User Value. If no user value then default value will be picked.
Now verify which ledger we are connected to.
General Ledger Super User >> Journals >> Enter >> We should find the Ledger Name at Top of form.

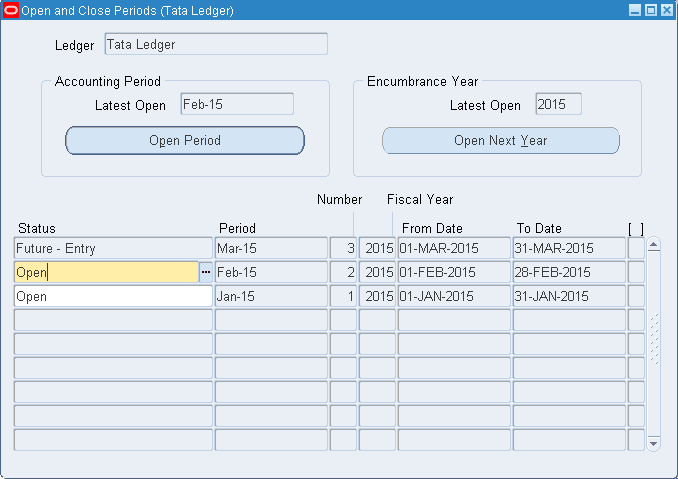
10. Open a Period
General Ledger Super User >> Setup >> Open/ Close
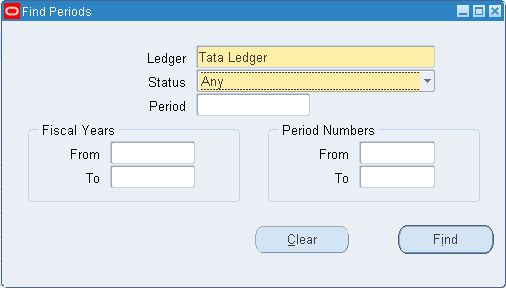
Click on Find >> Here you find First Period as ‘Jan-15’ >> This value can be changed. General Ledger Super User >> Setup >> Financials >> Accounting Setup Manager >> Accounting Setups >> Open the first ledger setup. There we have field as ‘First Ever Opened Period’ >>
If you want to proceed with ‘Jan-15’ click on Open >> Choose Yes
Here we have the Future – Entry for Feb since we gave Number of Future Enterable Periods as 1 in Accounting Setups
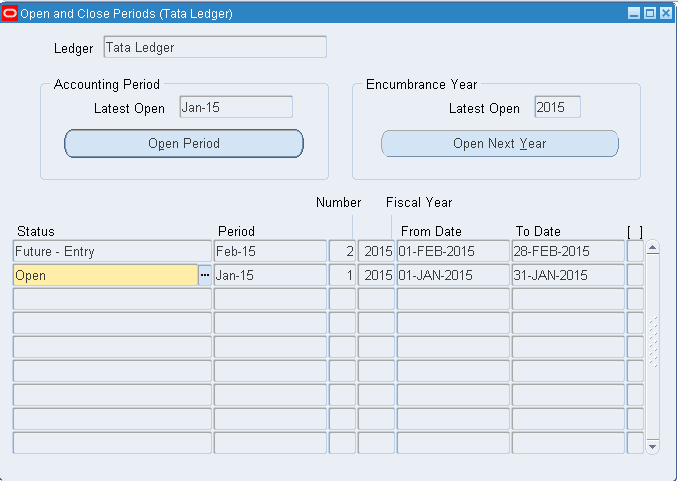
Opened the month of Feb
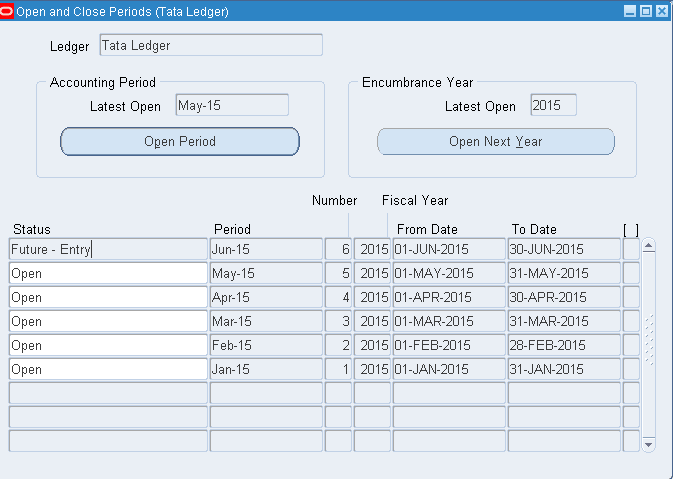
Open the month of May, leaving Mar and April unopened. Still all the periods get opened which are in between.
11. Entering a Journal
Journal Entry Structure:
1. Batch Name (Optional) Expense Batch
2. Journals like Rent Journal, Salary Journal
3. Journal Lines like Office Rent, Salary to Office staff, Factory Rent, Salary to Factory staff, Godown Rent, Salary to Godown staff, Guest House Rent, Salary to Guest House staff
General Ledger Super User >> Journals >> Enter >> Click on New Batch >> Enter values as given below

12. Effective date in Journals
1. Whenever user is going to enter journal for any previous period, system will consider the effective date as last date of previous period.
2. Whenever user is going to enter journal for any future period, system will consider the effective date as first date of future period.
3. Whenever user is going to enter journal for current period, system will consider the effective date as current date of current period.
13. Category in Journals
Purpose of the Journal entry. Ex: Payments, Payroll
Click on Journals >> Enter details as below >> Save

We have the above violation message as we have difference in Control Total amount and Batch amount.
Click on Yes and save the transaction.
Create new Salary Journal as below and save the transaction. Observe the difference in message. In the above image we have journal batch but here we have journal.

Now change the Dr/ Cr amounts to 10,000 and save. Here we don’t have any violation message.
Coz we have Batch control of 20,000. We created a rent journal of 10,000 and salary journal with 10,000 so when saving second record salary journal, we don’t have any violation.

Verifying the existing of Journals:
General Ledger Super User >> Journals >> Enter >> Find >> Here we should find the two Journal entries

Posting Rent Journal:
Under Payments category >> Click on >> Review Journal >> Click on Post.
Here you find both the batch status as Posted since both the journals belong to same batch (Expense Batch)

Create individual batch for each journal in case you want to get posted all journals.
14. Suspense Journals
General Ledger Super User >> Journals >> Enter >> New Journal >> Enter details as below and save

After saving the transaction click on Post
The Journal entry gets posted as below:

Since we have suspense account enabled for Tata Ledger, we have suspense account triggered.
If the suspense account is not enabled in accounting setup while creating ledger then we wont be able to post the entry. The concurrent program errors out and we have Error 6

In case you have Dr entry without Cr entry and you don’t want to hit suspense account, rather you want cash account to trigger. Then follow below set up
General Ledger Super User >> Setup >> Accounts >> Suspense >> This works only when the entry is Manual and Category is Payments

In case Cr without Dr or Dr w/o Cr, since we defined the suspense account the source as manual and category as payments, we get cash account rather than suspense account. If any other mode we have suspense account.
The below example provide more details:
Created a Rent Journal account with category as Payments and source as Manual without Cr entry and posted. Then instead of default suspense account we have cash account. Any other category or source we get suspense account (M03).

15. Document Sequence
Auto assigning of sequential numbers while creating Journals. By default we have Budget beneath effective date.

General Ledger Super User >> Other >> Profile >> For profile Sequential Numbering enter ‘Partially Used’ value

Now query for new journal where you find Document Number in the place of Budget.

Now assigning initial value to document number. Here we have initial value as 100
General Ledger Super User >> Setup >> Financials >> Sequences >> Document >> Define

General Ledger Super User >> Setup >> Financials >> Sequences >> Document >> Assign
In Document Tab

In Assignment tab

Now create a journal having Payments category and save the details to get the document number.


16. Auto Posting
Create a two new journals for posting.
http://myprofile.design/oracle_apps/wp-content/uploads/2016/01/GL_49.png
http://myprofile.design/oracle_apps/wp-content/uploads/2016/01/GL_50.png
General Ledger Super User >> Setup >> Journal >> AutoPost
Here we have category as Payment for period Feb-15, whereas we created a journal with category as Payroll for period Feb-15 so the below entry wont get posted.
http://myprofile.design/oracle_apps/wp-content/uploads/2016/01/GL_51.png
This gets posted for the newly created journals
http://myprofile.design/oracle_apps/wp-content/uploads/2016/01/GL_52.png
Also we have option as ALL which picks all unposted journals irrespective of source, category and periods >> If required enter the Journal effective dates which indicates post the unposted journals between these dates >> Click on Submit
http://myprofile.design/oracle_apps/wp-content/uploads/2016/01/GL_53.png
Now check the status of unposted journals which have been modified to Posted.
http://myprofile.design/oracle_apps/wp-content/uploads/2016/01/GL_54.png
17. Recurring Journals
Recurring journals are of three types:
1. Standard: User knows the entry and also the amount
Rent A/C Dr 1000/-
To Cash A/C 1000/-
2. Skeleton: User knows only the Entry, but don’t know the amount
Telephone Bill A/C Dr XXXX
To Cash A/C XXXX
3. Formula: User is going to use some formula (like +, -, *, /) within the journal
Rent A/C Dr 2400000/12 20000/-
To Cash A/C 20000/-
Standard recurring journal
———————————–
General Ledger Super User >> Define >> Recurring >> Enter values as below
http://myprofile.design/oracle_apps/wp-content/uploads/2016/01/GL_55.png
Click on Lines and create two lines as below
http://myprofile.design/oracle_apps/wp-content/uploads/2016/01/GL_56.png
http://myprofile.design/oracle_apps/wp-content/uploads/2016/01/GL_57.png
Now generate this setup
Journals >> Generate >> Recurring >> Enter details as below
http://myprofile.design/oracle_apps/wp-content/uploads/2016/01/GL_58.png
Click on Generate
Query for Journal and you find an unposted journal
http://myprofile.design/oracle_apps/wp-content/uploads/2016/01/GL_59.png
http://myprofile.design/oracle_apps/wp-content/uploads/2016/01/GL_60.png
We have Cash amount under Dr, which has to be under Cr.
To make that change, go to Journals >> Define >> Recurring >> Query for Rent Recurring Batch >> Lines >> For cash account enter amount as -12000
http://myprofile.design/oracle_apps/wp-content/uploads/2016/01/GL_61.png
Now go to Journals >> Generate >> Recurring >> Select Period as Feb-15 >> Generate
http://myprofile.design/oracle_apps/wp-content/uploads/2016/01/GL_62.png
Now search for Journal with period Feb-15 and you should have 12,000 under Cr.
http://myprofile.design/oracle_apps/wp-content/uploads/2016/01/GL_63.png
2. Skeleton Recurring Journal
—————————————
Journals >> Define >> Recurring
http://myprofile.design/oracle_apps/wp-content/uploads/2016/01/GL_64.png
Lines >> Enter two lines
http://myprofile.design/oracle_apps/wp-content/uploads/2016/01/GL_65.png
http://myprofile.design/oracle_apps/wp-content/uploads/2016/01/GL_66.png
Now generate a journal >> Journals >> Generate >> Recurring >> Enter Period as Jan-15 >> Click on Generate
http://myprofile.design/oracle_apps/wp-content/uploads/2016/01/GL_67.png
Now query for journal . Here we have information only about accounts but no amount.
http://myprofile.design/oracle_apps/wp-content/uploads/2016/01/GL_68.png
Now suppose I delete the rent recurring batch and purchase recurring batch from recurring journals.
Journals >> Generate >> Recurring >> Delete Rent Recurring Batch and Purchase Recurring Batch
Now query for journals which were created under those batches. Still you find the journals though we deleted recurring batches.
http://myprofile.design/oracle_apps/wp-content/uploads/2016/01/GL_69.png
Only Unposted journals can be deleted. In case you want to delete, then select each journal and delete manually.
3. Formula Recurring Journal
—————————————
Journals >> Define >> Recurring
http://myprofile.design/oracle_apps/wp-content/uploads/2016/01/GL_70.png
Lines
http://myprofile.design/oracle_apps/wp-content/uploads/2016/01/GL_71.png
Ensure you use line number as 9999
http://myprofile.design/oracle_apps/wp-content/uploads/2016/01/GL_72.png
Now generate this entry.
Journals >> Generate >> Recurring >> Generate for Jan-15 period.
http://myprofile.design/oracle_apps/wp-content/uploads/2016/01/GL_73.png
Search for Journal entry
http://myprofile.design/oracle_apps/wp-content/uploads/2016/01/GL_74.png
18. Security Rules
General Ledger – (Application)
Responsibilities
1. General Ledger Super User – Has 8 Sub menus
2. General Ledger Supervisor – 5
3. General Ledger Controller – 4
4. General Ledger Budget User – 3
5. General Ledger User – 2
Here we are trying to secure account values so go to Account value set which is ‘Tata Account Value Set’ and modify the security type ‘Hierarchical Security’
http://myprofile.design/oracle_apps/wp-content/uploads/2016/01/GL_75.png
Now to go Structure. General Ledger Super User >> Setup >> Financials >> Flexfields >> Key >> Segments >> Query for Tata Structure >> Unfreeze flexfield definition >> Segments >> Select Accounts segment >> Click on Open >> Enable Security Enabled >> Save
Freeze the Structure and compile
General Ledger Super User >> Setup >> Financials >> Flexfields >> Key >> Security >> Define >> Enter values as below and click on Find
http://myprofile.design/oracle_apps/wp-content/uploads/2016/01/GL_76.png
Enter name and message. First include all the values under Include type then select the values which you want to exclude.
http://myprofile.design/oracle_apps/wp-content/uploads/2016/01/GL_77.png
Here we excluded 2 assets and 3 liabilities.
Click on Assign >> Enter values as below
http://myprofile.design/oracle_apps/wp-content/uploads/2016/01/GL_78.png
Now create a journal entry to test the above security values. Here we don’t find the values which were excluded.
http://myprofile.design/oracle_apps/wp-content/uploads/2016/01/GL_79.png
To revoke back those values go back to Tata Structure >> uncheck Security enabled
And on Tata Account Value Set change the security type to No Security
19. Cross Validation Rules
Say we have 5 companies and 5 departments. Except C02 all companies have all 5 departments. The company C02 has only D01 and D02
C01 D01
C02 D02
C03 D03 X
C04 D04 X
C05 D05 X
Go to Tata Structure >> Unfreeze >> Check Cross Validate Segments >> Now freeze and compile
Now go to Setup >> Financials >> Flexfields >> Key >> Rules >> Enter values as below
Here company C02 is not allowed to enter departments D03, D04 and D05
http://myprofile.design/oracle_apps/wp-content/uploads/2016/01/GL_80.png
Now test the journal entry for C02 and D03 department.
http://myprofile.design/oracle_apps/wp-content/uploads/2016/01/GL_81.png
In case you don’t want the cross validation rule then uncheck in Tata Group Structure.
20. Calculation of Total Expenditure for a particular month
General Ledger Super User >> Inquiry >> Account >> Enter details as below
Here E01-E03 are expense account type.
http://myprofile.design/oracle_apps/wp-content/uploads/2016/01/GL_82.png
We need to calculate the totals manually by selecting show balances. For system calculation go to Setup >> Financials >> Flexfields >> Key >> Values >> Enter values as below and click on Find
http://myprofile.design/oracle_apps/wp-content/uploads/2016/01/GL_83.png
Create a new line as below and select Parent type
http://myprofile.design/oracle_apps/wp-content/uploads/2016/01/GL_84.png
Now keeping the cursor at Total Expense line, click Define Child Ranges >> Enter range from E01 to E03 >> Save
Now go to Setup >> Financials >> Flexfields >> Key >> Groups >> Enter details as below and click on Find
http://myprofile.design/oracle_apps/wp-content/uploads/2016/01/GL_85.png
Create a new rollup
http://myprofile.design/oracle_apps/wp-content/uploads/2016/01/GL_86.png
Now again go back to values and assign the newly created group
http://myprofile.design/oracle_apps/wp-content/uploads/2016/01/GL_87.png
Now go back to Structure >> Uncheck freeze and check freeze rollup groups >> Again Freeze and compile>> After Compilation we have Expense Rollup group gets uneditable
http://myprofile.design/oracle_apps/wp-content/uploads/2016/01/GL_88.png
21. Summary Accounts
Setup >> Accounts >> Summary >> Enter the period as Jan-15 >> Save
http://myprofile.design/oracle_apps/wp-content/uploads/2016/01/GL_89.png
Now go to Inquiry >> Account >> Enter Jan-15 period and select Expense Summary under Summary Template
http://myprofile.design/oracle_apps/wp-content/uploads/2016/01/GL_90.png
In case we don’t need to access the roll up group then unfreeze the structure and uncheck the freeze rollup groups
22. Multi Reporting Currency (MRC)
Create a new Ledger for this activity
Setup >> Financials >> Accounting Setup Manager >> Accounting Setups >> Create Accounting Setup >> Next >>
http://myprofile.design/oracle_apps/wp-content/uploads/2016/01/GL_91.png
Click on Add Reporting Currency
http://myprofile.design/oracle_apps/wp-content/uploads/2016/01/GL_92.png
Click Next and Finish
http://myprofile.design/oracle_apps/wp-content/uploads/2016/01/GL_93.png
Go to Accounting Options >> Click on Update against Ledger Options >>
http://myprofile.design/oracle_apps/wp-content/uploads/2016/01/GL_94.png
Enter Retained earnings account C01-D01-M02 >> Next >> Next >> Finish
Now click on update against Reporting Currencies >> Update >> Enter the default rate type as Corporate and click on Apply
http://myprofile.design/oracle_apps/wp-content/uploads/2016/01/GL_95.png
Click on Complete
http://myprofile.design/oracle_apps/wp-content/uploads/2016/01/GL_96.png
Now click on update against Balancing Segment Value Assignments >> Click Add Balancing Segment Value >> Select All companies >> Complete
Now click on update against Sequencing >> Modify the status to Complete >> Apply
Once all the Setup steps are completed >> Click on Complete button
Here we created a Ledger Tata MRC Ledger and system has dynamically created a ledger Tata MRC Ledger(USD)
Now assign the Tata MRC Ledger to profile value GL: Data Access Set
http://myprofile.design/oracle_apps/wp-content/uploads/2016/01/GL_97.png
Now open periods for new ledger.
Setup >> Open/ Close, say till Mar-15
Create another user and assign profile value of Tata MRC Ledger(USD) to GL: Data Access Set
And open periods for Tata MRC Ledger(USD), say till Mar-15
Corporate rate is fixed by Corporate head quarters.
Now create dollar rates in new user.
Setup >> Currencies >> Rates >> Daily >> Enter values as below (The below rate is applicable only for 31-JAN-2015)
http://myprofile.design/oracle_apps/wp-content/uploads/2016/01/GL_98.png
Come back to old user and create a new ledger as below. Save and Post
http://myprofile.design/oracle_apps/wp-content/uploads/2016/01/GL_99.png
Here the 2,75,000 INR gets converted into USD amount. Login to new user and search for Journal. There we will find both INR and USD values.
23. Intra Company Journals
When the transaction takes place between two companies then it is IntraCompany
For example:
C01 Purchase A/C Dr 5000/-
C01 Cash A/C Cr 5000/-
C02 Cash A/C Dr 5000/-
C02 Sales A/C Cr 5000/-
Here the C01 Cash A/C Cr and C02 Cash A/C Dr gets nullified and we get only
C01 Purchase A/C Dr 5000/-
C02 Sales A/C Cr 5000/-
Setup:
Open the ledger >> Click on update against Tata Ledger >> Next >> In step 2 of 4 check the ‘Enable Intracompany Balancing’ >> Finish >> Click on Return to Accounting options >> Click on update against Intracompany Balancing Rules >> Define Rules >> Create Rule >> Enter the details as given below
http://myprofile.design/oracle_apps/wp-content/uploads/2016/01/GL_100.png
Now in options tab enter details and click on Apply >> Done
http://myprofile.design/oracle_apps/wp-content/uploads/2016/01/GL_101.png
Now create a Journal and post
http://myprofile.design/oracle_apps/wp-content/uploads/2016/01/GL_102.png
After posting we have below accounts enabled due to Intracompany balancing.
http://myprofile.design/oracle_apps/wp-content/uploads/2016/01/GL_103.png
24. Ledger Set and Data Access Set
Other than TATA Ledger, create 2 more ledgers.
Tata Ledger 1
http://myprofile.design/oracle_apps/wp-content/uploads/2016/01/GL_104.png
Define Accounting Options
http://myprofile.design/oracle_apps/wp-content/uploads/2016/01/GL_105.png
Enter the Retained Earnings Account C01-D01-M02 >> Next >> Finish
For Reporting Currencies click on Complete
For Balancing Segment values click on Add Balancing Segment value and select all >> Click Complete
For Sequencing >> Modify the status from In Progress to Complete >> Apply
Finally click on Complete
Now create one more Ledger Tata Ledger 2
Ledger Set: Setup >> Financials >> Ledger Sets
http://myprofile.design/oracle_apps/wp-content/uploads/2016/01/GL_106.png
http://myprofile.design/oracle_apps/wp-content/uploads/2016/01/GL_107.png
Now go to Other >> Profile >> for GL: Data Access Set enter user value as Tata Ledger Set 1
Now enter a Journal >> Here we have Default ledger as Tata Ledger with multiple ledgers assigned under Ledger field
http://myprofile.design/oracle_apps/wp-content/uploads/2016/01/GL_108.png
Similarly change the profile value of GL: Data Access Set to Tata Ledger Set 2
Now enter a Journal >> Here we don’t have any default ledger but have multiple ledgers assigned under Ledger field
http://myprofile.design/oracle_apps/wp-content/uploads/2016/01/GL_109.png
Data Access Set: Setup >> Financials >> Data Access Sets
http://myprofile.design/oracle_apps/wp-content/uploads/2016/01/GL_110.png
Now go to Other >> Profile >> for GL: Data Access Set enter user value as Tata Data Access Set
Now enter a Journal >> Here we are able to find all 5 ledgers with the respective ledgers which are assigned under ledger set 1 and ledger set 2
http://myprofile.design/oracle_apps/wp-content/uploads/2016/01/GL_111.png
The difference between ledger access set and data access set is we have read/ write or read only mode in data access set.
25. FSG (Financial Statement Generator)
| Mandatory Steps | Optional Steps |
| 1. Define Row Set 2. Define Column Set 3. Define Report (Row set + Column set = FSG report) |
1. Define Content Set 2. Define Row Order 3. Define Display Set |