Fusion Core HCM
1. Define Geographies
2. Define Enterprise Structure
3. Enterprise Structure Configuration via ESC
4. Manage Enterprise HCM Information
5. Define Legal Entity
6. Define Workforce Structures
i. Define Locations
ii. Define HCM Organizations
7. Workforce Lifecycle
8. HCM Roles
9. Hire an Employee
10. Define Person record and Employment values
11. Approval Management
12. Defining Checklists
1. Define Geographies
To build a geography reference data for a country we must have:
i) Geography structure (Country structure)
ii) Geography hierarchy (Actual data)
We can create either manually or using import functionality (both structure & data can be imported).
In FSM page >> Tasks >> Search >> Manage Geographies >> Search Country code starts with ‘GB’
We get the geography structure (State >> County >> Local Admin >> Town >> Zip) from structure defined and geography hierarchy from hierarchy defined. Make sure all the items are in Completed status.
2. Define Enterprise Structure
• Enterprise structure is Customers organization structure.
• The ESC (Enterprise Structure Configurator) is an interview-based tool which guides us through the configuration of Enterprise structure.
• Access the ESC using the ‘Establish Enterprise Structure’ task
• Use ESC as part of your setup to define the organisation structure, job and position structures.
• Using ESC we can:
- Create all organisational structures at one time
- Create multiple configurations to test multiple scenarios
- Review the enterprise configuration prior to loading it
- Roll back the enterprise configuration after loading it
- Automatic organization (organization hierarchy) tree gets created
Establish Enterprise Structure (Tata)
↓
Manage Divisions (Tata Motors & TCS)
↓
Manage Legal Entity (Taxation Country)
↓
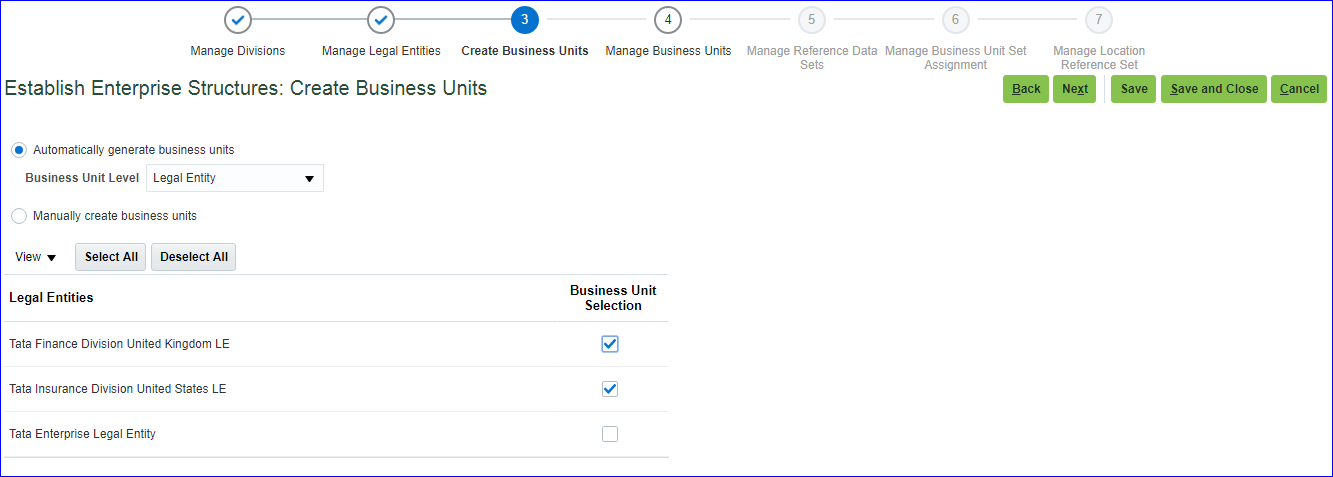
Create Business Unit
↓
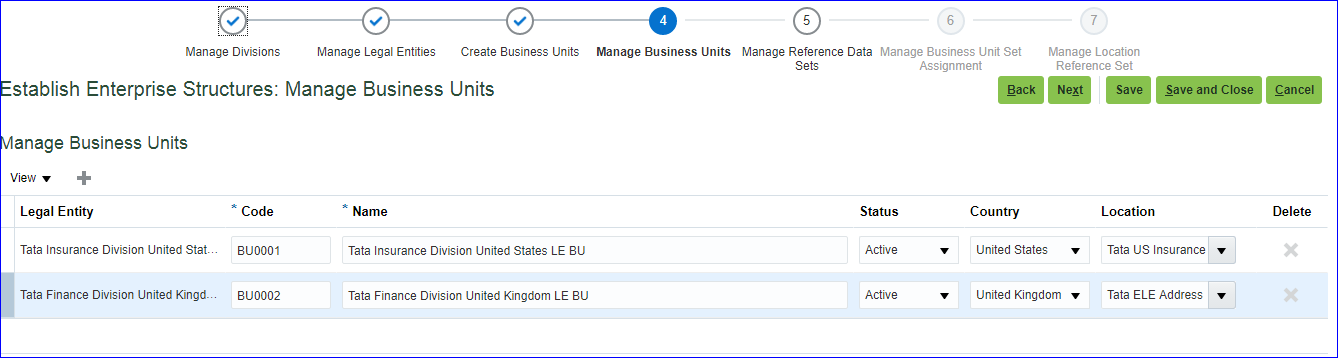
Manage Business Unit
↓
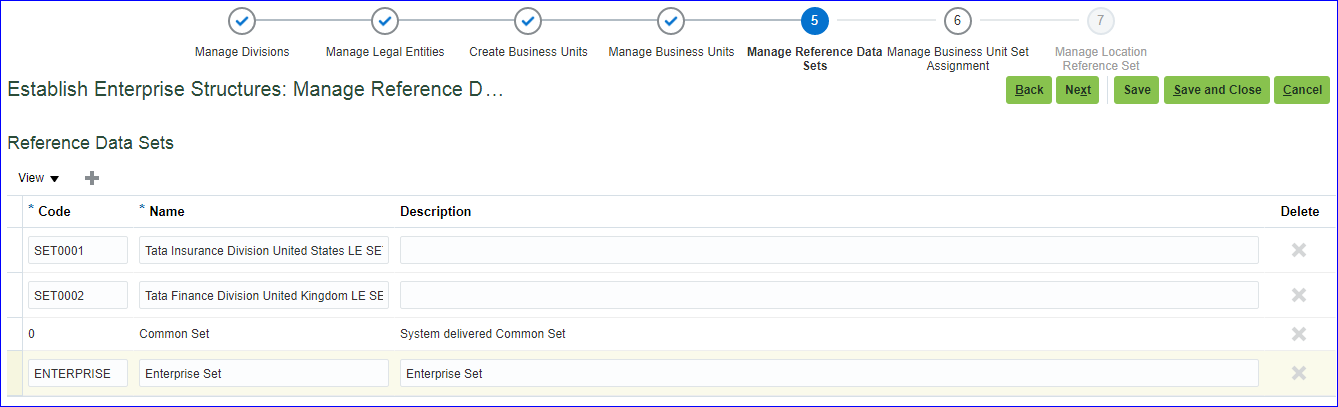
Manage Reference Data Set(RDS)
↓
Manage BU Set Assignment
↓
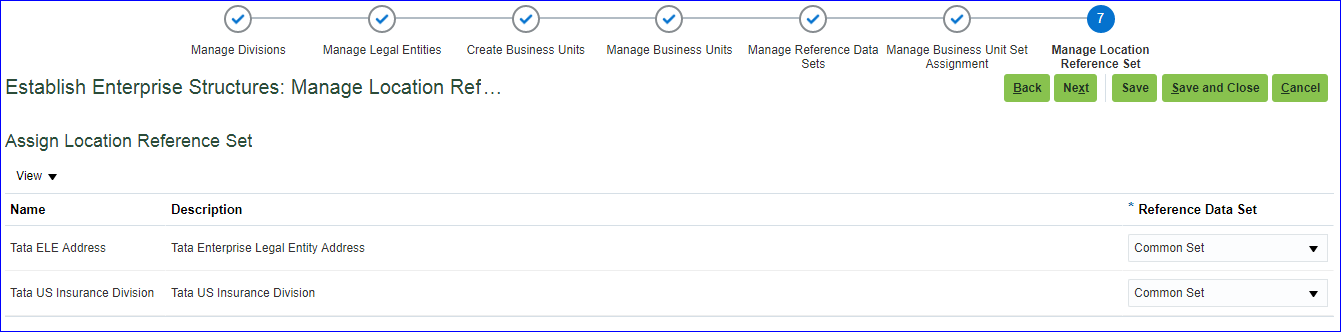
Manage Location Reference Set
3. Enterprise Structure Configuration via ESC
FSM page >> Search >> Task ‘Establish Enterprise Structures’ >> Create >> Name: Tata Enterprise Configuration; Description: Tata Enterprise Configuration >> Ok
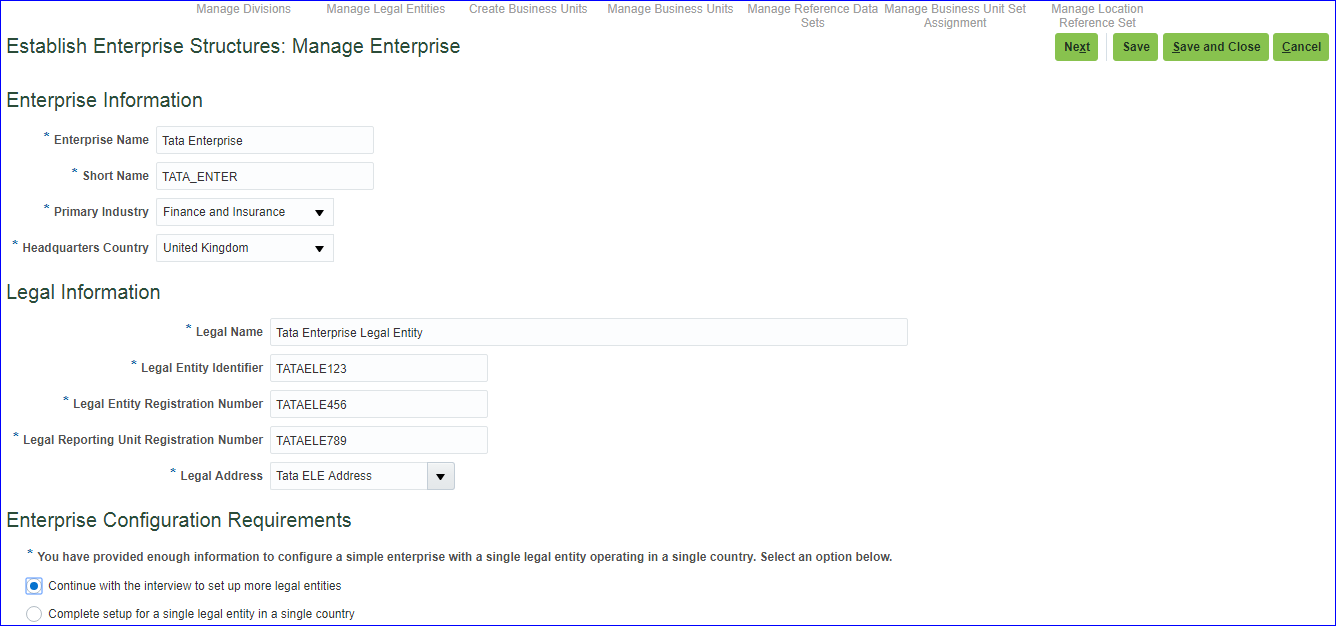
Save and Next
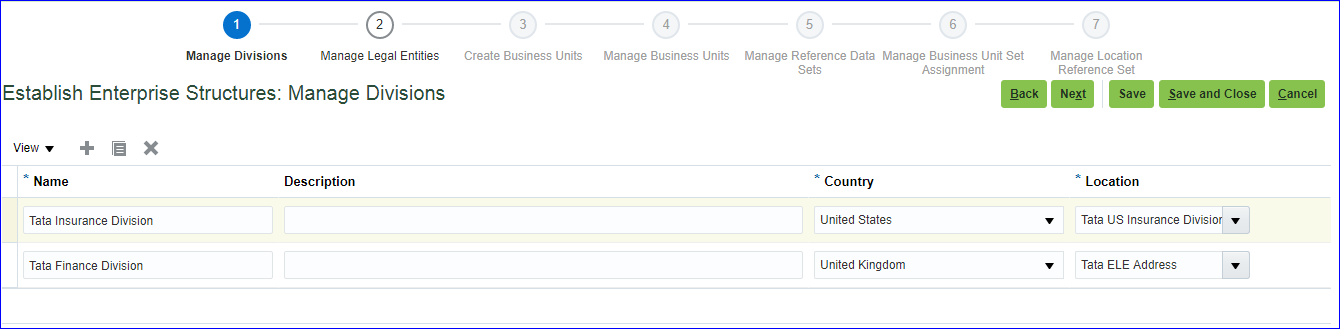
Insurance division is in US and Finance division is in UK
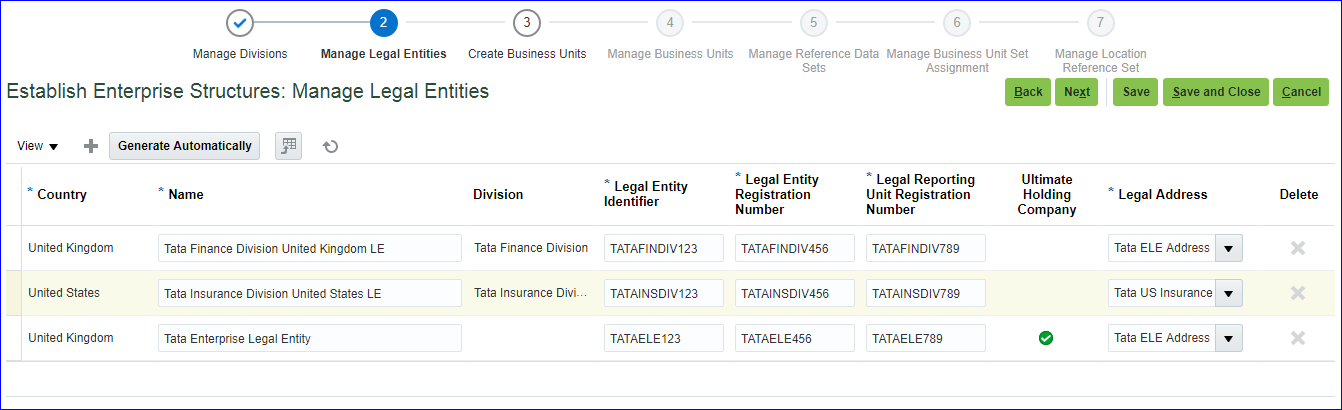
Save and Next >> Click on Generate Automatically to create LE’s >> Click on Ok on the warning message

Ok
Save and Next
Save and Next
Save and Next
Save and Next

Save and Next
Save and Next >> Review and finally click on Save and Close.
To download the structure in PDF, under Review Results click on Go to Task >> Click on ‘Download Technical Summary Report’ >> PDF gets generated.
In case you want to Rollback configuration then select the line whose status is Loaded and click on ‘Roll Back Configuration’ button.
Configure Jobs and Positions:
Here we wont create any jobs or positions. We just add DFF to existing Job or Position pages where we actually create them.
Click on Configure Jobs and Positions
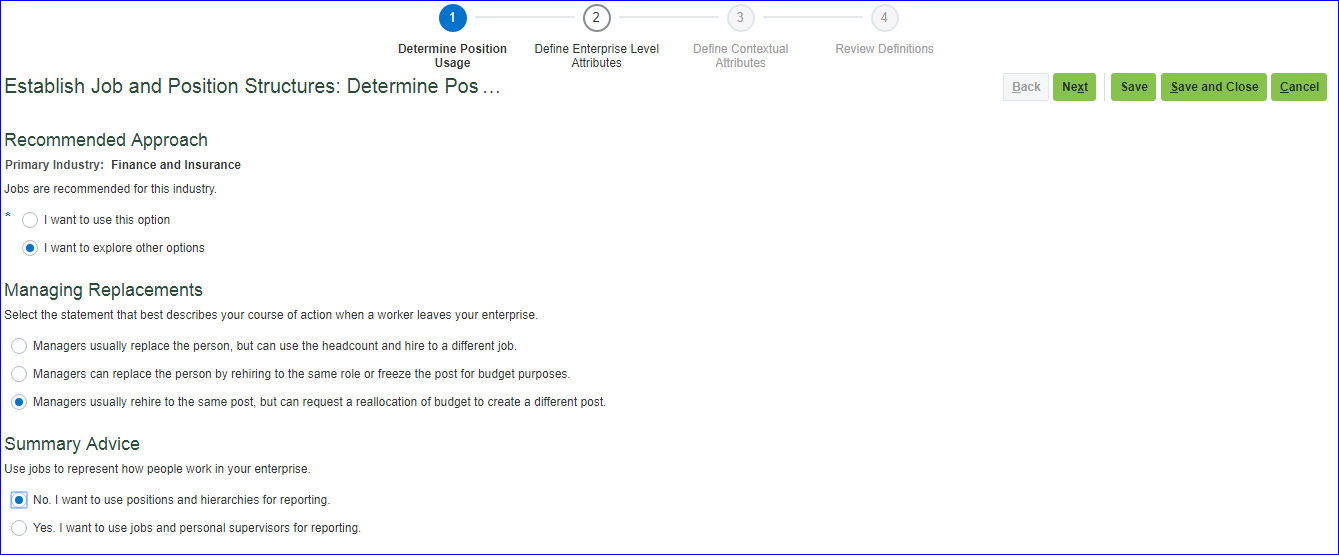
Next
When the additional field always need to be displayed on Job and Position page then enter enterprise level attributes.
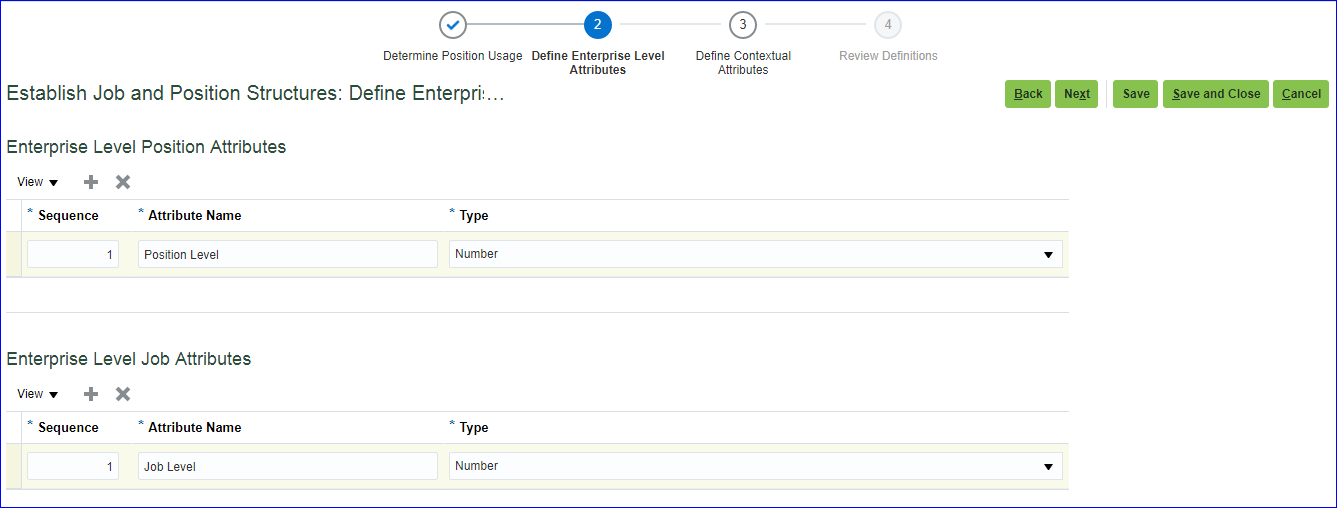
Next
Click on Create at ‘Business Unit Level Position Attributes’ level
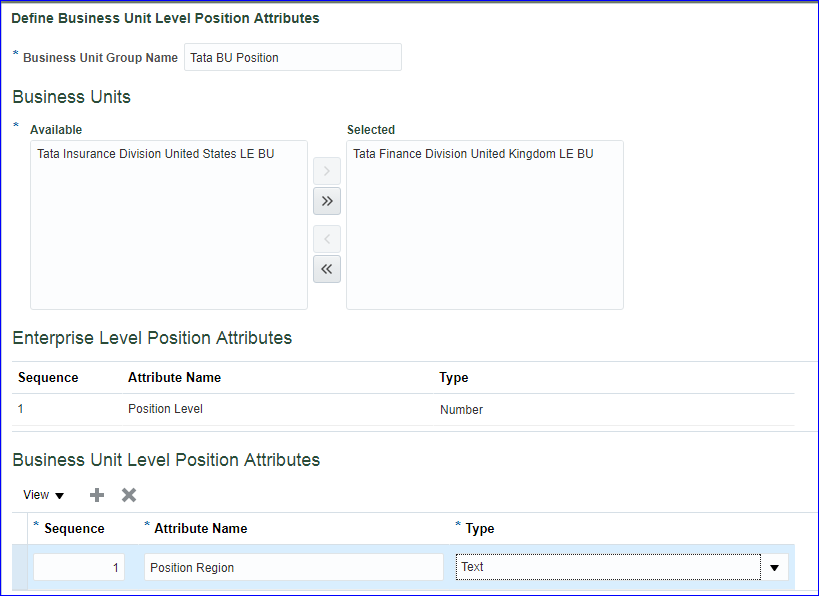
Click on Create at ‘Reference Data Set Level Job Attributes’ level

Next >> Save and Close.
You can view the result under Review Results, click on Go to Task.
Finally click on ‘Load Enterprise Configuration’ for the enterprise to Loaded.
4. Manage Enterprise HCM Information
We mainly deal with:
• Employment Model
• Person number generation
• Worker number generation
• Assignment number generation
• Position synchronization
• Action framework
→ Employment Model
Two-Tier Employment Model: Consists of Work Relationship and Assignments.
Work Relationship = Relationship between person and legal employer. We have three relationships i) Employee ii) Contingent worker (contract employee) iii) Non worker
Assignment = Employment related information like Job, Grade, Working hours….
Three-Tier Employment Model: Consists of Work Relationship, Employment Terms and Assignments
Employment Terms = Terms and conditions of employment
We go with this model when company has more number of hire to contract employees. Like contract for 6 months or 1 year.
Two-Tier Model options:
i) Single Assignment: Work Relationship >> Single Assignment (Ex: Job is Sales Manager). This is the default model in Fusion application.
ii) Single Assignment with Contract: Work Relationship >> Assignment with Contract (Instead of going with Three-tier, when company has less number of contract employees, we go with this option)
iii) Multiple Assignment: Work Relationship >> Multiple Assignment (Ex: Job is Sales Manager and Trainer)
A person can have multiple relationships (can be employee + contingent worker same time) with same legal employer and multiple assignments as well (employee assignment can be Sales Manager + Consultant and contingent worker assignment can be Trainer) with one primary relationship and one primary assignment.
Three-Tier Model options:
i) Work Relationship –> Employment Terms –> Assignment
ii) Work Relationship –> Employment Terms –> Multiple Assignments
iii) Work Relationship –> Multiple Employment Terms –> Single Assignment
iv) Work Relationship –> Multiple Employment Terms –> Multiple Assignments
The default model in Fusion application is ‘Two-Tier Single Assignment’ and we can change this using the task ‘Manage Enterprise HCM Information’ at FSM page level.
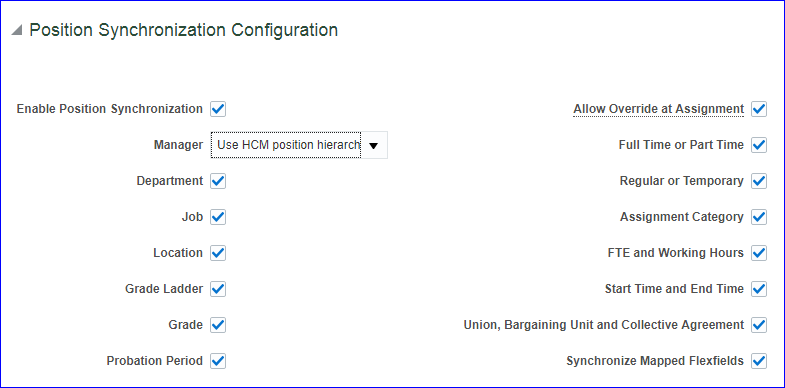
→ Position synchronization: On positions page we have certain fields like Department, Job, Grade, Location and so on, and to synchronize these fields we use Position synchronization.
By default Position synchronization will not be enabled. We have to enable at Enterprise level or Legal Employer level. In case we enable at both the levels, then the settings specified at legal employer level takes the precedence over enterprise level settings.
Enterprise level Position Synchronization
→ Person Number Generation
Person number is unique across Enterprise. Any person created in HCM attains Person number.
Person number can be generated at Enterprise level using following methods:
• Manual
• Automatic prior to submission – This is default method in application.
• Automatic upon final save
• Formula (available in future releases)
Initial person number: We can specify the initial person number for our enterprise when person numbers are generated automatically.
→ Worker Number Generation
We cannot distinguish employee and contingent worker based on person number. To differentiate employee from contingent worker we can assign worker number and this is optional. We can generate worker number either
i) Manually
ii) Automatic Generation Using Global Sequence
iii) Automatic Generation Using Legal Employer Sequence
If selected automatically then worker numbers will be allocated from either an enterprise sequence or a legal employer sequence. All legal employers automatically inherit the enterprise number-generation method. We can override the number-generation method at the legal employer level.
→ Assignment Number Generation
Every worker will have Assignment number. Assignment is a set of information including job, position, grade…that defines a workers or non-workers role in a Legal Employer. Assignments are identified by assignment numbers, which you can allocate either manually or automatically. In general Employee have prefix ‘E’, Contingent workers have prefix ‘C’, Non-workers have prefix ‘N’.
→ Action Framework
• Action: Actions track changes in HCM records. If you create a new action, you must associate the action with any one of the predefined action types.
• Action Type: Actions categorize the type of change.
• Action reason: You can optionally associate actions with reasons. The action reason information can be used for analysis and reporting purposes.
Action Type (Seeded & cannot create new action types) Ex: Hiring an employee, Terminating an employee.
Action (Seeded & can create custom actions) Ex: Hiring, Hiring full time employee, Hiring part time employee. Task is ‘Manage Actions’
Action Reason (Optional & can create custom actions) Ex: To fill a vacant position.
Create an Action
FSM page >> Tasks >> Search >> Task ‘Manage Actions’ >> Create >> Action code: TATA_HIRE_PT_EMP; Action name: Tata Hire Part Time Employee; Start Date: 2/28/19; End date: 12/31/12; Action Type: Hire an Employee
5. Define Legal Entities
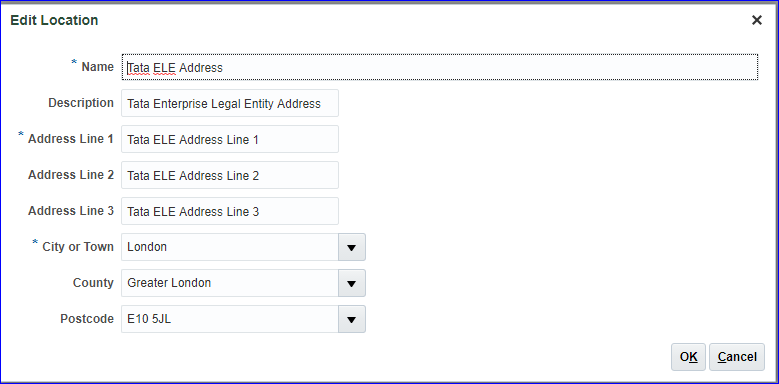
First we have to create legal address and then we create legal entity.
Legal address is mailing address of LE where we can send correspondence such as invoices, bills, reports…
In the implementation project search for task ‘Manage Legal Addresses’ >> Create
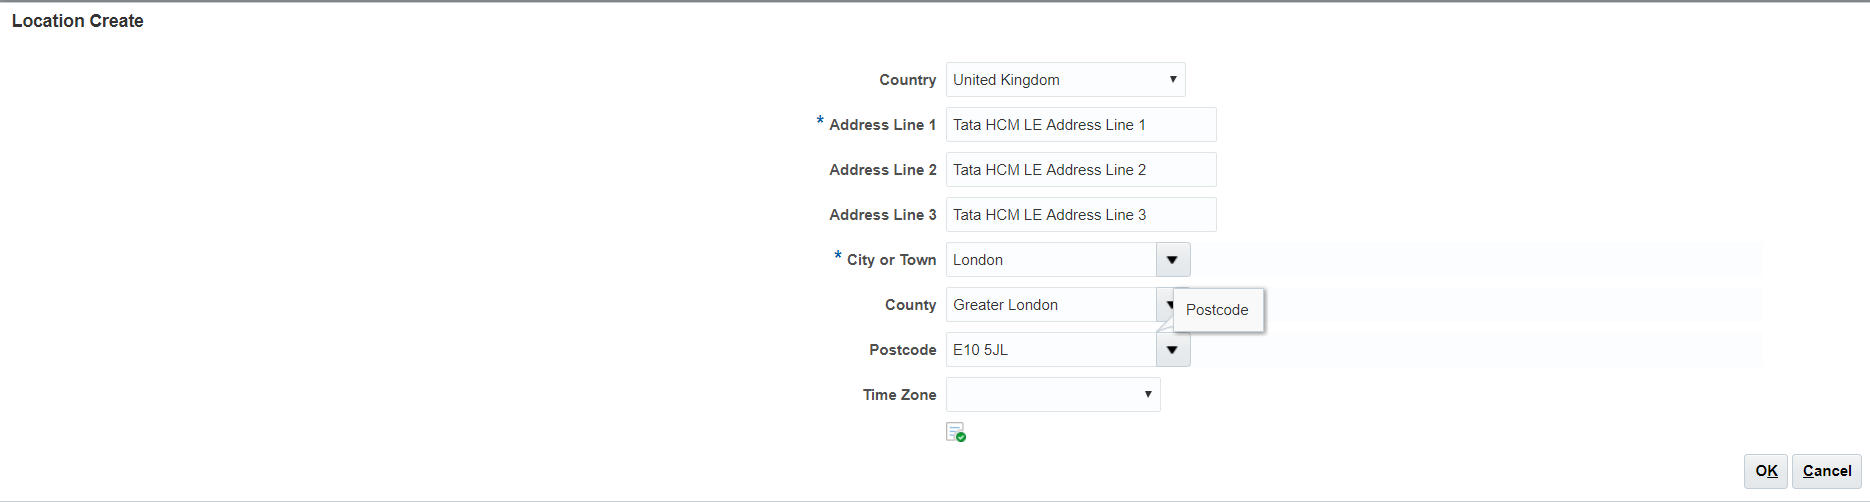
Ok >> Save and Close
In the implementation project search for task ‘Manage Legal Entity’ >> Select ‘Manage Legal Entity’ & Create New >> Apply and Go to Task >> Create
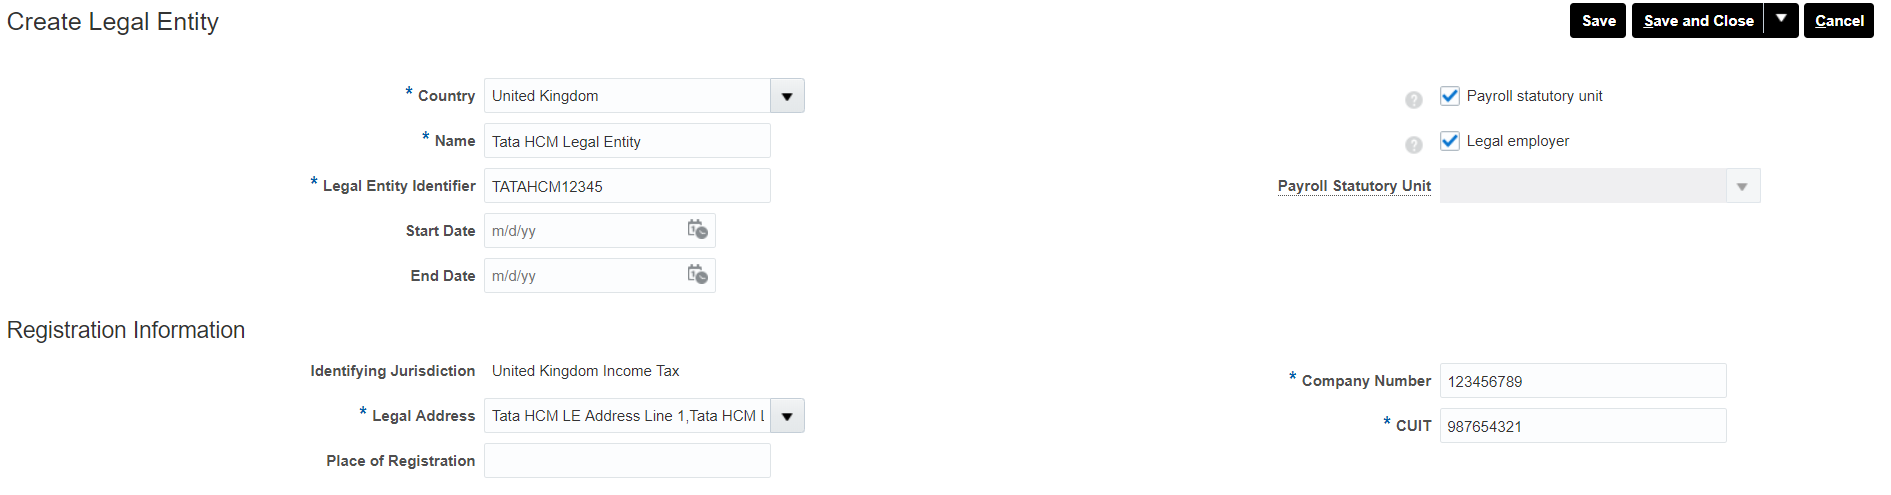
Save and Close
In the implementation project search for task ‘Manage Legal Entity HCM Information’ >> Select ‘Manage Legal Entity HCM Information’ & Select and Add >> Apply and Go to Task >> Select your LE and Save and Close >> Edit >> Correct >> Payroll Statutory Unit tab >> Associated Legislative Data Group: ‘Progress UK Legislative Data Group’ >> Submit
6. Define Workforce Structures
Workforce structure consists of Positions, Jobs, Grades, Departments, Locations & Organizations.
i. Define Locations = Physical address
FSM Page >> Tasks >> Search >> ‘Manage Locations’ >> Create (Tata BU Location)
Refer to ‘Create location for Business Unit’ in ‘Fusion Accounts Payable’ page
ii. Define HCM Organizations
The different Organization classifications are LE, Division, BU, Department, LDG, External organizations like (Professional Bodies, Reporting Establishments, Disability Organizations)
a) Create BU: Refer Create Business Unit, Creation of Reference Data Set(RDS), Assign RDS to BU Reference Data Objects in ‘Fusion Accounts Payable’ page.
b) Create Divisions: FSM page >> Tasks >> Search >> Manage Divisions >> Create >> Name: Tata Division (US1 Division) >> Next >> Next >> Submit
c) Create Departments: FSM page >> Tasks >> Search >> Manage Departments >> Create >> Name: Tata Department (Accounting UK) >> Next >> Next >> Submit
d) Organization Security Profile: FSM page >> Tasks >> Search >> Manage Organization Security Profile
We have two Tree structures in Fusion. i) Department hierarchy ii) Organization hierarchy
e) Create Grades: The two profile options (Manage Profile Options) determine the grades that are available for selection. Make sure the profile option levels at site level should be updateable.
i) PER_ENFORCE_VALID_GRADES — The list of valid grades (multiple) which were defined while creation of Job will be displayed at Assignment page after selecting Job.
ii) PER_DEFAULT_GRADE_FROM_JOB_POSITION — The list of valid grade (only one) which was defined while creation of Job will be displayed at Assignment page after selecting Job.
Hierarchy is Grades >> Jobs >> Positions
Task ‘Manage Administrator Profile Values’ >> Search profile option code ‘PER_ENFORCE_VALID_GRADES’ >> Change the profile value at site level to ‘Y’ >> Save and Close
Task ‘Manage Administrator Profile Values’ >> Search profile option code ‘PER_DEFAULT_GRADE_FROM_JOB_POSITION’ >> Change the profile value at site level to ‘Y’ >> Save and Close
Grade Rate Values = Compensation amount associated with each grade. The lookup type GRADE_PAY_RATE_TYPE identifies the compensation components for which you want to set up grade rates. The predefined values are salary, bonus and overtime.
Task ‘Manage Grades’ >> Create >> Grade Set: Common Set; Name: Tata Sales Executive Grade; Code: TATA_SALES_EXEC_GRADE >> Next >> In case you want to create steps then perform the task here else click on Next >> Next (We will create Grade rates in next step) >> Submit
Task ‘Manage Grade Rates’ >> Create >> Select you LDG (Tata LDG) >> Enter mandatory fields >> Under Grade Rate Values, click on Add Row and select the Grade which you have create above. >> Submit
Grade Ladders: Grade Ladders group grades without steps or group grades with steps in the sequence in which workers progress.
f) Create Jobs:
i) Job Family: Group of Jobs which has similar functions or qualifications. We will associate this Job family when we create a Job. User name (HCM_IMPL1) >> FSM page >> Tasks >> Search >> Manage Job Families >> Create >> Name: Tata Job Family; Job Family Code: TATA_JOB_FAMILY >> Submit
ii) Job Lookups: We have three types of lookup configuration level i) User (Addition & deletion of values possible) ii) Extensible (Only addition is possible, no deletion) iii) System (Neither addition nor deletion of values possible). User name (HCM_IMPL1) >> FSM page >> Tasks >> Search >> Manage Job Lookups >> Just review four lookups
iii) Job creation: User name (HCM_IMPL1) >> FSM page >> Tasks >> Search >> Manage Job >> Create >> Job Set: Common Set; Name: Tata Sales Executive Job; Code: TATA_SALES_EXEC_JOB >> Next >> Under Valid Grades enter your Grade (Admin02) >> Next >> Evaluation Criteria click on Next >> Profiles click on Next >> Submit
g) Create Positions:
i) Position Lookups: User name (HCM_IMPL1) >> FSM page >> Tasks >> Search >> Define Jobs and Positions >> Manage Position Lookups >> Just review lookups
ii) Position creation: User name (HCM_IMPL1) >> FSM page >> Tasks >> Search >> Manage Positions >> Create >> Business Unit: Tata Business Unit; Name: Tata Sales Executive Position >> Next >> Department: United Kingdom; Job: Tata Sales Executive Job; Hiring Status: Approved; (Only Approved status can be assigned to employees not proposed. Proposed means just proposal, not finalized. Frozen cannot be used); Type: None (Shared means the position can be shared with other employees where as Single Incumbent means CEO, i.e only one position. None means any number of people can be assigned same position) >> Next >> Next >> Next >> Submit
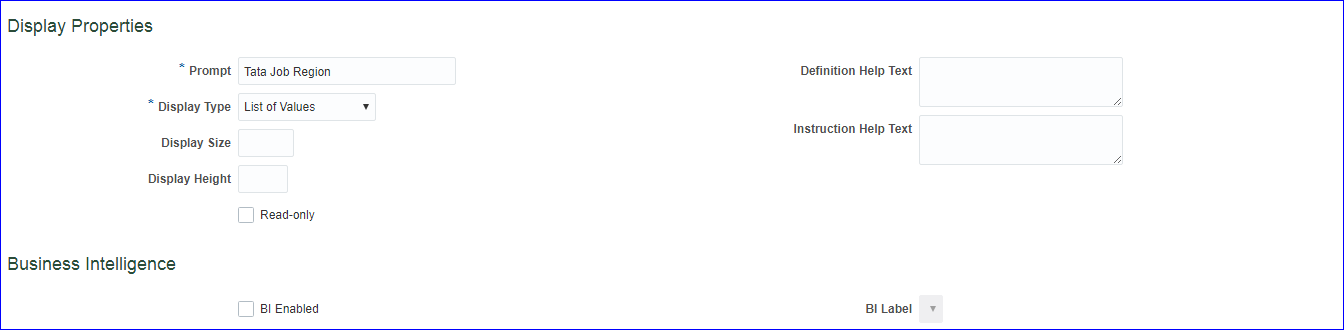
h) Flexfields
KFF – Segments; DFF – Additional information; EFF- Extensible flexfield
Assume we want to create additional fields (max 30) on Job page.
User name (HCM_IMPL1) >> FSM page >> Tasks >> Search >> Manage Descriptive Flexfields >> Search for Job name >> Select Job Attributes row and click on Edit >> Click on Create under Global Segments

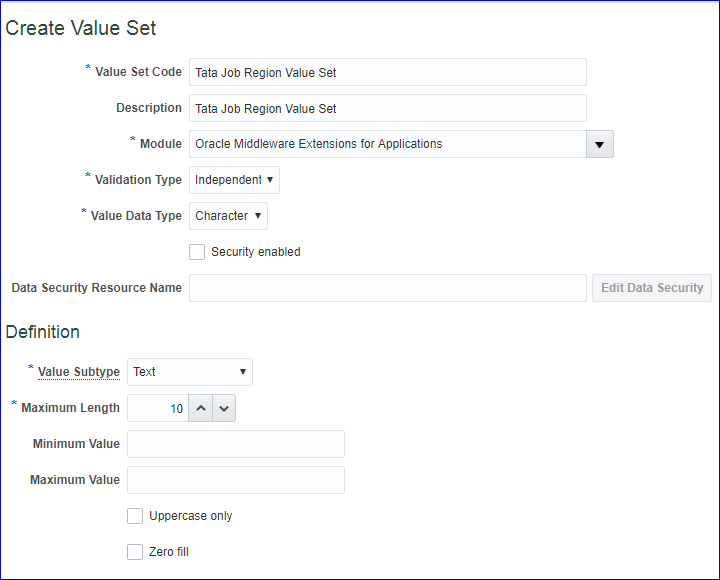
Save >> Manage Values >> Create
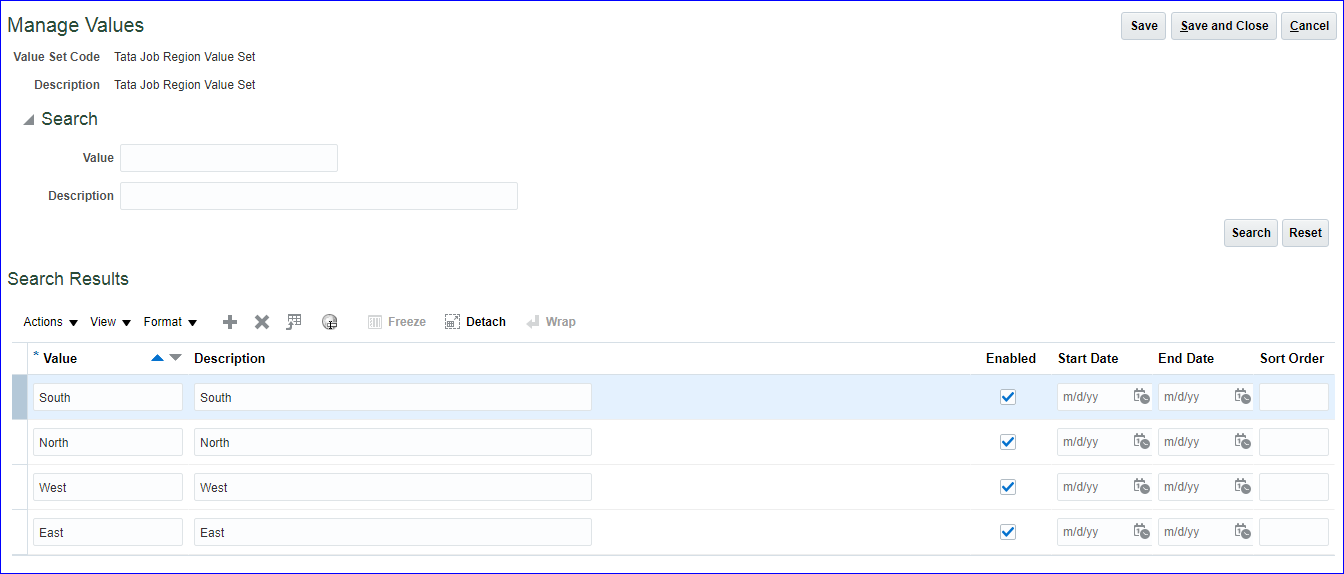
Save and Close >> Save and Close >> Click on Deploy Flexfield button. Next go to ‘Manage Job’ task and verify the new field.
7. Workforce Lifecycle
The workforce lifecycle covers the workers association with the enterprise, from creation of person record till termination.
Add Person
↓
Create Employment
↓
Change/ Promote Employment
↓
Transfer worker
↓
Terminate worker
8. HCM Roles
• Application Implementation Manager
• Application Implementation Consultant
• Human Capital Management Application Administrator
• Human Capital Management Integration Specialist
• HCM Application Admin – View All
• HR Specialist – View All
• HR Analyst – View All
• HR Manager – View All
• Benefits Manager – View All
• Benefits Administrator – View All
• Benefits Specialist – View All
• Compensation Manager – View All
• Compensation Administrator – View All
• Compensation Analyst – View All
• Compensation Specialist – View All
• Payroll Manager – View All
• Payroll Administrator – View All
• IT Security Manager
• Line Manager
• Employee
9. Hire an Employee
User: robert.jackman >> My Team >> New Person >> Tasks >> Hire an Employee
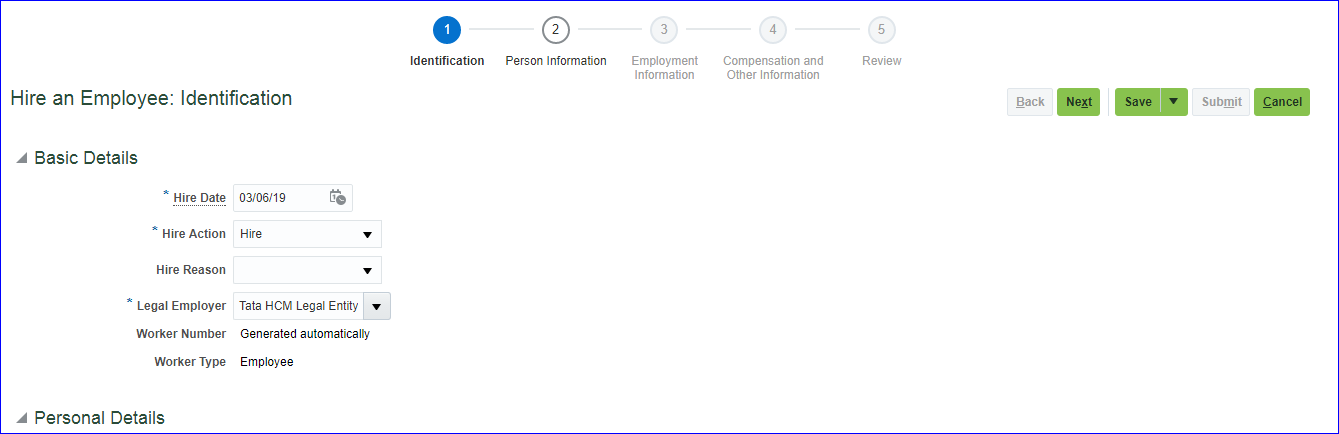
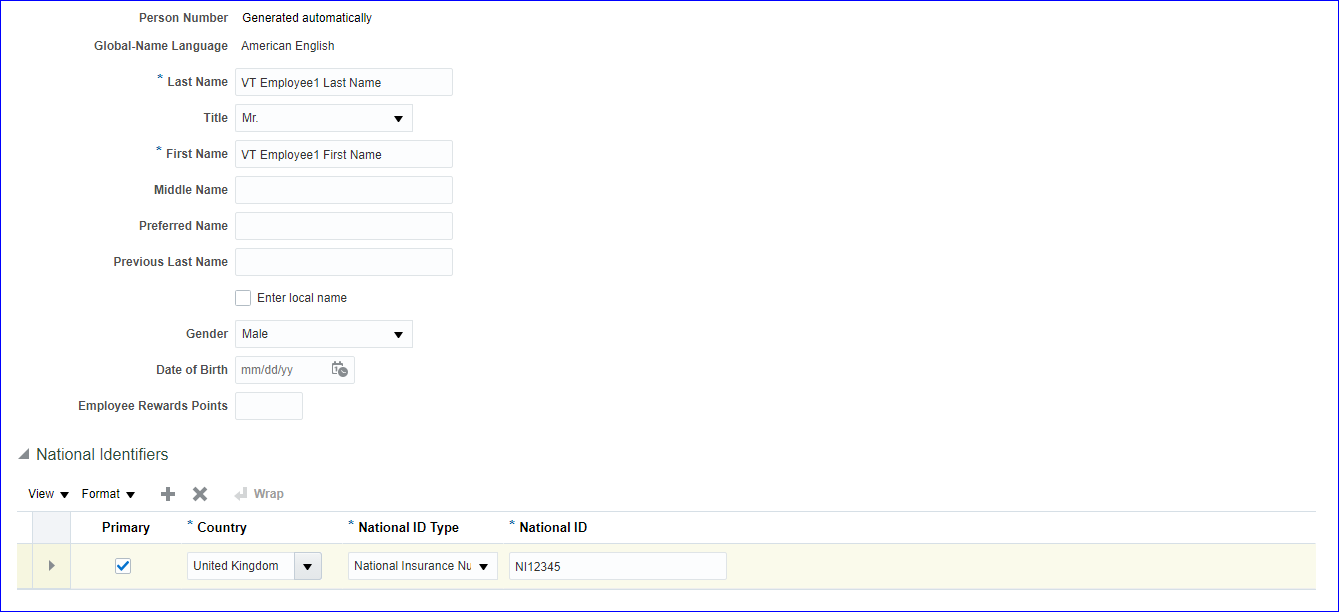
Next

Next >> Enter the details in Employment Terms tab (Business Unit) and Assignment tab (Position, Job, Grade, Department, Location) >> Next >> Next >> Submit
Try to create another employee using existing values (Person number 4255)
Now login as HCM.IMPL1 >> My Workforce >> Person Management and search for employees which were created above. Open any employee >> Tasks >> Click on Create Work Relationship to create additional relationship >> Action: Add Contingent Work Relationship; Select your Legal Employer >> Next >> Finally Submit
Transfer = Employee moving from one location to another within same Legal Employer
Global Transfer = Employee moving from one Legal Employer to another
Temporary Transfer = Transfer for limited period of time
To terminate a contingent worker, open the person record >> Tasks >> Manage Work Relationship >> Actions >> Terminate >> Enter details
10. Define Person record and Employment values
• Manage person type
• Manage assignment status
• Manage person lookups
• Manage employment lookups
• Manage person type: List of system person types and user person types (also called assignment person type) defined for the selected system person type of Employee – Employee.
User HMC_IMPL1 >> FSM >> Search >> Manage Person Types >> Select ‘Employee’ System Person Type and see the list of user person types below >> Click on Add under User Person Type >> Add ‘Tata Permanent Emp’ and ‘Tata Probation Emp’ >> Save and Close
My Client Groups >> New Person >> Tasks >> Hire an Employee >> Enter identification details (Last name is Tata Emp 3 LN) >> Enter person information (person number is 4256) >> Enter employment information. Under Assignment >> Person Type – Observe the newly created user/ assignment person types 🙂
• Manage assignment status: Each assignment contains an assignment status. The HR status and Payroll status values are linked to the assignment status and are set automatically when the assignment status changes.
| Assignment Status | HR Status | Payroll Status |
| Active – Payroll eligible | Active | Process |
| Active – no payroll | Active | Do not process |
| Suspended – Payroll eligible | Suspended | Process |
| Suspended – no payroll | Suspended | Do not process |
| Inactive – Payroll eligible | Inactive | Process |
| Inactive – no payroll | Inactive | Do not process |
HCM_IMPL1 >> FSM >> Search >> ‘Manage Assignment Status’ >> Create
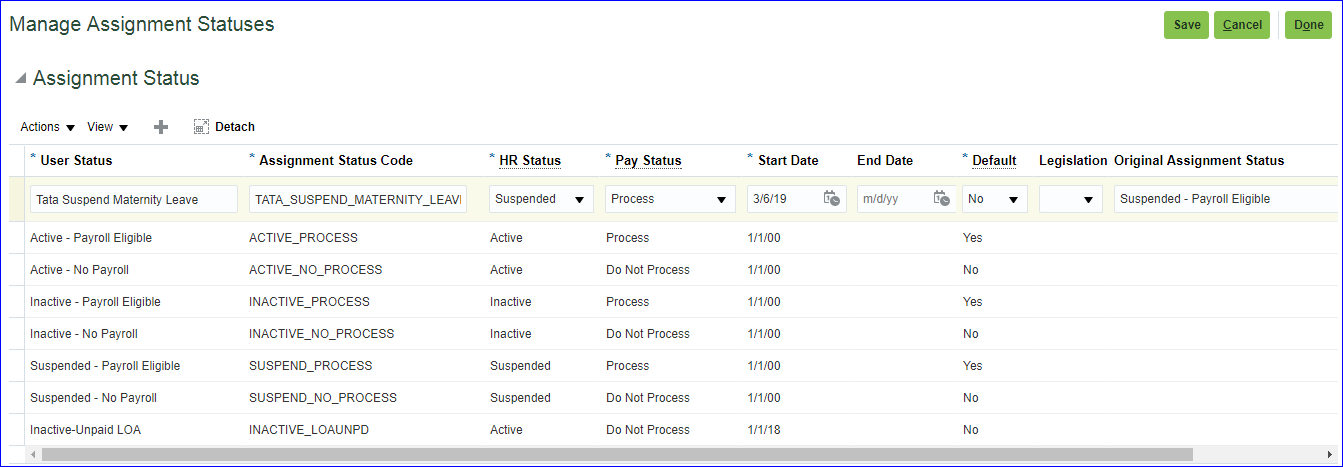
Save and Done
My Client Groups >> Person Management >> Search for your employee >> Edit >> Update >> Assignment tab >> Assignment status – Observe the newly created assignment status 🙂
• Manage person lookups: Person-related common lookups that have user or extensible customization levels. Below are lookup names:
→TITLE
→EMAIL_TYPE
→ADDRESS_TYPE
→PHONE_TYPE
→BLOOD_TYPE
→MAR_STATUS
→PER_RELIGION
→PER_ETHNICITY
→PER_NATIONAL_IDENTIFIER
• Manage employment lookups: Employment-related common lookups that have user or extensible customization levels. Below are lookup names:
→EMP_CATEGORY
→EMPLOYEE_CATEGORY
→CONTRACT_TYPE
→BARGAINING_UNIT_CODE
→PER_RESPONSIBILITY_TYPE
11. Approval Management
To manage approval processes, Oracle Fusion applications use the approval management extensions of Oracle SOA suite human workflow services or BPM (Business Process Management).
**Push back never happens at Requester, its always between immediate approvers (between 2nd and 1st approver, between 4th and 3rd approver but not between 4th and 1st).
Approval hierarchy:
i) Employee Supervisor/ Manager hierarchy: Software Engineer >> Team Lead >> Project Manager
ii) Position hierarchy: Store Manager >> Regional Manager >> General Manager
iii) Job levels: Mr. A, administration assistant (job level 1) reports to
Mr. B, Manager (job level 2) reports to
Mr. C, Senior Manager (job level 2) reports to
Mr. D, Director (job level 3)
iv) Approval groups: Predefined set of approvers.
Task is ‘Define Approval Management for Human Capital Management’ and we need duty role ‘BPM Worklist Administration Duty’ which is predefined in ‘Application Implementation Consultant’ job role.
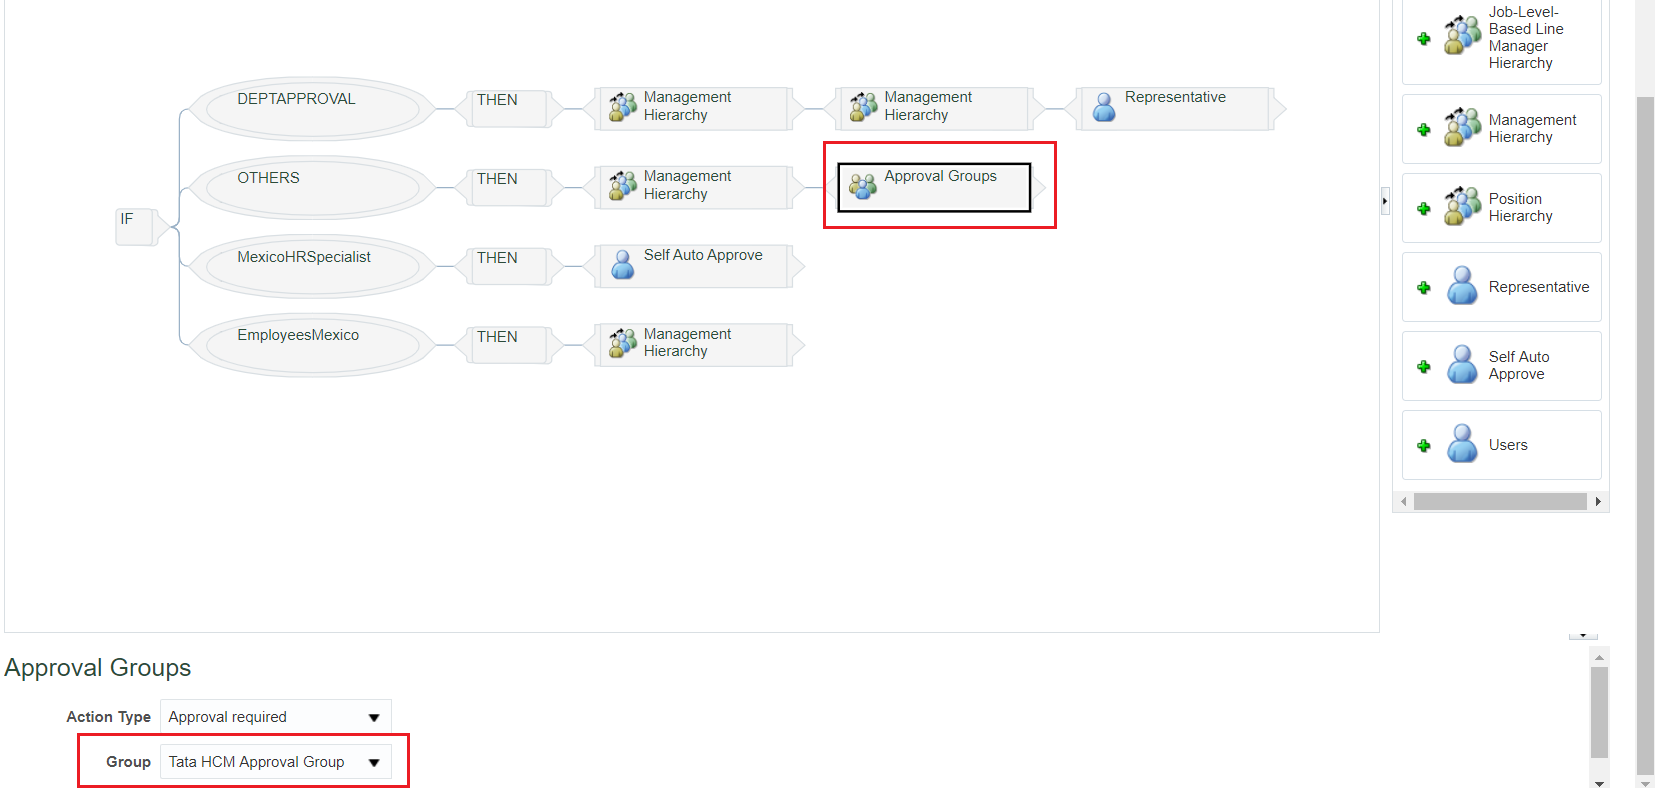
FSM >> Tasks >> Search >> ‘Define Approval Management for Human Capital Management’ >> Here the task configuration & approvals groups takes us to BPM. Click on ‘Manage Approval Groups’ >> Create >> Name: Tata HCM Approval Group >> Click on Add Member (+ icon) >> Add henry.jones >> Again click on Add Member and add michelle.shannon [**These two persons need not be related or associated and need not be Managers, need not to have any dedicated role/ privileges. Simply these two users get notification ] >> Save >> Close browser
FSM >> Tasks >> Search >> ‘Manage Approval Transactions for Human Capital Management’ >> Approval Rules section >> Here you can configure rules >> Search for ‘Promote’ process name >> Click on Configure Rules icon >> If Others then Management hierarchy – Add Approval Groups here >> Select Approval Groups and in bottom select your approval group name >> Save and Submit
12. Defining Checklists
List of common tasks. Say in hiring process we have few tasks like first level interview, second level interview, manager round n HR round. Similarly in terminating process get all clearances from specific departments, HR relieving letter.
Start with 15th