Procure to Pay – P2P
This article elucidates the basic flow, navigation, concurrent programs and basic tables which are involved in P2P cycle.
[table id=2 /]
P2P basic flow involves the following steps

Prior to execution of P2P process we should complete:
1. Item Creation
2. Supplier Creation
3. Buyer Creation
1. Item Creation
Navigation: Inventory, Vision Operations (USA) >> Go to Inventory responsibility >> Items >> Master Items >> Select the required organization from LOV >> Enter Item details & User Item Type as Purchased item

In Inventory tab check the Inventory Item flag

In Purchasing tab check the Purchasable flag

In order to assign this item to multiple organizations go to Tools >> Organization Assignment >> check the Assigned check box with respect to corresponding organization

In Main tab >> Tools >> Categories >> Ensure the Purchasing Category set exists

Tables
SELECT *
FROM mtl_system_items_b msib, mtl_system_items_tl msit
WHERE msib.organization_id = msib.organization_id
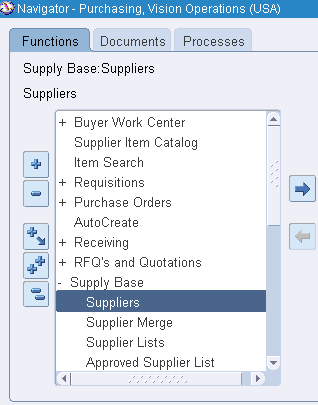
2. Supplier Creation
Navigation
Purchasing, Vision Operations (USA) responsibility >> Supply Base >> Suppliers
 \
\
Enter the supplier name and save the transaction. The supplier number will be generated automatically. In Supplier site, enter site details and other required information.
Tables
SELECT *
FROM po_vendors pv, po_vendor_sites_all pvsa, po_vendor_contacts pvc
WHERE pv.vendor_id = pvsa.vendor_id AND pvsa.vendor_id = pvc.vendor_id
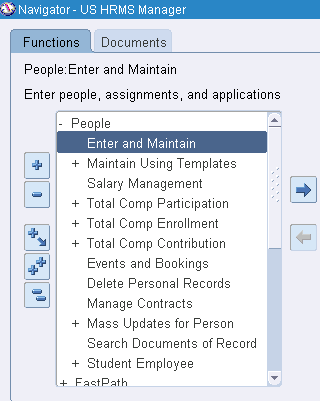
3. Buyer Creation
Navigation
Go to HRMS responsibility and follow below navigation
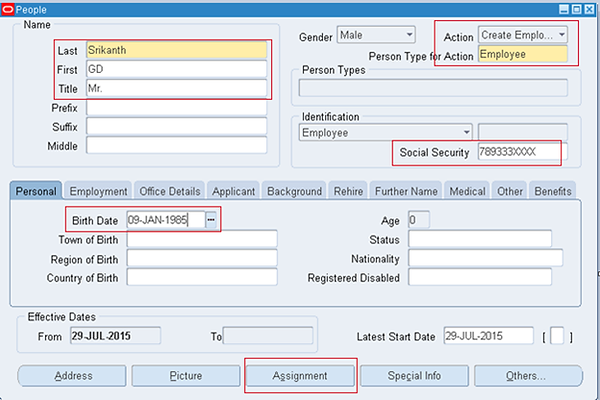
Click on New

Enter details as given below:
Prior to making changes in Assignments tab >> Go to Purchasing, Vision Operations (USA) responsibility >> Setup >> Approvals >> Approval Groups >> Query for Name >> Note the desired name (Here it is Buyer Materials)

Now go to Approval Assignments >> Select any desired position >> Under Approval Group enter the name which you noted above >> Select Document Type approvals

By enduring this process the requisitions/ po gets Approved after the approval process.
Now go to HRMS Manager >> Under Assignments of Employee creation select Position & Job which we defined above.

Now assign this Employee as Buyer.
Go to Purchasing, Vision Operations (USA) responsibility >> Setup >> Personnel >> Buyers >> Click Add Buyer >> Enter Buyer details and Save page

Also ensure the name is attached to User in System Administrator responsibility.

Tables
per_all_people_f
4. Requisition
Requisition is a purchasing document which is created by Employer when in need to goods/ services. Requisitions can be created automatically by executing ‘Requisition Import Program’
Types

Levels

Each Header will be associated to at least one line/ multiple lines and each line will be associated to one or multiple distributions.
While trying to access the Requisition or PO form and if you see error message (You are not setup as a worker. To access this form you need to be a worker.)

Solution:
Ensure the employee has been assigned under user level.

Creation of Requisition
Purchasing, Vision Operations (USA) responsibility >> Requisitions >> Requisitions >> Header Level >> Line level (item details) >> Distribution level (account details)
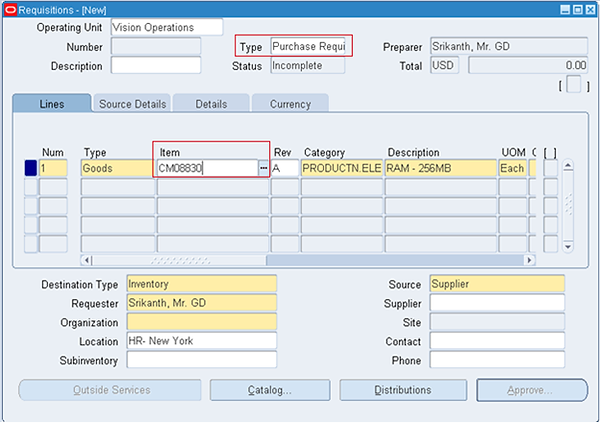
Click on Distributions on verify Charge Account

Save to get Requisition number.

Click on Approve and submit for approval.

Once the Requisition gets approved we won’t be able to see again in Requisition form.
Checking approval status of Requisition:
Purchasing, Vision Operations (USA) responsibility >> Requisitions >> Requisition Summary >> Enter Requisition Number >> Click on Find

Approval status should be Approved

In order to check approver details go to Tools >> View Action History (po_action_history pah)

Cancellation of Requisition:
Go to Requisition Summary >> Enter Requisition number >> Click Find >> Tools >> Control >> Cancel Requisition
Creation of Manual Requisition:
Purchasing Responsibility >> Set Up>> Organizations >> Purchasing Options >> Go to Document Numbering section >> Select Requisition Number entry as Manual type >> Save Transaction

Tables
SELECT *
FROM po_requisition_headers_all prha,
po_requisition_lines_all prla,
po_req_distributions_all prda
WHERE segment1 = 14334
AND prha.requisition_header_id = prla.requisition_header_id
AND prla.requisition_line_id = prda.requisition_line_id
5. Request for Quotation (RFQ)
Once the Requisition gets approved, RFQ comes into process.
RFQ Types:

Terms & Conditions for Implementing RFQ

Creation of RFQ
Purchasing, Vision Operations (USA) responsibility >> RFQ’s and Quotations >> RFQ’s >> Select OU from LOV and RFQ type from header level >> Enter site details (ship to/ bill to) >> Enter item details in item tab (item name & desc) >> Enter terms for RFQ type >> Enter price break details if RFQ type is Standard or Catalog >> Enter Shipment details if RFQ type is Bid >> Enter supplier details to whom RFQ has to be send >> Enter currency type
Auto Creation of RFQ
RFQ/ PO can be created directly based on approved Requisition.
Create new Requisition & make it approved >> Open auto create form (a) Click clear button (b) Enter Requisition # (c) Find >> Select line by checking check box >> Select Action as create >> Document type as RFQ >> Click automatic button and then click Create button
Tables
SELECT *
FROM po_headers_all
WHERE type_lookup_code = ‘RFQ’
6. Quotation
The Quotations are received from Suppliers against particular RFQ’s and the receiver should enter the details into the apps system.
Types: 1. Standard 2. Bid 3. Catalog
Creation of Quotation
Purchasing, Vision Operations (USA) responsibility >> RFQ’s and Quotations >> Quotations
Tables
SELECT *
FROM po_headers_all
WHERE type_lookup_code = ‘QUOTATION’
7. Purchase Order (PO)
PO mainly consists of
1. Terms and Conditions
2. Shipping Details
3. Distribution Details
Types
1. Standard:
a. Placed when we need items from supplier directly
b. Raised one time for purchase of various materials from suppliers
c. Placed when we know: Goods/ Services, Estimated cost/ quantities, Estimated delivery schedules/ accounting distributions
2. Planned:
a. Long term agreement from a single source
b. Have to specify tentative delivery dates & all details for goods/ services that we want to buy including charge a/c, quantities and estimated cost
3. Blanket:
a. Agreement
b. Placed when we know the details of goods/ services to buy in a specific period but not sure about delivery dates
c. Negotiation of pricing can take place before actual purchase
d. Blanket purchase agreement can be created for a single organization or to be shared with diff BU’s of the org. called ‘Global Agreements’
e. The supplier once accepts to the agreement, then we can release PO each time when we need goods/ service specific to the agreement.
4. Contract:
a. When suppliers agree to specific T&C
b. We do not indicate goods/ service that require
c. The buyer can later issue a Standard PO referencing to the suppliers contract
Creation of PO
Purchasing, Vision Operations (USA) responsibility >> AutoCreate >> Enter Requisition number & click on Find

Check the requisition line >> Select Document Type & Action as Create >> Click on Automatic
In case of Automatic selection, one requisition will be converted into one PO.
In case of Manual selection, multiple requisitions will be converted into single PO.
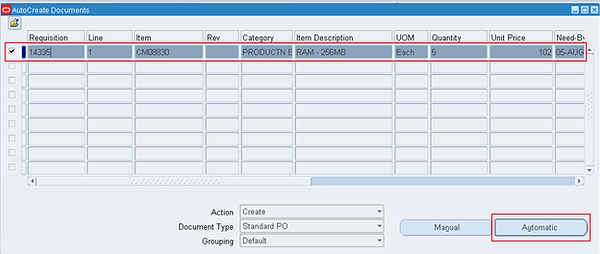
Click on Create

The Purchase Order form opens with PO Number and other details.
Select appropriate Ship to as this is required to create inventory receipt/ purchasing receipt.

Click on Shipments >> More >> Select the desired Match Approval Level

Click on Receiving Controls to ensure the Receipt Routing as ‘Direct Delivery’

Click on Approve & Check Submit for Approval >> Ok >> Status has to Approved

Match Approval Concept
Two-Way: PO Quantities & Invoice Quantities must match within tolerance before the corresponding invoice can be paid.
Three-Way: PO quantities, Invoice quantities and Receipt quantities must match
Four-Way: PO quantities, Invoice quantities, Receipt quantities and Inspection quantities must match
Tables
SELECT *
FROM po.po_headers_all pha,
po.po_lines_all pla,
po_distributions_all pda,
po_line_locations_all plla
WHERE segment1 = ‘6061’ –po number
AND pha.po_header_id = pla.po_header_id
AND pla.po_header_id = pda.po_header_id
AND pda.po_header_id = plla.po_header_id
8. Goods Receipt Note (GRN)
Types:
Direct Delivery Receipt – Two-Way match approval – Receive and deliver
Standard Receipt – Three-Way match approval – Receive and later deliver
Inspection Required Receipt – Four-Way match approval – Receive, inspect and later deliver
Creation of Receipt
Purchasing, Vision Operations (USA) responsibility >> Receiving >> Receipts >> Select the same org which we selected in Ship to of PO form >> Enter PO number and click on Find

The Receipt Header & Receipts forms open.

Close the Receipt Header form and go to Receipts form >> Check the line >> Ensure subinventory/ rest details are populated >> Save the form >> Click on Header button to generate Receipt Number
Note: Once we create a receipt for PO, we will not be allowed to create another receipt for same PO. This is possible only in case of partial receipts.


Checking On-Hand Quantity:
Go to Inventory >> On-hand, Availability >> On-hand Quantity >> Select org >> Enter receipt number in Receipt tab >> Find

The Inventory quantity should be increased by respective quantity.

Check the Material Transactions:
Inventory >> Transactions >> Material Transactions >> Query for Item & Click Find

Cross check the Source Type, Source & Transaction Type

Tables
SELECT *
FROM apps.rcv_shipment_headers rsh,
apps.rcv_shipment_lines rsl,
apps.rcv_transactions rt
WHERE rsh.receipt_num = ‘23711’ — receipt number
AND rsh.shipment_header_id = rsl.shipment_header_id
AND rsl.shipment_header_id = rt.shipment_header_id
9. Invoice
Creation of Invoice
Auto creation of Invoice:
Purchasing, Vision Operations (USA) responsibility >> View >> Requests >> Run ‘Pay On Receipt AutoInvoice’ >> Enter Receipt Number
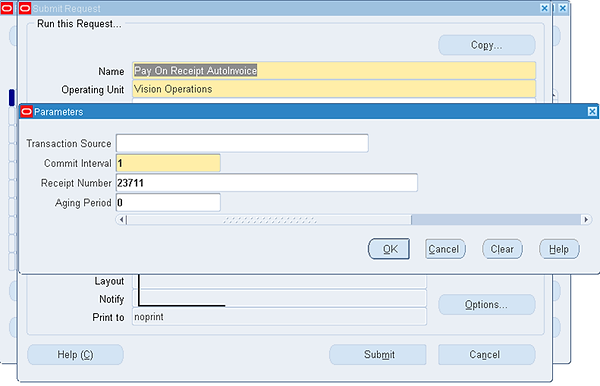
Ensure the program successfully get completed.
Now go to Payables, Vision Operations (USA) >> Invoices >> Entry >> Invoices >> Query with PO Number.
Manual Creation of Invoice:
Payables, Vision Operations (USA) >> Invoices >> Entry >> Invoices >> Enter PO Number >> Tab >> Enter Invoice Date & Invoice Number & Invoice Amount (Ensure the Total of Invoice Lines does not equal Invoice Amount) >> Click on Match

Enter PO Number & Click on Find

Check the Match line >> Enter Qty Invoiced >> Click on Match

Once the PO gets matched we have the Total in General Tab

Click on Calculate Tax to update any tax if applicable >> Click on Actions…1

Ensure the total amount should match invoice amount.

Check Validate & Click on OK

The Status should be Validated. In case you have Holds, go to Holds tab and debug

Now again click on Actions…1 >> Select Create Accounting with Final Post. This send the Accounting entries to GL & Post

The below note appears as confirmation.
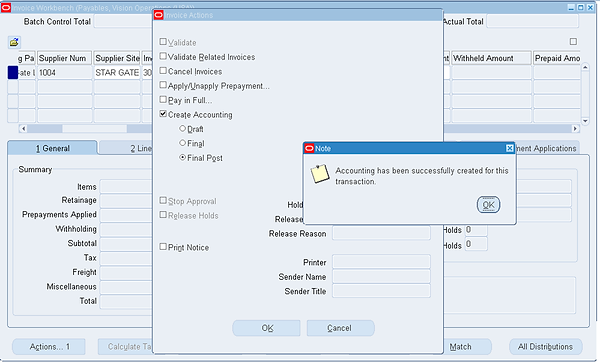
Ensure the Accounted as Yes

Tables
SELECT *
FROM apps.ap_invoices_all aia, apps.ap_invoice_distributions_all aida
WHERE aia.invoice_num = ‘INV-23711’ — invoice number
AND aia.invoice_id = aida.invoice_id
10. Payment of Invoice
Navigation
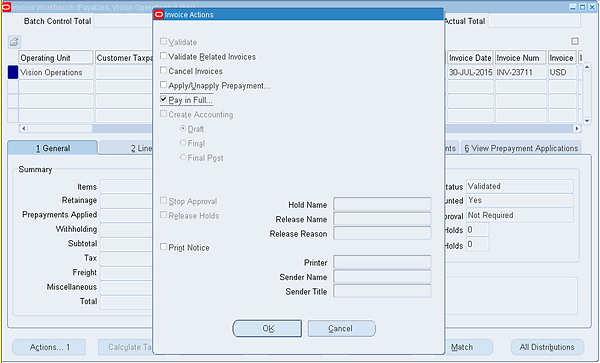
Go to Scheduled Payments tab >> Click Pay…1 >>

Enter Payment Method, Payment Process Profile and other mandatory details >> Save the form
Next click on Actions…1 >> Check Pay in Full >> Ok
Tables
ap_checks_all
ap_invoice_payments_all
ap_payment_schedules_all
11. GL Transfer
After the successful completion of Payment go to Invoice Workbench form >> Click on Actions…1 >> Select Create Accounting & check Final Post >> Ok
Tables
gl_periods
Accounting Entries
Mandatory accounts in P2P
[table id=21 /]
Another approach of P2P
Supplier:
———–
Navigation: Payables XX Supplier Setup >> Suppliers >> Entry >> Create Supplier (Site, Site contacts, Bank account and other details)
ASL:
—–
Navigation: XX Purchasing Super User >> Supply Base >> Approved Supplier List >> Click on Torch icon (Search icon). Find Commodity and add Suppliers
Commodities are groupings of categories. Use commodities to group categories that you have already defined in the Purchasing Category set in Oracle Purchasing. You can place only Purchasing categories in these commodities.
Three types of Categories:
1. Purchasing Item categories
2. Shopping categories
3. Browsing categories
Contract Purchase Agreement:
—————————————
Navigation: XX Purchasing Super User >> Buyer Work Center >> Agreements
CPA is Supplier specific and enter Amount agreed.
Will be auto approved if the buyer is in Approval group with limit > Amount agreed and assigned to approval group with document type of ‘Approve Contract Purchase Orders’, else it goes to Supervisor for approval.
Requisition:
—————
Navigation: XX Self Service Purchasing 5 >> Shop >> Non-CatalogRequest >> Enter Category (which is provided in ASL), Supplier Number, CPA, Quantity and Unit Price.
Will be approved by Approver and PO gets generated.
Receipt:
———–
Navigation: XX Self Service Purchasing 5 >> Shop >> Stores >> Click on Requisition and click Receive.
Enter Receipt Quantity (Either full or partial) and submit for Receipt number generation.
Invoices creation through WEB ADI:
———————————————-
Navigation: XX AP ADI Upload >> XX ADI Template
Download the template. Enter the batch name and remaining details. In the template go to ADD_INS >> Oracle >> Upload. This step creates invoices in staging table.
Note: Invoice Amount < Receipt Amount (100 < 50) , else hold will be applied due to billed quantity more than the received quantity and we have to release hold manually.
Run invoice import program (‘XX AP WebADI Invoice Import’) from same responsibility to import invoices (create invoices in base tables) by passing Batch Name (same name as in WEB ADI) value as parameter.
Verify Invoices in XX Payables Invoice Entry >> Invoices >> Entry >> Invoice Batches >> Query with Batch Name >> Click on Invoices button >> Here status will be ‘Never Validated’ and verify header and line details.
Invoice Approval (Validated):
—————————————
Navigation: AP % Interface Administration >> Requests >> Run >> ‘Payables Approval’ with Option All and Invoice Batch Name as given above. If there is any mismatch between billed (invoice) and received quantity then holds will be applied here. These holds will be released by ‘% Payables Supervisor’ responsibility. Open Invoice and click Release..1. Enter release name and release reason to release holds. After releasing all holds run approval process again and check the status should be Validated.
Invoice Payments:
————————
Navigation: % Payables Payments >> Payments >> Entry >> Payables Manager >> Schedule Payment Process Request >> Enter Request name and click on Next >> Enter Template name (XX Payment Template) and other date fields >> Click Next and Submit >> Custom concurrent program gets submitted and the log file will be the input of BACS
Confirm Invoice Payment:
———————————
Navigation: XX Funds Disbursment Proces Manager >> Payment Process Requests >> Select ‘Electronic Payment Instructions Not Marked Complete’ >> Go >> It will give the list of payment process request which are recently submitted >> Open >> Click on Apply >> Refresh
Transfer to GL:
——————-
Navigation: XX AP Interface administrator and run ‘Create Accounting’ program