Fusion P2P
Fusion P2P
- Create Inventory Location
- Assign Business Unit Business Function for Procurement & Inventory
- Add offerings to employee user
- Define facilities for Procurement
- Create item master organization
- Configure Procurement Business Function
- Configure Requisitioning Business Function
- Manage Common options for Payables and Procurement
- Receiving parameters
- Procurement agent
- Manage Transaction Account Definitions
- Transaction Account Definition
- Manage Subledger Accounting Options
- Managing Requisition & Purchasing Document Approvals -Rule
- Assign Roles to User
- Provide Data Access for User
- Run LDAP job
- Create Subinventory
- Create Item Class
- Create Items and assign to Inventory Organization
- Create Requisition & approve
- Create Auto PO & approve
- Create Receipt
- Check on hand quantity
- Create Invoice in AP
1. Create Inventory Location
In FSM page search for task ‘Manage Locations’ >> Create
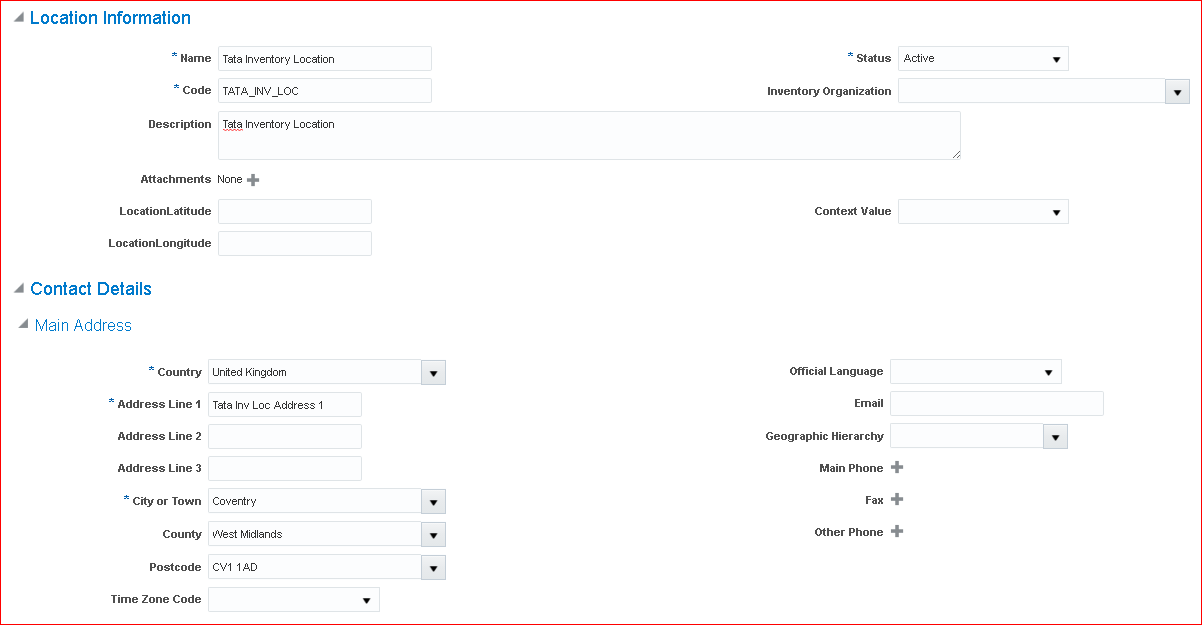
Submit
2. Assign Business Unit Business Function for Procurement & Inventory
In implementation project search for task ‘Assign Business Unit Business Function’ >> Make sure Procurement, Requisitioning and Receiving are checked
3. Add offerings to employee user
i) Materials Management and Logistics
ii) Product Management
4. Define facilities for Procurement
Workday calendar in EBS = Below 3 facilities in Fusion
i) Facility shifts
ii) Facility workday pattern
iii) Facility schedules
i) Facility shifts
In implementation project search for task ‘Manage Facility Shifts’ (path: Materials Management) >> Create >> Name: Tata 8 Hours Shift; Start Time: 8:00 AM; Duration: 8; Shift Detail Type: None >> Save and Close
ii) Facility workday pattern
Task ‘Manage Facility Workday Patterns’ >> Create >> Name: Tata Workday Pattern; Length in Days: 7; Start Day: 1; End Day: 5; Shift Name: Tata 8 Hours Shift >> Save and Close
iii) Facility schedules
Task ‘Manage Facility Schedules’ >> Create >> Name: Tata Schedule; Sequence: 1; Pattern Name: Tata Workday Pattern >> Save and Close
5. Create item master organization
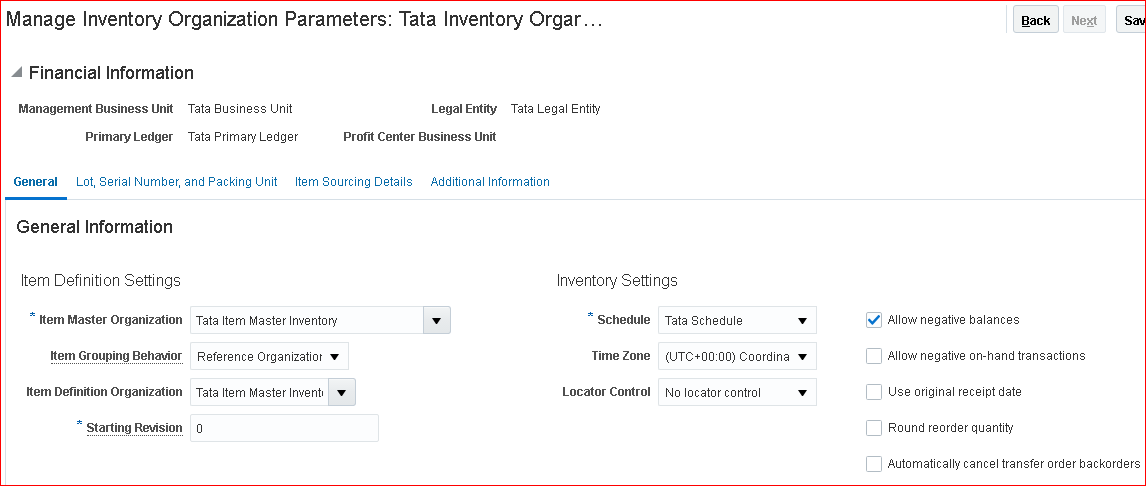
In implementation project search for task ‘Manage Item Organizations’ (Path – Product Management) >> Create >> Name: Tata Item Master Inventory; Organization: TATAITEMMASTER; Location Address name: Tata Inventory Location >> Next >> Item Master Organization: Tata Item Master Inventory; Starting Revision: 1 >> Save and Close
In implementation project search for task ‘Manage Inventory Organizations’ (Path – Product Management) >> Create
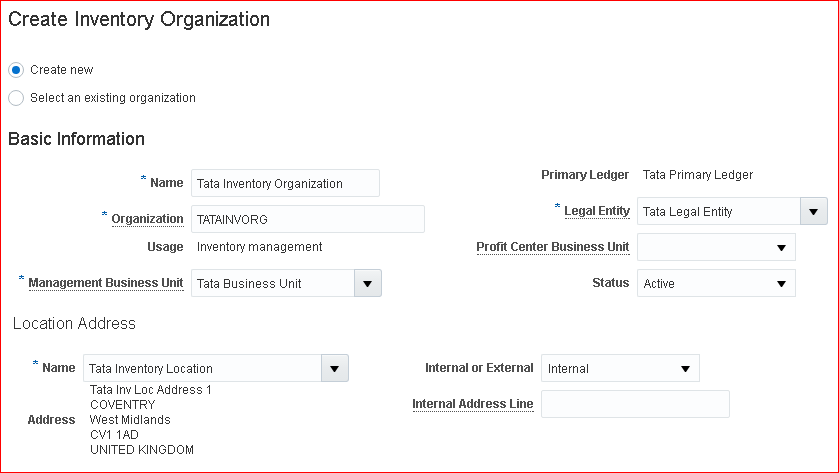
Next
Save and Close
6.Configure Procurement Business Function
= Purchasing options in EBS
Task ‘Configure Procurement Business Function’ >> Payment Terms: Immediate; Inventory Organization: Tata Inventory Organization; Line Type: Goods; Currency: GBP; Conversion Rate Type: Corporate >> Save and Close
7. Configure Requisitioning Business Function
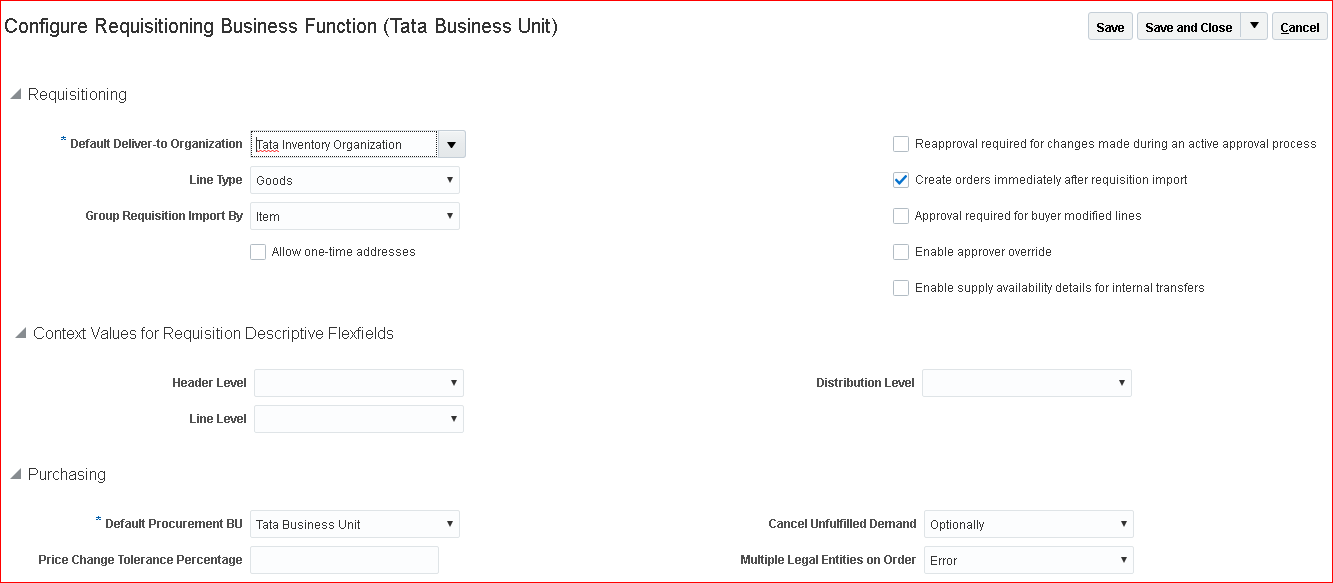
Save and Close
8. Manage Common options for Payables and Procurement
Task ‘Manage Common options for Payables and Procurement’ >> Enter COA values >> Save and Close
9. Receiving parameters
= Receiving options in EBS
Task ‘Manage Receiving Parameters’
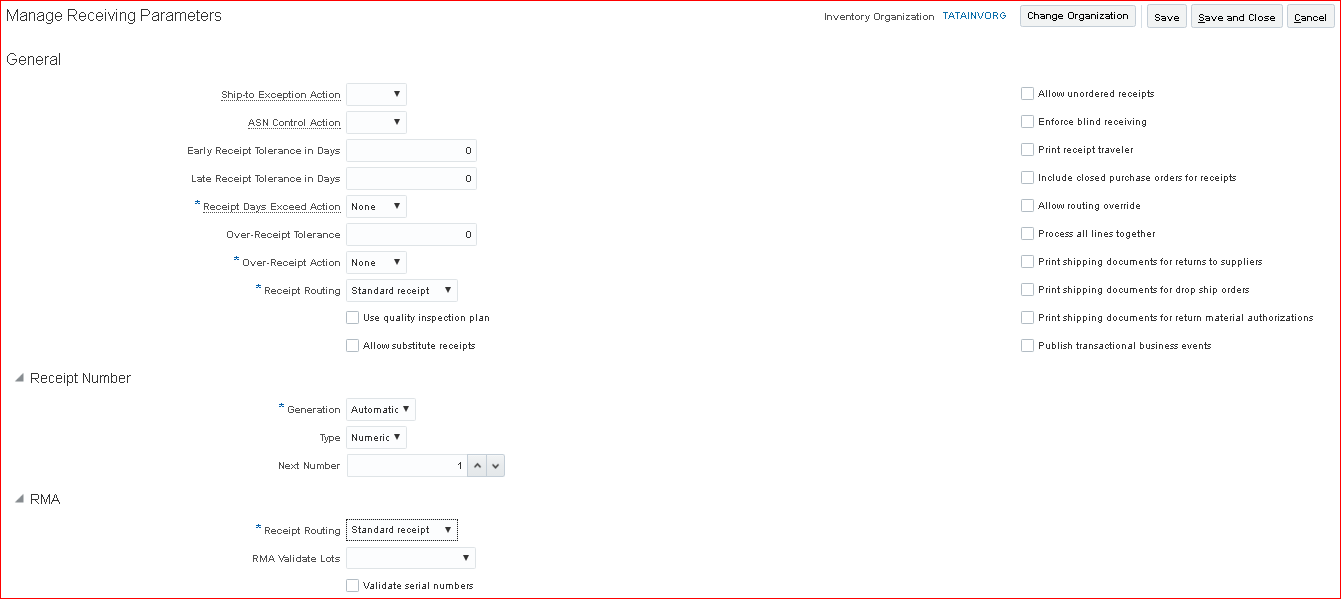
Save and Close
10. Procurement agent
Task ‘Manage Procurement Agents’ >> The agent ‘SRIKANTH, EMPLOYEE’ has already been created in Payables.
11. Manage Transaction Account Definitions (Accrual account(Liability), Charge account(Expense), Destination charge(Expense), Destination variance(Expense), Variance(Expense))
In Fusion we have to specify account using PO-TAB (Purchasing Transaction Account Builder).
i) Manage Account Rules
In implementation project search for task ‘Manage Account Rules’ (Path – Procurement…Define Transaction Accounts) >> Create

Save and Create Another
ii)Name: Tata Charge Account; Short Name: TATA_CHARGE_ACCOUNT; Value Type: Constant; Value: C01.D01.E01
iii)Name: Tata Destination Charge Account; Short Name: TATA_DESTINATION_CHARGE_ACCOUNT; Value Type: Constant; Value: C01.D01.E01
iv)Name: Tata Destination Variance Account; Short Name: TATA_DESTINATION_VARIANCE_ACCOUNT; Value Type: Constant; Value: C01.D01.E01
v)Name: Tata Variance Account; Short Name: TATA_VARIANCE_ACCOUNT; Value Type: Constant; Value: C01.D01.E01
12. Transaction Account Definition
Task ‘Manage Transaction Account Definitions’ >> Create >> Create Transaction Account Definition’ page opens. Even its Transaction Account Definition we still call it as Transaction Account Builder (TAB)
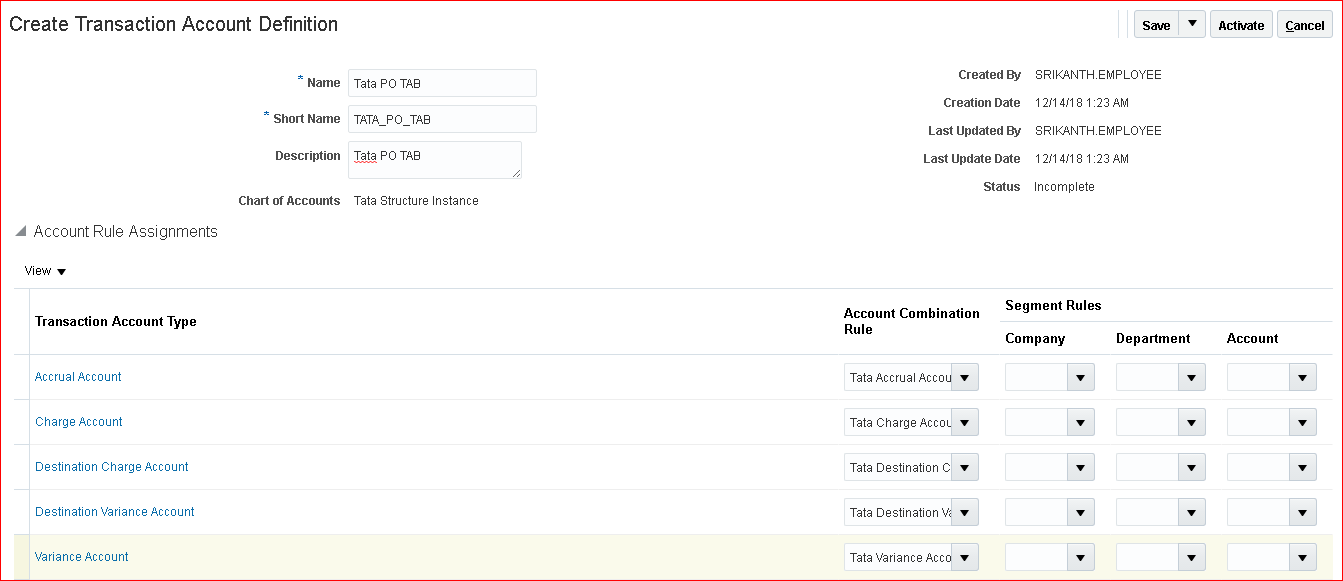
Activate
13. Manage Subledger Accounting Options
Task ‘Manage Subledger Accounting Options’ >> Path: Procurement > Define Common Procurement Configuration > Define Transaction Accounting for Procurement > Define Transaction Account Rules >> Search ‘Tata Primary Ledger’ >> Purchasing (In case we do not see Purchasing then edit any component and close)>> Edit accounting options >> Transaction Account Definition: Tata PO TAB >> Save and Close
14. Manage Requisition & Purchasing Document Approvals – Rule
Task ‘Manage Requisition Approvals’ >> Select stage and disable existing rule >> Select participant: Postapproval Header Consensus and enable >> Edit rules >> Create >> Rule: Tata Autoapprovals; Priority: Medium >> Ok >> Add Condition >> Attribute: Requisitioning BU; Value Tata Business Unit >> Ok >> Add Actions >> Action Type: Automatic >> Ok >> Save and Close >> Deploy
Task ‘Manage Purchasing Document Approvals’ >> Select stage and disable existing rule >> Select participant: Postapproval Consensus and enable >> Edit rules >> Create >> Rule: Tata Autoapprovals for PO; Priority: Medium; Description: Tata Autoapprovals for Purchase Orders >> Ok >> Add Condition >> Attribute: Procurement BU; Value Tata Business Unit >> Ok >> Add Actions >> Action Type: Automatic >> Ok >> Save and Close >> Deploy
15. Assign Roles to user
Security console >> Assign below roles:
Procurement Manager; Procurement Requester; Procurement Preparer; Advanced Procurement Requester; Inventory Manager; Warehouse Manager; Warehouse Operator
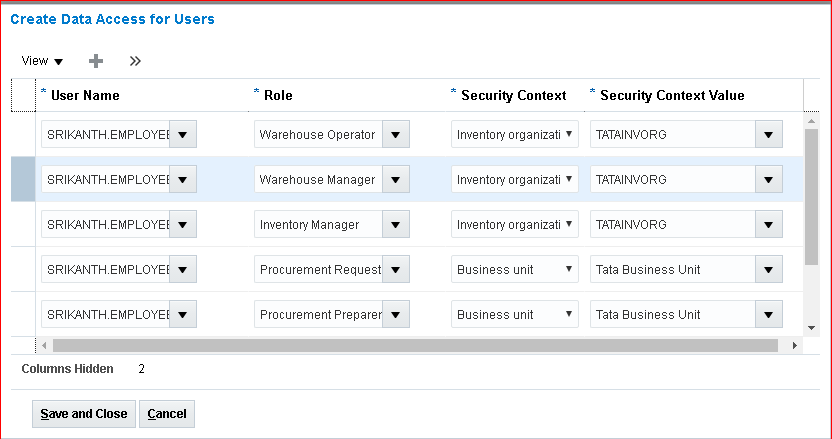
16.Provide Data Access for User
FSM search ‘Manage Data Access for Users’ >> Create

17. Run LDAP job
Submit ‘Retrieve Latest LDAP Changes’
18. Create Subinventory
Implementation project >> Task ‘Manage Subinventories and Locators’ >> Organization: TATAINVORG >> Create >> Subinventory: Tata Subin; Description: Tata Subinventory >> Save and Close >> Done
19. Create Item Class
Implementation project >> Task ‘Manage Item Classes’ >> Select Root Item Class and click on Create >> Name: Tata Item Class; Internal Name: TATA_ITEM_CLASS; Description: Tata Item Class >> Save and Add Details >> Item Management tab >> Item Number Generation Method: Sequence Generated; Starting Number: 1000; Prefix: TATA_; Increment By: 1; Item Description Generation Method: User Defined; >> Security tab >> Add >> Principal: Person; Name: SRIKANTH.EMPLOYEE; Organization: TATAINVORG >> Go to Actions (bottom of same page) >> Select all actions, Apply and Ok>> Similarly add Principal: Person; Name: SRIKANTH.EMPLOYEE; Organization: TATAITEMMASTER >> Go to Actions (bottom of same page) >> Select all actions, Apply and Ok>> Save and Close
20. Create Items and assign to Inventory Organization
Navigator >> Product Management >> Product Information Management >> Tasks panel >> Create Item >> Organization: TATAITEMMASTER; Create New; Number of Items: 1; Item Class: Tata Item Class; Select Purchased Item >> Ok
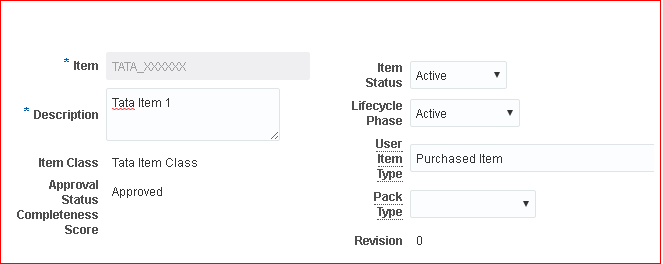
Overview tab >> Primary Unit of Measure: Ea >> Associations tab >> Make sure two organizations exist – TATAITEMMASTER & TATAINVORG >> Save >> Apply >> Save and Close
21. Create Requisition & approve
Navigator >> Procurement >> Purchase Requisitions >> More Tasks >> Enter Requisition Line >> Deliver to Location: Tata Inventory Location >> Save and Close
Again More Tasks >> Enter Requisition Line
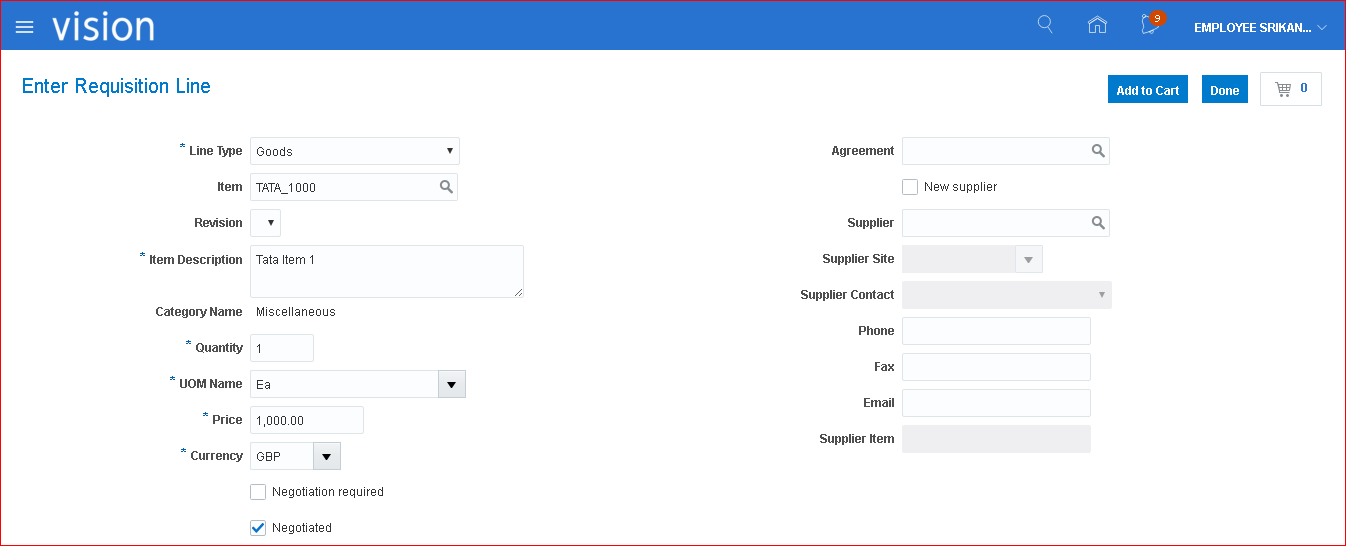

Add to Cart >> Go to cart & Submit >> Manage Requisitions >> Search >> See the status is Approved
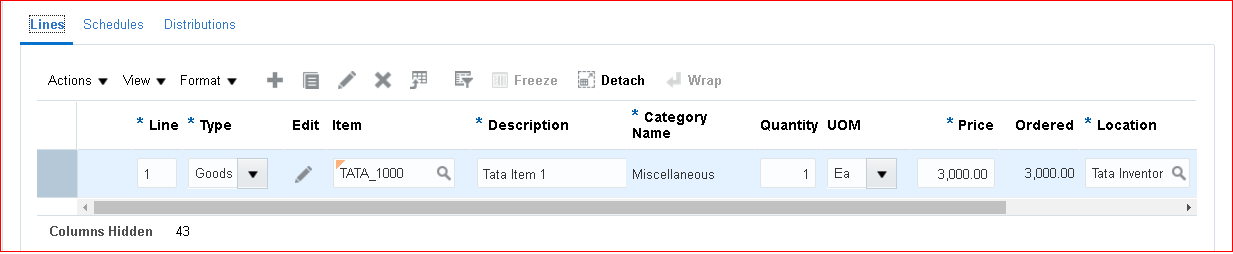
22. Create Auto PO & approve
Navigator >> Procurement >> Purchase Orders >> Under Requisition Lines click on Number >> Select the line and click on Add to Document Builder >> Enter Supplier info >> Ok >> Create >> The document (Purchase Order) 1 was created. >> Submit >> The document (Purchase Order) 1 was submitted for approval. >> Tasks panel >> Manage Orders >> Search >> Here status is Open (In Fusion Open = Approved)
Creation of manual PO
Navigator >> Procurement >> Purchase Orders >> Tasks panel >> Create Order
Create >> Enter line details >> Schedules tab enter some Promised delivery date
Save >> Submit >> The document (Purchase Order) 2 was submitted for approval.
Status will be Open (= Approved in Fusion)
23. Create Receipt
Navigator >> Supply Chain Execution >> Inventory Management >> Tasks panel >> Show tasks: Receipts >> Receive Expected Shipments >> Search PO:1 >> Select line and click on Receive >> Quantity: 1 >> Create Receipt >> Submit >> Receipt 2 was created. Number of lines: 1. >> Tasks panel >> Put Away Receipts >> Receipt number: 2 & Search >> Select line and Put Away (Here the item gets moved from staging area to targeted inventory) >> Submit >> The put away transaction was created.
24. Check on hand quantity
Navigator >> Supply Chain Execution >> Inventory Management >> Tasks panel >> Show tasks: Inventory >> Manage Item Quantities >> Search >> On hand quantity is 1
25. Create Invoice in AP
Navigator >> Payables >> Invoices >> Tasks Panel >> Create Invoice >> Select Match Invoice Lines and click on go >> Select Match >> Apply >> Ok
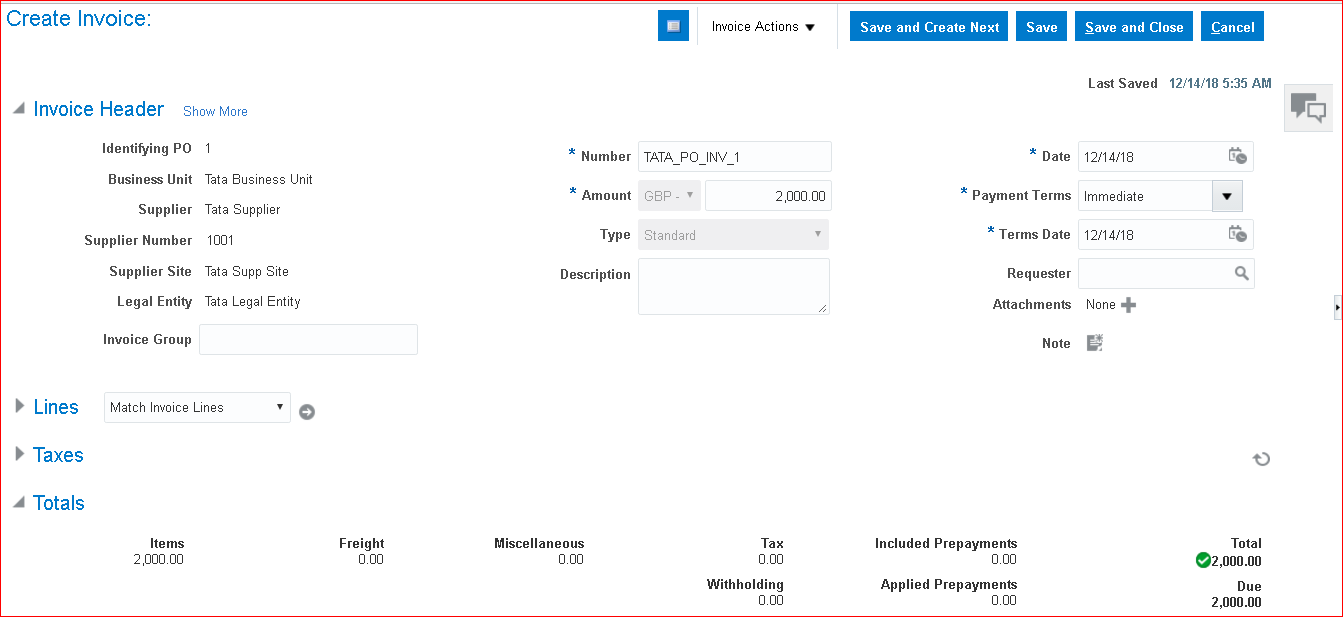
Save >> Validate >> Save and Close 🙂