Fusion Reporting
Cloud Reporting
1. Reports in Fusion
2. Basic steps involved in FBDI
3. Supplier Conversion
4. ESS Job Error
5. AP Invoice Conversion
6. BI Reports
7. OTBI Reports
8. Customer Conversion
i) FBDI
ii) ‘Upload Customers from Spreadsheet’
9. AR Invoice Conversion
10. Journal creation
i) ADFdi
ii) FBDI
1. Reports in Fusion
| ADFDI (Application Development Framework Data Integrator) | Rapid Implementation | FBDI(File Based Data Import) |
| Web ADI in EBS | Configuration/ Setup | Data conversions |
| Daily transactions | Supplier conversion, Invoice conversion | |
| You can use the ADFdi workbook for entering a high volume of data. More than 100k records. | In general it is recommended to use File Based Import (FBDI) if data being entered is in thousands of rows (approximately over 30K rows) since this sheet does not have any validations. |
2. Basic steps involved in FBDI
Step 1: Download the template from OER(Oracle Enterprise Repository)
Step 2: Enter data into Template
Step 3: Convert data template into ZIP file
Step 4: Upload ZIP file into UCM(Universal Content Management). This is optional step as we can directly upload in step 5.
Step 5: Populate data into interface tables by executing Job – ‘Load Interface File for Import’ is the job and parameters are ‘Import Process’ (get this value from OER page itself) and ‘Data File’ (Upload zip file)
Step 6: Import data into base tables by executing Job (The same job which you used in Import Process in the above step)
3. Supplier Conversion
We have different templates for Supplier profile (header), Supplier address, Supplier sites, Supplier site assignments and so on…
Step 1: Download the template from OER(Oracle Enterprise Repository) Search for ‘oracle oer’ in google (https://www.oracle.com/webfolder/technetwork/docs/HTML/oer-redirect.html) >> Procurement tab >> Click on Release 13 (update 17b) >> Use >> Get started with file-based data import >> Open link in new tab for Suppliers, Supplier Addresses, Supplier Sites, Supplier Site Assignments >> For XLSM template, right click and use “Save link as” and save four files >> In the links we can see different jobs and UCM path which needs to be executed for conversion process.
Step 2: Enter data into SupplierImportTemplate
Open SupplierImportTemplate >> Delete all sample records except first record and on first record enter below values. Click on Show Additional Attributes and delete other values in first record, except below values:
Import Action: CREATE
Supplier Name: Tata FBDI Supplier
Tax Organization Type: Corporation
Supplier Type: Supplier
Business Relationship: SPEND_AUTHORIZED
Payment Method: CHECK
Step 3: Convert data template into ZIP file
Instructions and CSV Generation >> Click on ‘Generate CSV File’ >> PozSuppliersInt (CSV and ZIP file have been created)
Step 4: Upload ZIP file into UCM(Universal Content Management). This is optional step as we can directly upload in step 5.
Navigator >> Tools >> File Import and Export >> Upload >> Upload the ZIP file and Account: prc/supplier/import >> Save and Close
Step 5: Populate data into interface tables by executing Job
ESS Job Page: Navigator >> Tools >> Scheduled Processes >> Schedule New Process >> Job Name: Load Interface File for Import >> Ok >> Import Process: Import Suppliers and Data File: PozSuppliersInt.zip >> Submit.
The import process parameter value and interface table is POZ_SUPPLIERS_INT (We can get this info from Suppliers tab in step i)
Step 6: Import data into base tables by executing Job
Reload ESS Job Page again: Navigator >> Tools >> Scheduled Processes >> Schedule New Process >> Job Name: Import Suppliers >> Ok (no need to change parameters) >> Submit. Now verify the Supplier in application 🙂
Repeat step 2 for other three templates as well…
**Enter data into SupplierAddressImportTemplate
Import Action: CREATE
Supplier Name: Tata FBDI Supplier
Address Name: Tata FBDI Supplier Address
Country: GB
Address Line 1: Tata FBDI Supplier Address 1
City: Coventry
County: West Midlands
Postal code: CV1 1DT
RFQ Or Bidding: Y
Ordering: Y
Pay: Y
**Enter data into SupplierSiteImportTemplate
Import Action: CREATE
Supplier Name: Tata FBDI Supplier
Procurement BU: Tata Business Unit
Address Name: Tata FBDI Supplier Address
Supplier Site: TATA FBDI Site (**Make sure the maximum length < 15)
Sourcing only: N
Purchasing: Y
Pay: Y
Primary Pay: Y
**Enter data into SupplierSiteAssignmentImportTemplate
Import Action: CREATE
Supplier Name: Tata FBDI Supplier
Supplier Site: TATA FBDI Site
Procurement BU: Tata Business Unit
Client BU: Tata Business Unit
Bill-to BU: Tata Business Unit 🙂
4. ESS Job Error
If the job completes in Error then click on Error hyperlink >> Come to bottom of page and see
“Log and Output
Attachment
ESS_L_1490126 (1 more…) “
Here click on (1 more…) and open pdf to know the error
5. AP Invoice Conversion
Step 1: Download the template from OER(Oracle Enterprise Repository)
Search for ‘oracle oer’ in google (https://www.oracle.com/webfolder/technetwork/docs/HTML/oer-redirect.html) >> Financials tab >> Click on Release 13 (update 17b) >> Use >> Import file-based data >> Payables Standard Invoice Import >> For XLSM template, right click and use “Save link as”>> In the link we can see, Scheduled process name and UCM account as well.
Step 2: Enter data into PayablesStandardInvoiceImportTemplate
Open PayablesStandardInvoiceImportTemplate >> Delete all sample records except first record and on first record enter below values. Click on Show Additional Attributes and delete other values in first record, except below values:
AP_INVOICES_INTERFACE values
*Invoice ID: 100
*Business Unit: Tata Business Unit
*Source: External
*Invoice Number: TATA_FBDI_STD_INV_1
*Invoice Amount: 1000.00
*Invoice Date: 2018/12/03
**Supplier Name: Tata Supplier
*Supplier Site: Tata Supp Site
Invoice Currency: GBP
Payment Currency: GBP
Description: TATA_FBDI_STD_INV_1
*Invoice Type: STANDARD
Legal Entity: Tata Legal Entity
*Payment Terms: Immediate
Terms Date: 2018/12/03
Accounting Date:2018/12/03
Payment Method: CHECK
Pay Group: Standard
Liability Combination: C01.D01.L03
AP_INVOICE_LINES_INTERFACE values
*Invoice ID: 100
Line Number: 1
*Line Type: ITEM
*Amount: 1000.00
Distribution Combination: C01.D01.E03
Accounting Date: 2018/12/03
Step 3: Convert data template into ZIP file
Instructions and CSV Generation >> Click on ‘Generate CSV File’ >> apinvoiceimport(CSV and ZIP file have been created)
Step 4: Upload ZIP file into UCM(Universal Content Management). This is optional step as we can directly upload in step 5.
Navigator >> Tools >> File Import and Export >> Upload >> Upload the ZIP file and Account: prc/supplier/import >> Save and Close
Step 5: Populate data into interface tables by executing Job
ESS Job Page: Navigator >> Tools >> Scheduled Processes >> Schedule New Process >> Job Name: Load Interface File for Import >> Ok >> Import Process: Import Payables Invoices and Data File: apinvoiceimport.zip >> Submit.
The import process parameter value and interface table info we can get this info from Payables Standard Invoice Import page)
Step 6: Import data into base tables by executing Job
Reload ESS Job Page again: Navigator >> Tools >> Scheduled Processes >> Schedule New Process >> Job Name: Import Payables Invoices >> Parameters — Business Unit: Tata Business Unit; Ledger: Tata Ledger; Source: External >> Submit. Now verify the Invoice in application 🙂
Import Errors:
In case we come across any invoice import errors then click on ‘Correct Import Errors’ on invoice tasks panel >> Open excel >> Here we get detailed list of error reasons >> We can correct in the same excel >> Select that particular line >> Correct Import Errors >> Save and Submit Invoice Import >> Parameter Source is External.
For deletion of record from sheet, double click on Delete column with respect to row and click on Save.
6. BI Reports
In google search for ‘oracle oer’ >> Financials >> Tables and Views >> Release 13 (update 17b) >> Books >> Tables and Views for Oracle Financials Cloud >> HTML >> Tables >> Here we get list of all tables.
Let us execute query: SELECT INVOICE_NUM, INVOICE_AMOUNT, INVOICE_DATE FROM AP_INVOICES_ALL;
Navigate to BI catalog page.
Navigator >> Tools >> Reports and Analytics >> Browse Catalog >> New >> Data Model >> New Data Set >> SQL Query
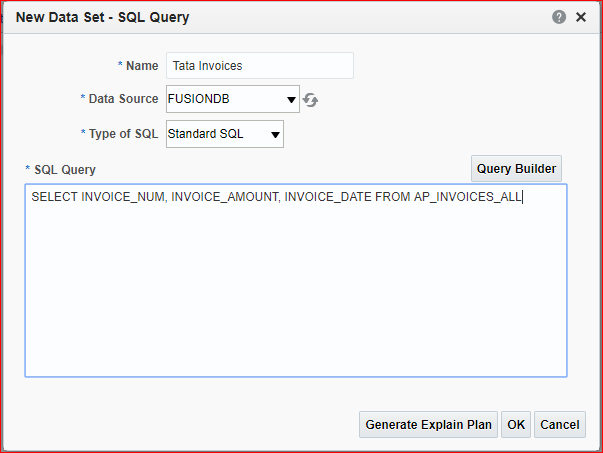
Ok >> Data tab >> Rows: 50; Click on View >> Save As Sample Data >> Ok >> Save >> Select My Folder & Name: Tata Invoices >> Ok >> Look for Saved message >> Create Report >> Next >> Next >> Drag three columns and Drop at mentioned location & I have excluded grand totals row >> Next >> Finish >> Name: Tata Invoices1 >> Ok >> Click on View Report >> Excel >> Report gets downloaded in Excel 🙂
7. OTBI Reports
In BI report we have to write the query in OTBI we do not have option to write query. Its just drag and drop of columns.
Navigator >> Tools>> Reports and Analytics >> Create >> Analysis >> (The subject area which ends with ‘Real Time’ only to be used in OTBI) >> Select ‘Payables Invoices – Transactions Real Time’ >> Continue >> Expand >> We call folders as dimensions (Subject area >> dimensions >> columns) >> Business Unit >> Select Business Unit Name and click on add >> Supplier >> Select Supplier and click on add >> Supplier Site >> Select Business Unit Name and click on add Site >> Invoice Details >> General Information >> Select Invoice Number and click on add >> Invoice Details >> Invoice Amounts >> Select Invoice Amount and click on add >> Next >> Title: TCS Invoice Analysis; Table: Table; Click on preview >> Next >> In case we want to filter the data. Lets assume we want to filter data based on BU then expand ‘Additional Layout Options’ >> Select Business Unit Name from Columns section >> Move To >> Prompt For >> Next >> Next >> Next >> Select My Folders and Analysis Name: Tata Invoice OTBI Analysis >> Submit
Search the name >> Click on … >> View 🙂
Go to invoice workbench >> Reports and Analytics >> Here also we can see OTBI (OTBI = Analysis)
8. Customer Conversion
i) FBDI
Download the template from OER(Oracle Enterprise Repository)
or
https://docs.oracle.com/cloud/farel12/financialscs_gs/OEFBF/Customer_Import_300919043_fbdi_7.htm#300919043)
For XLSM template, right click and use “Save link as” and save file.
Now go to cloud application and look for Customer Data Management >> Data Import.
Under Tasks >> Create Data Import Batch >> Batch Name: Tata Customer Data Import Batch; Source System: Comma separated values; Object: Customer and Consumer >> Save and Close >> Copy the batch ID (300000176289359).
Next go to spreadsheet and delete all records except first record.
HZ_IMP_PARTIES_T
| *Batch Identifier | 300000176289359 |
| Party Original System | CSV |
| Party Original System Reference | TATA_CUST_01 |
| Insert Update Indicator | I |
| *Party Type | ORGANIZATION |
| Party Usage Code | CUSTOMER |
| Organization Name | Tata Customer 01 |
| DUNS Number | 123456789 |
HZ_IMP_PARTYSITES_T
| *Batch Identifier | 300000176289359 |
| Party Original System | CSV |
| Party Original System Reference | TATA_CUST_01 |
| Party Site Original System | CSV |
| Party Site Original System Reference | TATA_CUST_PS_01 |
| Location Original System | CSV |
| Location Original System Reference | TATA_CUST_LOC_01 |
| Insert Update Indicator | I |
| Party Site Name | Tata Customer Site 01 |
| Party Site From Date | 2019/01/01 |
| Mail Stop | MS 6OP |
| *Identifying Address | Y |
HZ_IMP_PARTYSITEUSES_T
| *Batch Identifier | 300000176289359 |
| Party Original System | CSV |
| Party Original System Reference | TATA_CUST_01 |
| Party Site Original System | CSV |
| Party Site Original System Reference | TATA_CUST_PS_01 |
| *Party Site Use Type | BILL_TO |
| Primary Indicator | Y |
| Insert Update Indicator | I |
| From Date | 2019/01/01 |
| Party Site Use Original System | CSV |
| Original System Party Site Use Reference | TATA_CUST_PSU_01 |
HZ_IMP_ACCOUNTS_T
| *Batch Identifier | 300000176289359 |
| Customer Account Source System | CSV |
| Customer Account Source System Reference | TATA_CUST_ACCOUNT_01 |
| Party Original System | CSV |
| Party Original System Reference | TATA_CUST_01 |
| Account Number | TATA_CUST_ACCOUNT_01 |
| Insert Update Indicator | I |
| Account Type | R |
| Account Description | Tata Customer Account 01 |
| Account Established Date | 2019/01/01 |
HZ_IMP_ACCTSITES_T
| *Batch Identifier | 300000176289359 |
| Customer Account Source System | CSV |
| Customer Account Source System Reference | TATA_CUST_ACCOUNT_01 |
| Account Site Source System | CSV |
| Account Site Source System Reference | TATA_CUST_AS_01 |
| Party Site Original System | CSV |
| Party Site Original System Reference | TATA_CUST_PS_01 |
| Insert Update Indicator | I |
| *Account Address Set | TATA_RDS_CUST_SIT |
| From Date | 2019/01/01 |
| Key Account | Y |
HZ_IMP_ACCTSITEUSES_T
| *Batch Identifier | 300000176289359 |
| Account Site Source System | CSV |
| Account Site Source System Reference | TATA_CUST_AS_01 |
| Account Site Purpose Source System | CSV |
| Account Site Purpose Source System Reference | TATA_CUST_ASU_01 |
| *Purpose | BILL_TO |
| Primary Indicator | Y |
| Insert Update Indicator | I |
| Site | London |
| *Account Address Purpose Set | TATA_RDS_CUST_SIT |
| Purpose From Date | 2019/01/01 |
HZ_IMP_LOCATIONS_T
| *Batch Identifier | 300000176289359 |
| Location Original System | CSV |
| Location Original System Reference | TATA_CUST_LOC_01 |
| Insert Update Indicator | I |
| Country | GB |
| Address Line 1 | Cust Address Line 01 |
| City | London |
| Address Effective Date | 2019/01/01 |
After entering values in respective tabs go to ‘Instructions and CSV Generation’ and click on ‘Generate CSV File’.
Go to ESS job page and schedule new process ‘Load Interface File for Import’ >> Import Process: Import Trading Community Data in Bulk; Data File: Upload the csv file >> Submit.
Go to Customer Data Management >> Data Import >> Actions >> Import >> Select your choice of Import Process Mode >> Submit
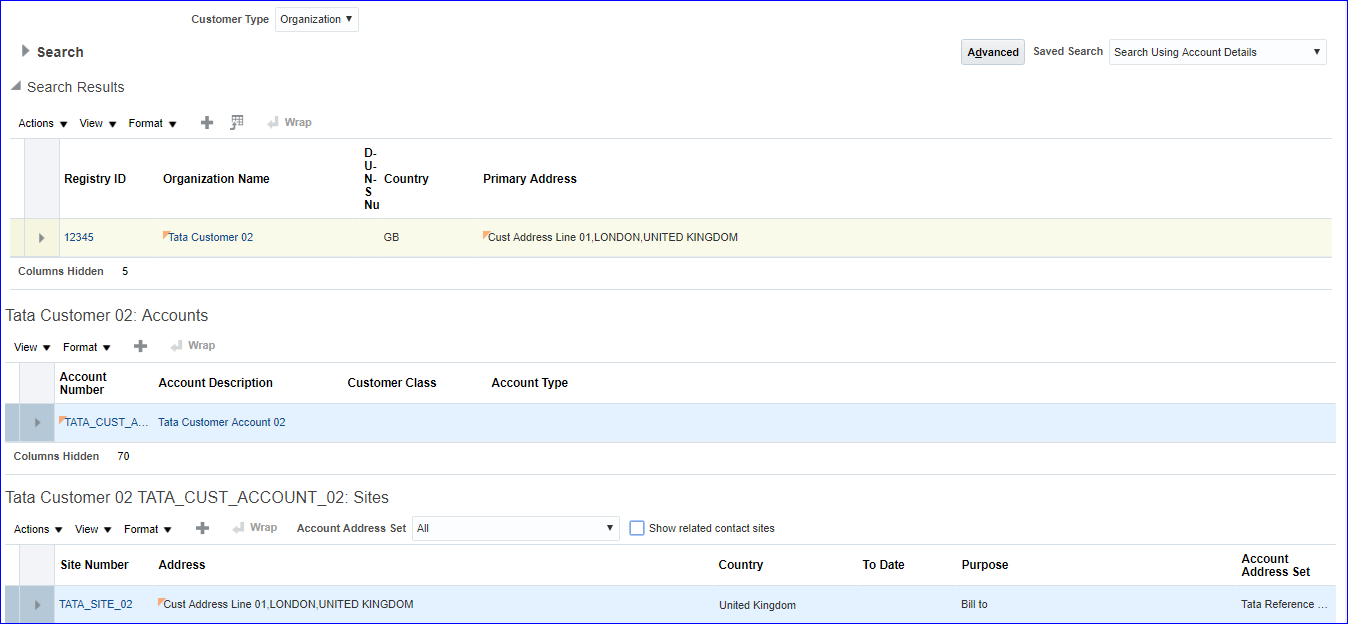
Verify new Customers in Receivables >> Billing >> Tasks >> Manage Customers 🙂
ii) ‘Upload Customers from Spreadsheet’
Receivables >> Billing >> Tasks >> Upload Customers from Spreadsheet >> Download Customer Spreadsheet Template >> ‘UploadCustomersTemplate’ file gets downloaded
Go to Instructions tab and click on ‘Show Extensible Attributes’ (This will display hidden columns)
Customers
| *Source System | UK Customer Sales |
| *Customer Number | 12345 |
| *Customer Name | Tata Customer 02 |
| *Account Number | TATA_CUST_ACCOUNT_02 |
| Account Description | Tata Customer Account 02 |
| Account Established Date | 2019/01/01 |
| Customer Profile Class | Tata Profile Class |
| *Account Address Set | TATA_RDS_CUST_SIT |
| *Location Source Reference | TATA_CUST_LOC_02 |
| *Address Line 1 | Cust Address Line 01 |
| City | London |
| *Country | GB |
| *Identifying Address | Y |
| *Site Purpose Source Reference | TATA_CUST_ASU_02 |
| *Purpose | BILL_TO |
| *Site Purpose Primary Indicator | Y |
| Payment Method | Check |
| Primary Payment Method Indicator | Y |
Go to Instructions tab and click on ‘Generate CSV File’ >> Save csv file >> Ok
Receivables >> Billing >> Tasks >> Upload Customers from Spreadsheet >> Click on ‘Upload Customers from Spreadsheet’ button >> Batch Name: Tata Customer 02 Upload; Data File: Choose .zip file >> Submit >> Check for completion status and count of successful records 🙂
9. AR Invoice Conversion
i) AutoAccounting configuration for all account types
Implementation Project >> Task ‘Manage AutoAccounting Rules’ >> Search your BU to verify which account types have been created and create rest all accounts with some random account type.
Create:
Business Unit: Tata Business Unit; Account Type: AutoInvoice Clearing
Company: C01; Deaprtment: D01; Account: A01 (Just give some random account value)
Business Unit: Tata Business Unit; Account Type: Bills Receivable
Company: C01; Deaprtment: D01; Account: A01
Business Unit: Tata Business Unit; Account Type: Deferred Tax
Company: C01; Deaprtment: D01; Account: A01
Business Unit: Tata Business Unit; Account Type: Factored Bills Receivable
Company: C01; Deaprtment: D01; Account: A01
Business Unit: Tata Business Unit; Account Type: Freight
Company: C01; Deaprtment: D01; Account: A01
Business Unit: Tata Business Unit; Account Type: Remitted Bills Receivable
Company: C01; Deaprtment: D01; Account: A01
Business Unit: Tata Business Unit; Account Type: Tax
Company: C01; Deaprtment: D01; Account: A01
Business Unit: Tata Business Unit; Account Type: Unbilled Receivable
Company: C01; Deaprtment: D01; Account: A01
Business Unit: Tata Business Unit; Account Type: Unearned Revenue
Company: C01; Deaprtment: D01; Account: A01
Business Unit: Tata Business Unit; Account Type: Unpaid Bills Receivable
Company: C01; Deaprtment: D01; Account: A01
Save and Close
ii) Transaction source: Imported
In implementation project search for task ‘Manage Transaction Sources’ >> Search Name: Receivables Import >> Select the line and click on Edit >> Enter your Legal Entity (Tata Legal Entity) and Standard Transaction Type (Tata Invo Trans Type) >> Save and Close
iii) Create line transaction DFF
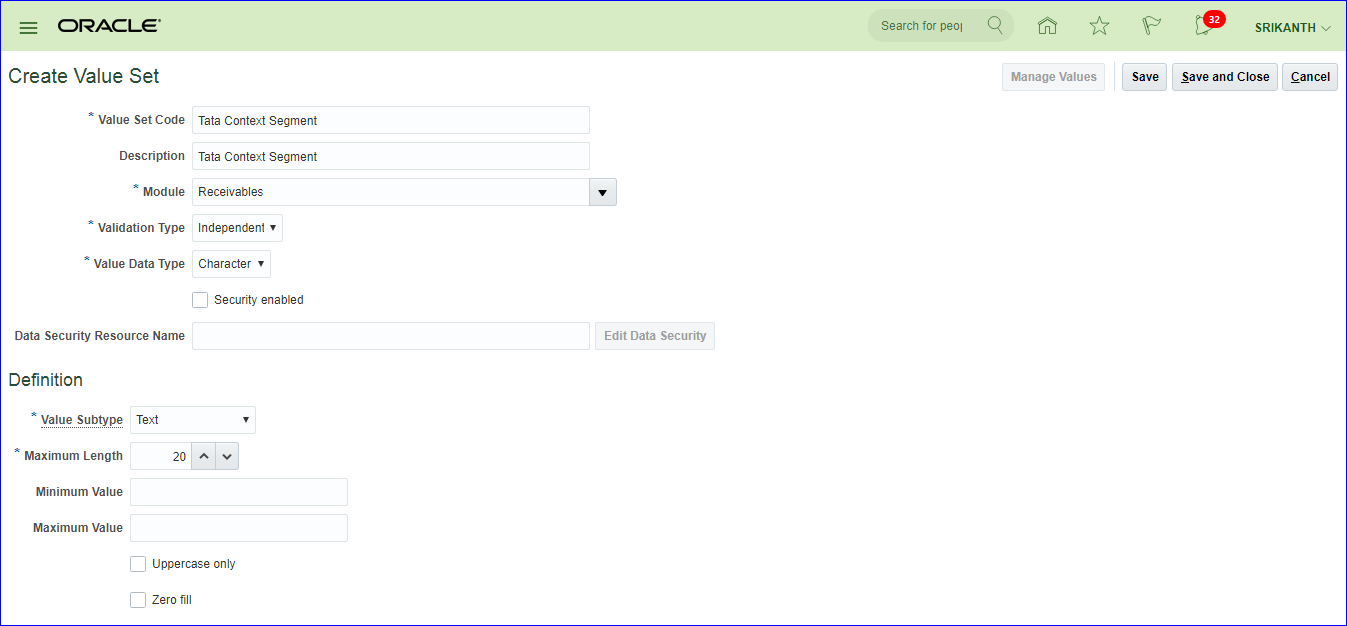
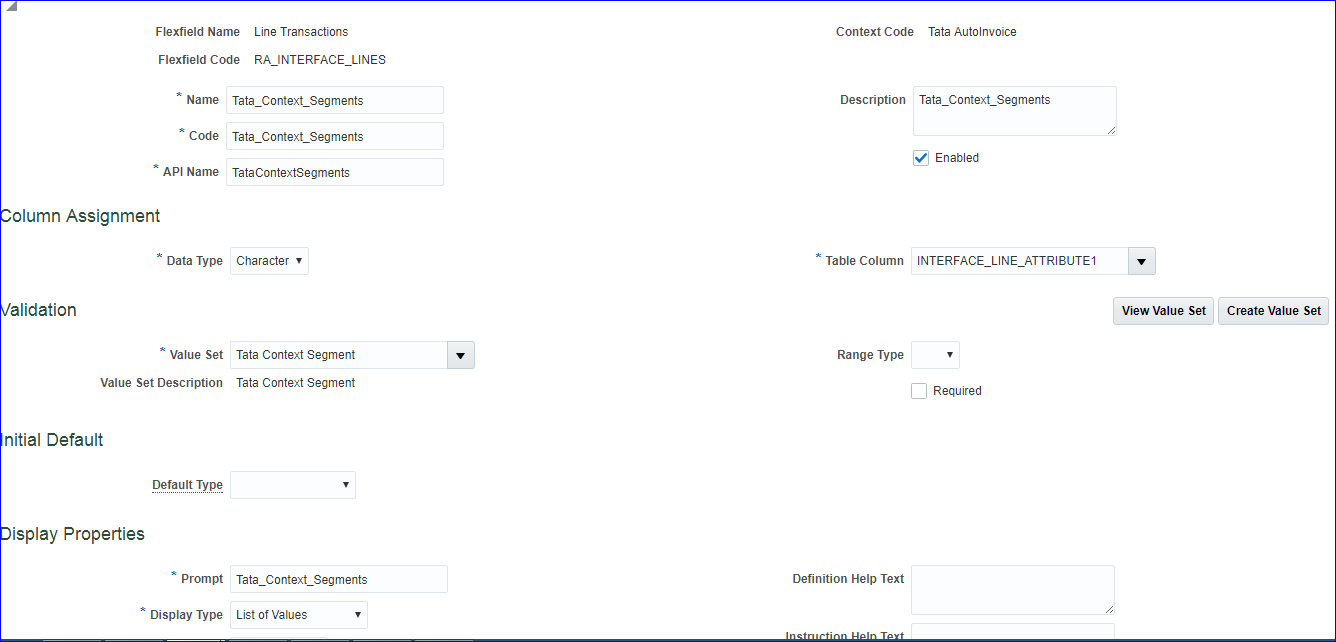
In implementation project search for task ‘Manage Receivables Descriptive Flexfields’ >> Search for Name: Line Transactions >> Select the line and click on Edit >> Manage Contexts >> Create >> Display Name: Tata AutoInvoice; Context Code: Tata AutoInvoice; API Name: TataAutoInvoice; Description: Tata AutoInvoice >> Save >> Under Context Sensitive Segments, click on Create >> Name: Tata_Context_Segments; Code: Tata_Context_Segments; API Name: TataContextSegments; Description: Tata_Context_Segments >> Create Value Set
Save and Close
Save and Close >> Save and Close >> Save and Close >> Save and Close >> Deploy Flexfield >> Look for confirmation message and click on Ok >> Done
Download the template from OER(Oracle Enterprise Repository)
or
https://docs.oracle.com/en/cloud/saas/financials/18b/oefbf/AutoInvoice-Import-312157752-fbdi-1.html
For XLSM template, right click and use “Save link as” and save file. In the same page we can find Scheduled process (Import AutoInvoice) which needs to be executed.
Fetch the existing values from instance. Receivables >> Billing >> Tasks >> Create Transaction
RA_INTERFACE_LINES_ALL
| *Business Unit Name | Tata Business Unit |
| *Transaction Batch Source Name | Receivables Import |
| *Transaction Type Name | Tata Invo Trans Type |
| Payment Terms | Tata Pay Terms |
| Transaction Date | SYSDATE |
| Accounting Date | SYSDATE |
| Bill-to Customer Account Number | 20111 |
| Bill-to Customer Site Number | 879872 |
| Ship-to Customer Account Number | 20111 |
| Ship-to Customer Site Number | 879872 |
| *Transaction Line Type | LINE |
| *Transaction Line Description | Desktop |
| *Currency Code | GBP |
| *Currency Conversion Type | User |
| Currency Conversion Date | SYSDATE |
| Currency Conversion Rate | 1.00 |
| Transaction Line Amount | 1000.00 |
| Transaction Line Quantity | 1.00 |
| Unit Selling Price | 1000.00 |
| Line Transactions Flexfield Context | Tata AutoInvoice |
| Line Transactions Flexfield Segment 1 | 10001 |
RA_INTERFACE_DISTRIBUTIONS_ALL
| *Business Unit Name | Tata Business Unit |
| *Account Class | REC |
| Amount | 1000.00 |
| Percent | 100.00 |
| Line Transactions Flexfield Context | Tata AutoInvoice |
| Line Transactions Flexfield Segment 1 | 10001 |
| Accounting Flexfield Segment 1 | C01 |
| Accounting Flexfield Segment 2 | D01 |
| Accounting Flexfield Segment 3 | A01 |
RA_INTERFACE_DISTRIBUTIONS_ALL
| *Business Unit Name | Tata Business Unit |
| *Account Class | REV |
| Amount | 1000.00 |
| Percent | 100.00 |
| Line Transactions Flexfield Context | Tata AutoInvoice |
| Line Transactions Flexfield Segment 1 | 10001 |
| Accounting Flexfield Segment 1 | C01 |
| Accounting Flexfield Segment 2 | D01 |
| Accounting Flexfield Segment 3 | R01 |
Click on ‘Generate CSV File’ in ‘Instructions and CSV Generation’ tab
Go to ESS job page >> Tools >> Scheduled Processes >> Schedule New Process >> Search for ‘Load Interface File for Import’ >> Import Process*: Import AutoInvoice and upload the zip file >> Submit
Again re-open ESS job page and submit ‘Import AutoInvoice’ >> Business Unit: Tata Business Unit; Transaction Source: Receivables Import; Default Date: Today’s date >> Submit
10. Journal creation
i) ADFdi
General Accounting >> Journals >> Tasks >> Create Journal in Spreadsheet
;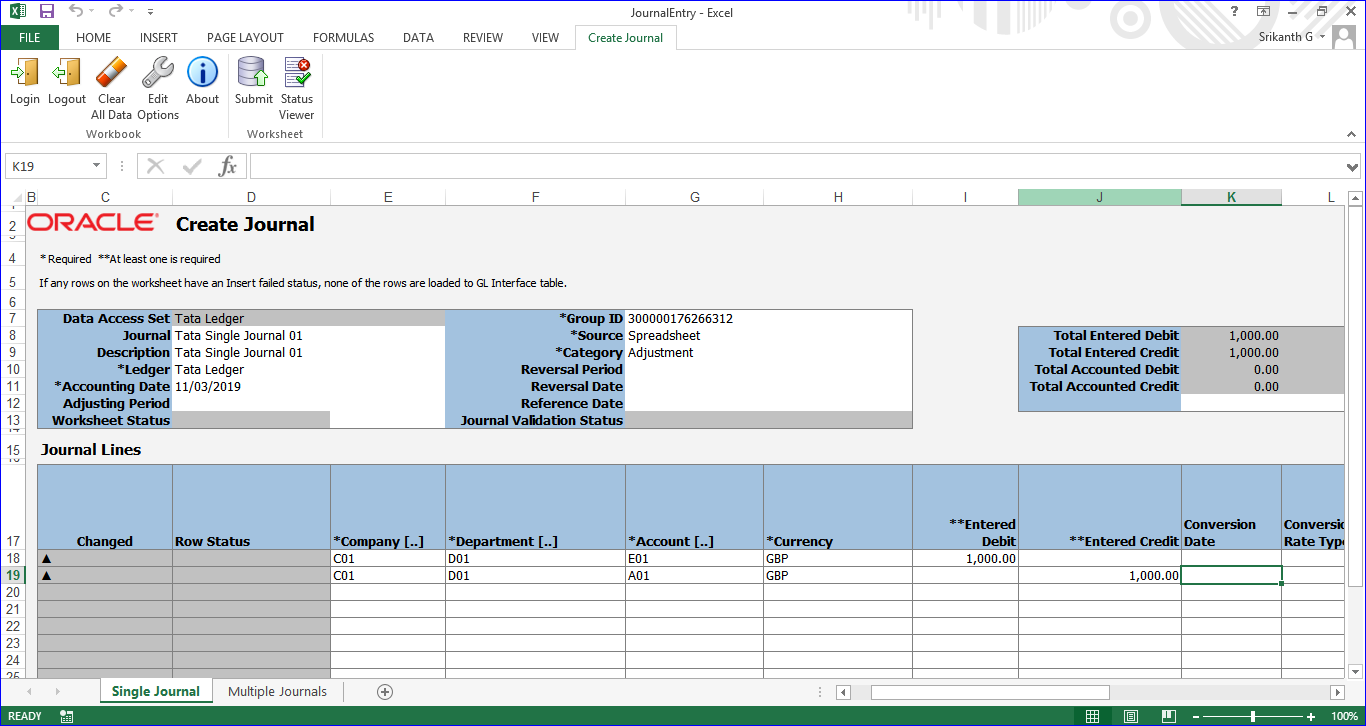
Go to Create Journal tab >> Submit >> Submission Option: Submit Journal Import and Posting; Import Descriptive Flexfields: No >> Submit. Now verify the entry under Manage Journals 🙂
ii) FBDI
a) Download the template from OER(Oracle Enterprise Repository) – Search for ‘oracle oer’ in google or direct link is ‘https://docs.oracle.com/en/cloud/saas/financials/r13-update17d/oefbf/Journal-Import-304233274-fbdi-23.html’ >> For XLSM template (JournalImportTemplate.xlsm), right click and use “Save link as”>> Also we can see the Scheduled process ‘Import Journals’
Fetch Ledger ID: FSM >> Tasks >> Search >> ‘Manage Primary Ledgers’ >> Select your record >> View >> Columns >> Select Ledger ID
| *Status Code | NEW | NEW |
| *Ledger ID | 300000176281847 | 300000176281847 |
| *Effective Date of Transaction | SYSDATE | SYSDATE |
| *Journal Source | Balance Transfer | Balance Transfer |
| *Journal Category | Remote Transfer | Remote Transfer |
| *Currency Code | GBP | GBP |
| *Journal Entry Creation Date | SYSDATE | SYSDATE |
| *Actual Flag | A | A |
| Segment1 | C01 | C01 |
| Segment2 | D01 | D01 |
| Segment3 | E01 | A01 |
| Entered Debit Amount | 3000.00 | |
| Entered Credit Amount | 3000.00 | |
| REFERENCE4 (Journal Entry Name) | Tata FBDI Journal 01 | Tata FBDI Journal 01 |
Save >> Instructions and CSV Generation tab >> Click on ‘Generate CSV File’ >> Save csv/ zip file
Scheduled Processes >> Load Interface File for Import >> Import Process: Import Journals and Data File: Upload zip file >> Submit.
Next submit ‘Import Journals’ job >> Source: Balance Transfer; Ledger: Tata Ledger; No Group ID >> Submit. Now verify the entry under Manage Journals 🙂